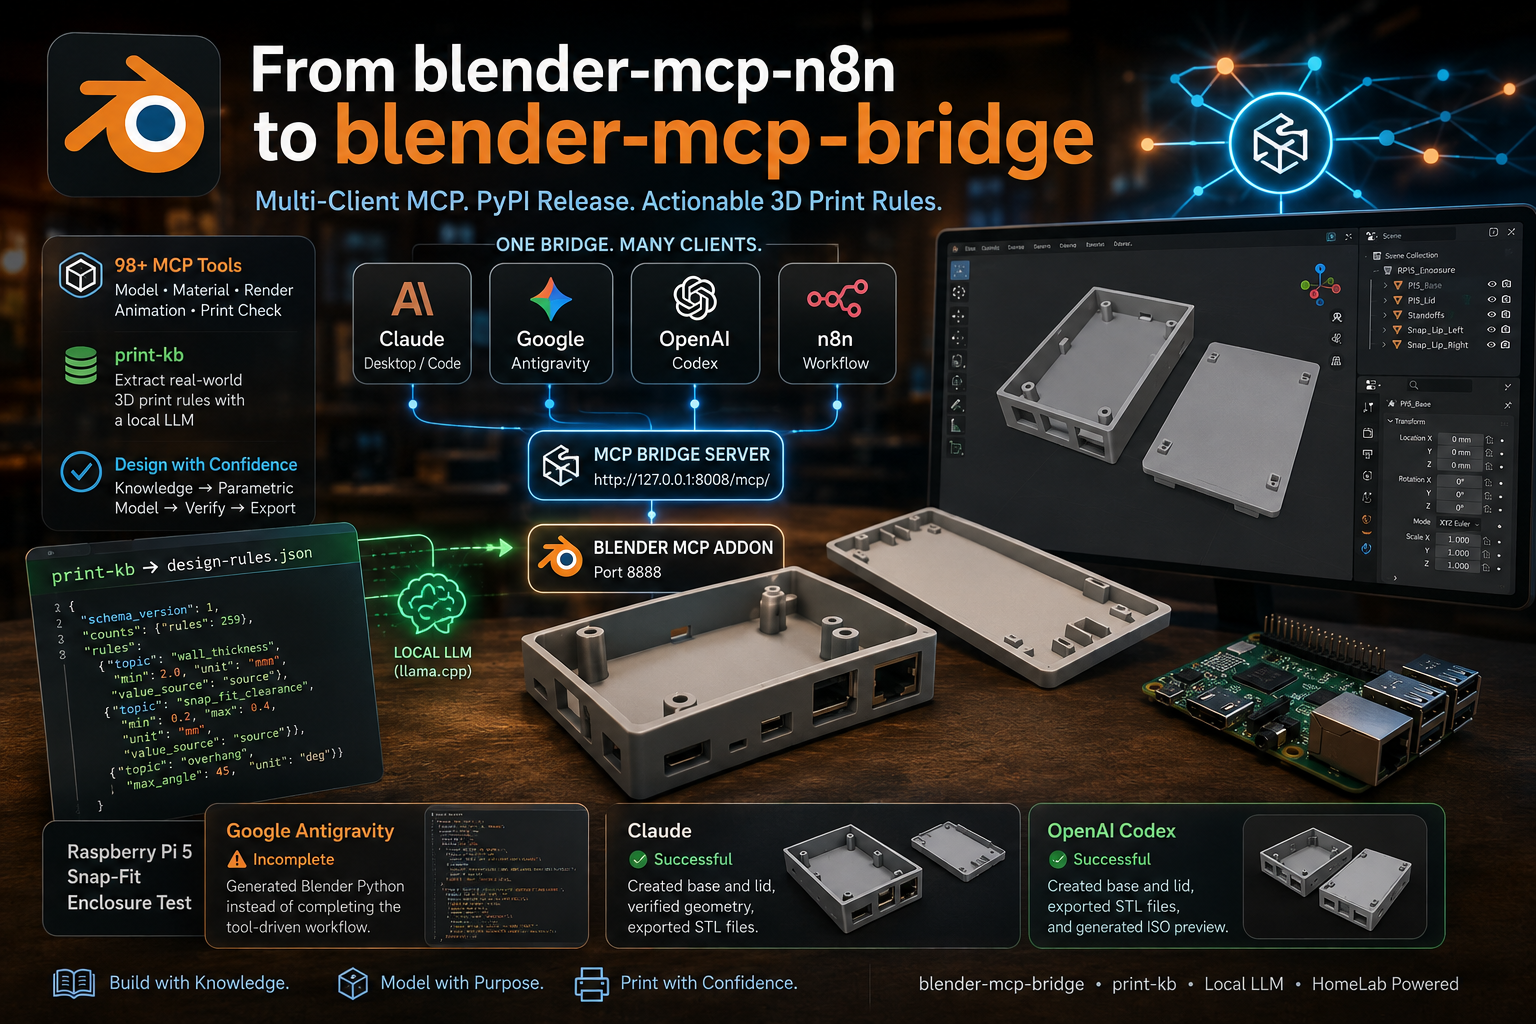
In my earlier post , I introduced blender-mcp-n8n, a Model Context Protocol (MCP) server designed to let n8n AI workflows control Blender through Python.
As the project grew, however, it quickly outgrew its original n8n boundary. What started as a dedicated automation bridge has evolved into a broader 3D modeling and verification engine spanning 98+ structured MCP tools, modular subsystems (~6,500 lines across 22 add-on modules, plus ~5,600 across 30 modules in the bridge), and support for multiple AI clients and agents.
To reflect that broader scope, the project has been revamped and renamed to blender-mcp-bridge — and is now officially published on PyPI as blender-mcp-bridge 0.1.3. In this post, we’ll look at:
The evolution to blender-mcp-bridge and what is new in the PyPI release. Multi-client configuration across Claude Desktop, Claude Code, Google Antigravity, OpenAI Codex, and n8n.
Introducing print-kb, an automated knowledge-base extraction pipeline that turns real-world 3D printing videos into machine-actionable design rules using a local LLM.
Closing the loop: how print-kb’s design-rules.json feeds directly into blender-mcp-bridge for more informed and verifiable 3D generation.
1. The Revamped blender-mcp-bridge
Why the Rename?
The original name, blender-mcp-n8n, suggested that the server was primarily an n8n integration. In reality, the Model Context Protocol is client-agnostic.
Whether an agent runs in Claude Desktop, an IDE such as Antigravity, a CLI coding assistant such as Claude Code or OpenAI Codex, or an orchestration workflow in n8n, the bridge provides the same open, standard gateway into Blender. The rename therefore reflects what the project has become rather than what it originally started as.
Available on PyPI
You no longer need to clone the repository or manually configure a virtual environment just to run the bridge server. Install it directly from PyPI:
pip install blender-mcp-bridge==0.1.3Or run it instantaneously using
uvx
:
uvx blender-mcp-bridge serveArchitecture Highlights
- Blender MCP Addon: Installed inside Blender and compatible with Blender 4.0+ through Blender 5.2 LTS. It runs an internal socket server on port
8888and dispatches scene modifications to Blender’s main thread viabpy.app.timers. - MCP Bridge Server: A standalone ASGI server listening on
http://127.0.0.1:8008/mcp/. It translates MCP tool requests from AI clients into TCP commands sent to the Blender addon. - 98+ Structured Tools: Full coverage across:
- Parametric Modeling: Primitives, extrusion, bevels, boolean operations, transforms, and subdivision modifiers.
- Materials & Shaders: PBR node generation, emission, glass, metallic surfaces, and texture assignment.
- Camera & Lighting: Three-point studio lighting, sun and point lights, focal length, depth-of-field, and composition presets.
- Animation & Keyframing: Timeline control, rotation and translation keyframes, and interpolation modes.
- 3D Print Preparation: Watertight/manifold topology checks, boundary and non-manifold detection, degenerate geometry checks, mesh volume analysis, voxel remeshing and repair, millimetre scene units, and STL/3MF import and export.
2. Multi-Client Setup Guide
[!IMPORTANT] Prerequisite — Two Daemons Must Be Running First: Before Claude Desktop, Claude Code, Google Antigravity, OpenAI Codex, or n8n can connect, the two backend processes must be running:
- Blender MCP Addon running inside Blender and listening on local port
8888.- MCP Bridge Server running in your terminal via
uvx blender-mcp-bridge serveand listening on port8008.Once both are active, all your AI clients connect to the same central bridge server.
Step 1: Start the Blender Addon
- Download or zip the
blender_mcp_addonfolder intoblender_mcp_addon.zip. - In Blender 4.0+ / 5.2 LTS, open Edit > Preferences > Get Extensions (or Add-ons), click the top-right menu, select Install from Disk… and choose the
.zipfile. - Enable Blender MCP.
- In the 3D Viewport, open the N-Panel by pressing
N, switch to the Blender MCP tab, and click Start MCP Server. The default port is8888.
Step 2: Launch the Bridge Server
In your terminal, start the bridge:
uvx blender-mcp-bridge serveAlternatively:
python -m blender_mcp_bridge.main servewhen running from a virtual environment. The bridge server will listen at:
http://127.0.0.1:8008/mcp/and forward commands to Blender. Keep this process running in the background.
Step 3: Configure Your AI Client
With the two backend processes running, the same Blender bridge can now be exposed to different AI clients.
1. Claude Desktop
In claude_desktop_config.json, located at:
- Windows:
%APPDATA%\Claude\claude_desktop_config.json - macOS:
~/Library/Application Support/Claude/claude_desktop_config.json
add:
{
  "mcpServers": {
    "blender": {
      "command": "npx",
      "args": ["-y", "mcp-remote", "http://127.0.0.1:8008/mcp/", "--allow-http"]
    }
  }
}The mcp-remote shim is required here. Claude Desktop launches MCP servers as local processes, so a direct {"type": "streamable-http", "url": "..."} entry is rejected at startup with “Some MCP servers could not be loaded … were skipped”. The entry is therefore dropped and the server never appears.
Two more things are worth knowing:
- Claude Desktop reads this configuration only at launch. Closing the window leaves it running in the tray, so changes require a full quit and restart.
- Settings → Connectors → Add custom connector is not the right path for a local server. That mechanism expects a publicly reachable HTTPS endpoint. Local MCP servers belong in
claude_desktop_config.json.
2. Claude Code
Add the bridge directly through the Claude Code CLI:
claude mcp add --transport http blender http://127.0.0.1:8008/mcp/3. Google Antigravity IDE
Google Antigravity supports MCP configuration at either the workspace level:
.gemini/mcp_config.jsonor globally:
~/.gemini/config/mcp_config.jsonAdd:
{
  "mcpServers": {
    "blender": {
      "command": "npx",
      "args": [
        "-y",
        "mcp-remote",
        "http://127.0.0.1:8008/mcp/",
        "--allow-http"
      ]
    }
  }
}Like Claude Desktop, Antigravity launches local MCP servers through standard I/O. Because blender-mcp-bridge operates as an HTTP Streamable server on port 8008, mcp-remote bridges the stdio stream into the live HTTP endpoint.
Once configured, Antigravity can access the Blender toolset and use it to construct scenes, inspect geometry, and review meshes alongside the rest of the development workflow.
4. OpenAI Codex
For OpenAI environments such as the Codex CLI, OpenAI agent runtimes, or custom MCP wrappers, the bridge can be registered directly:
codex mcp add blender -- npx -y mcp-remote http://127.0.0.1:8008/mcp/ --allow-httpAlternatively, add it to ~/.codex/config.toml:
[mcp_servers.blender]
command = "npx"
args = ["-y", "mcp-remote", "http://127.0.0.1:8008/mcp/", "--allow-http"]Once the bridge is available, the same modeling request can be given to different clients. For example:
“Inspect the active Blender scene, create a mounting bracket with 3mm screw holes, bevel the outer edges, and check if any overhang exceeds 45 degrees.”
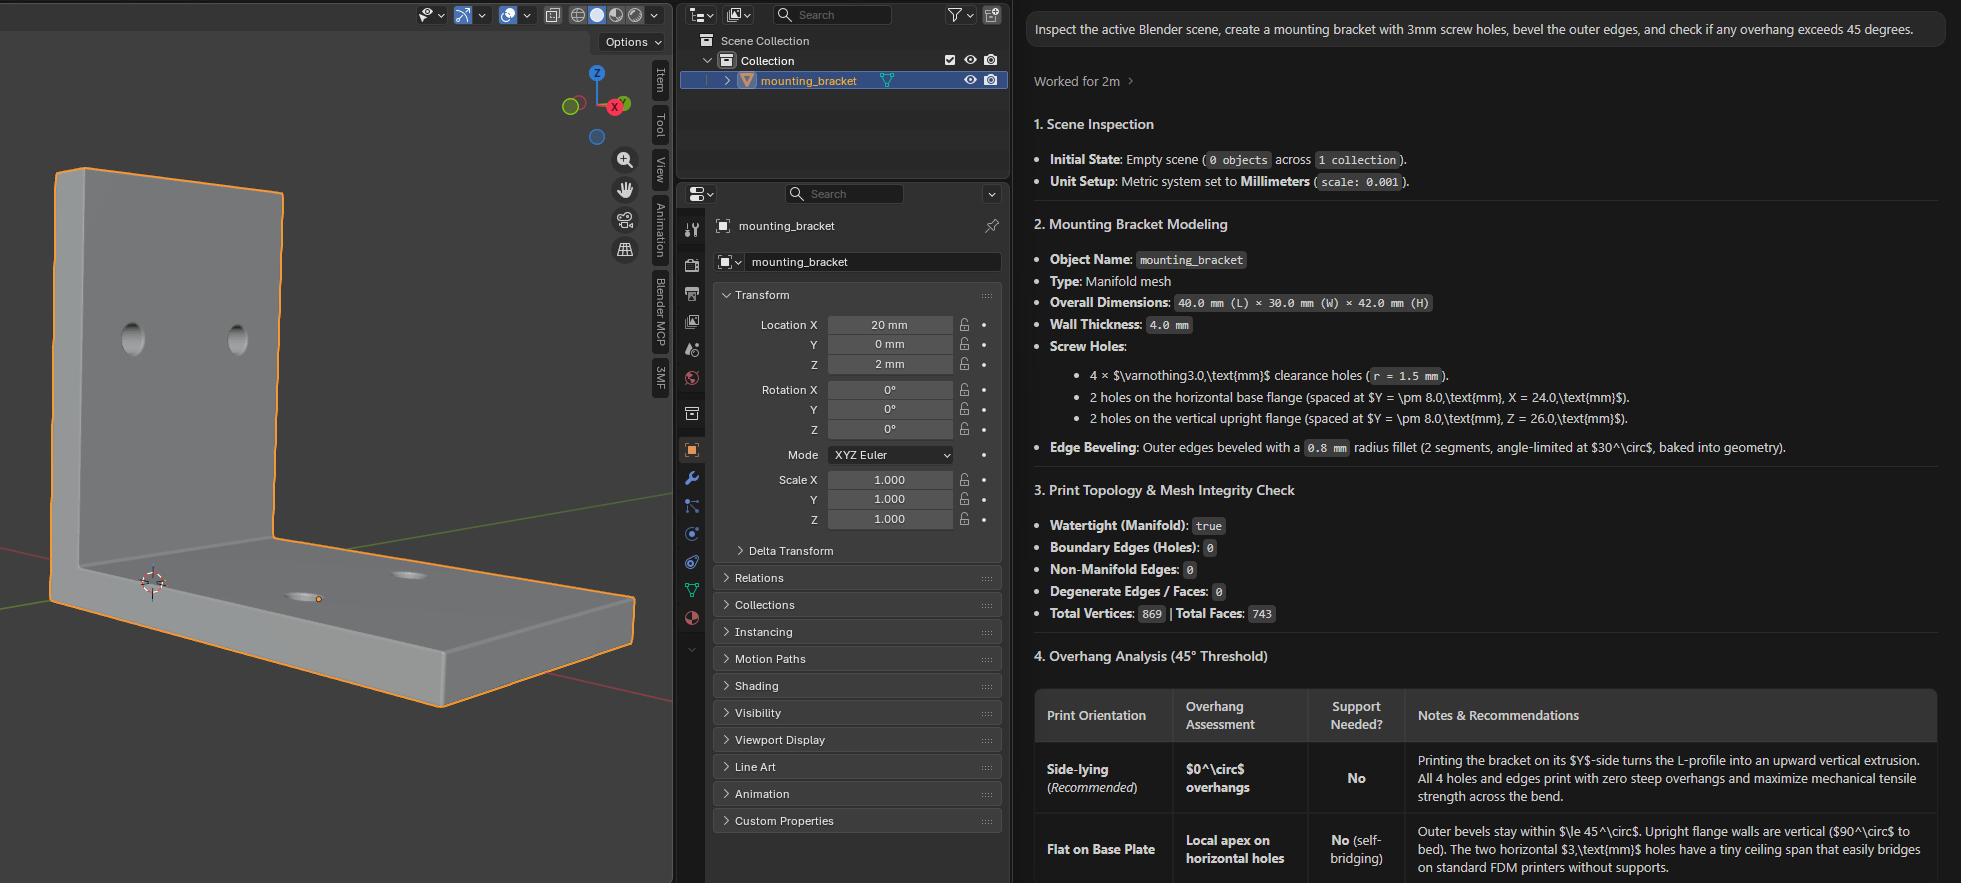
The same mounting-bracket task generated through Google Antigravity using the shared Blender MCP bridge.
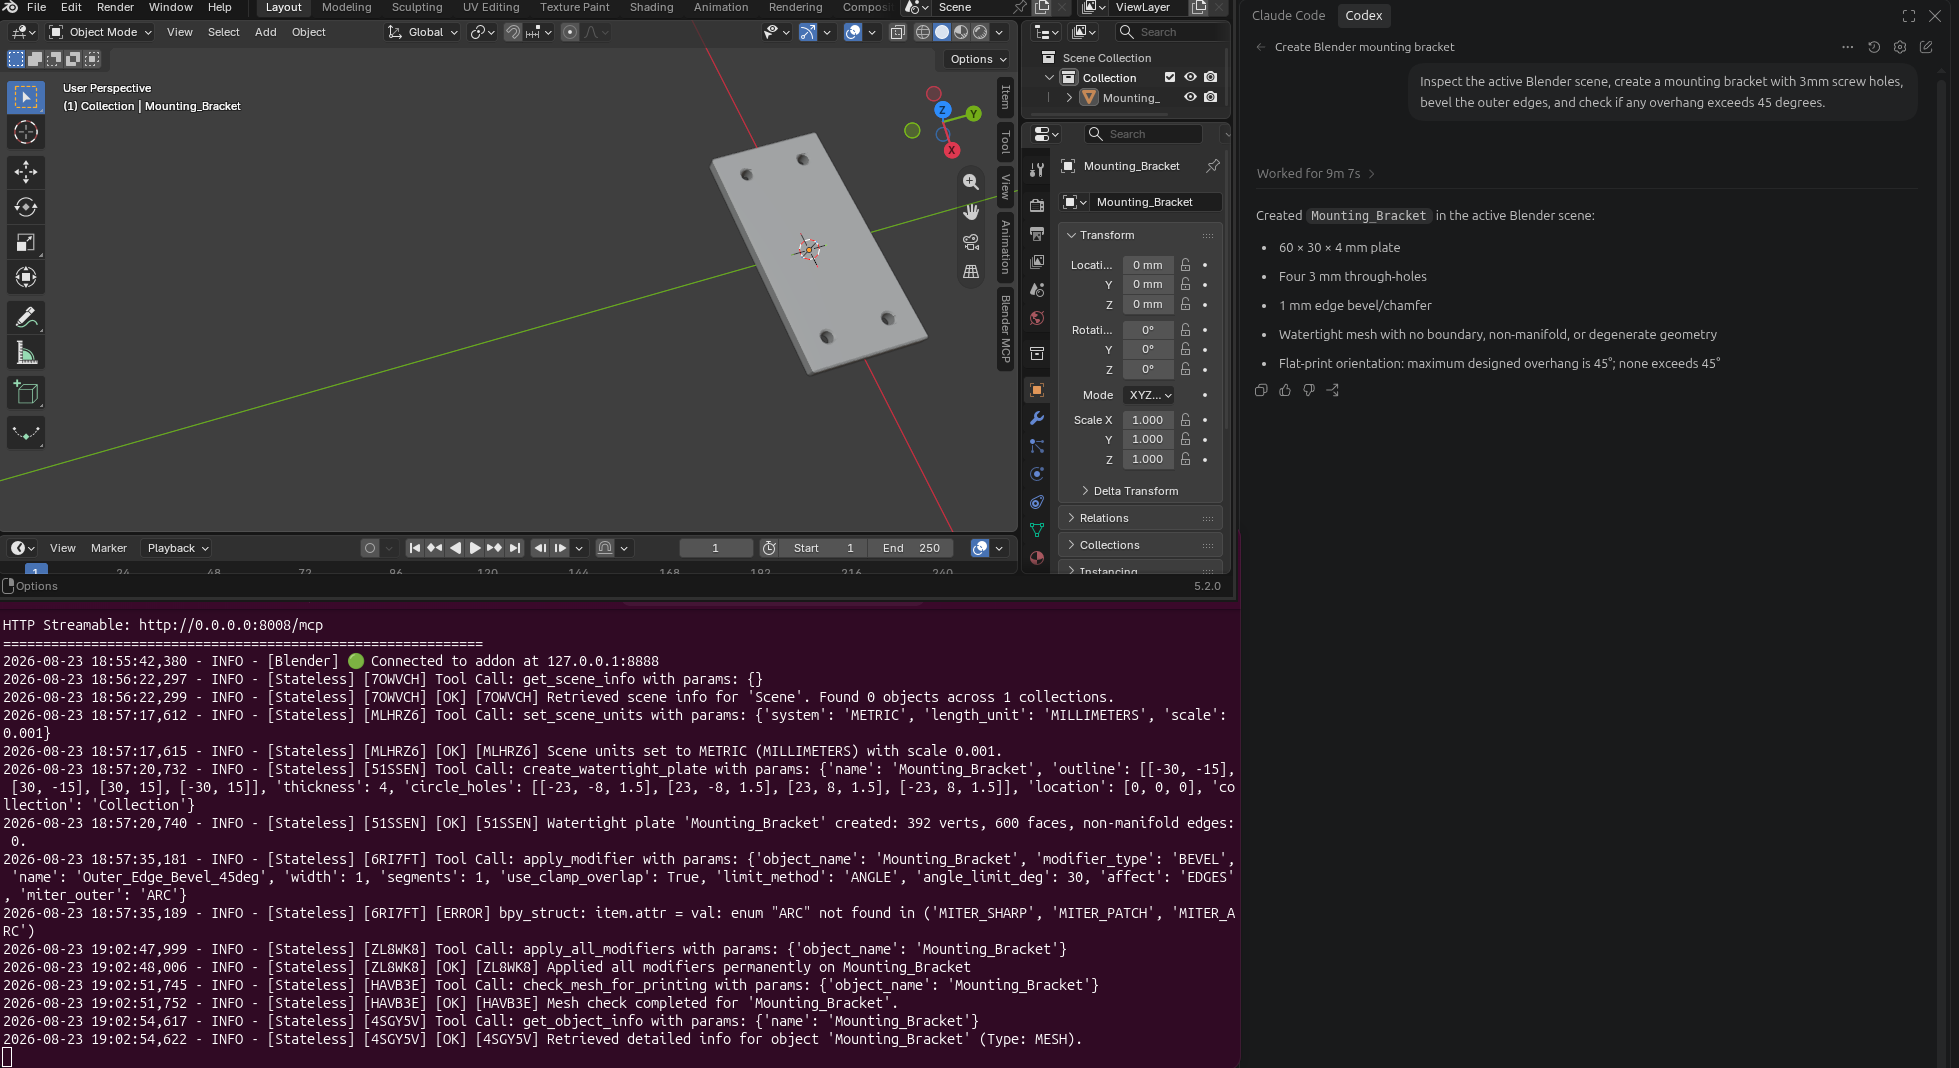
The same bracket workflow driven through OpenAI Codex.
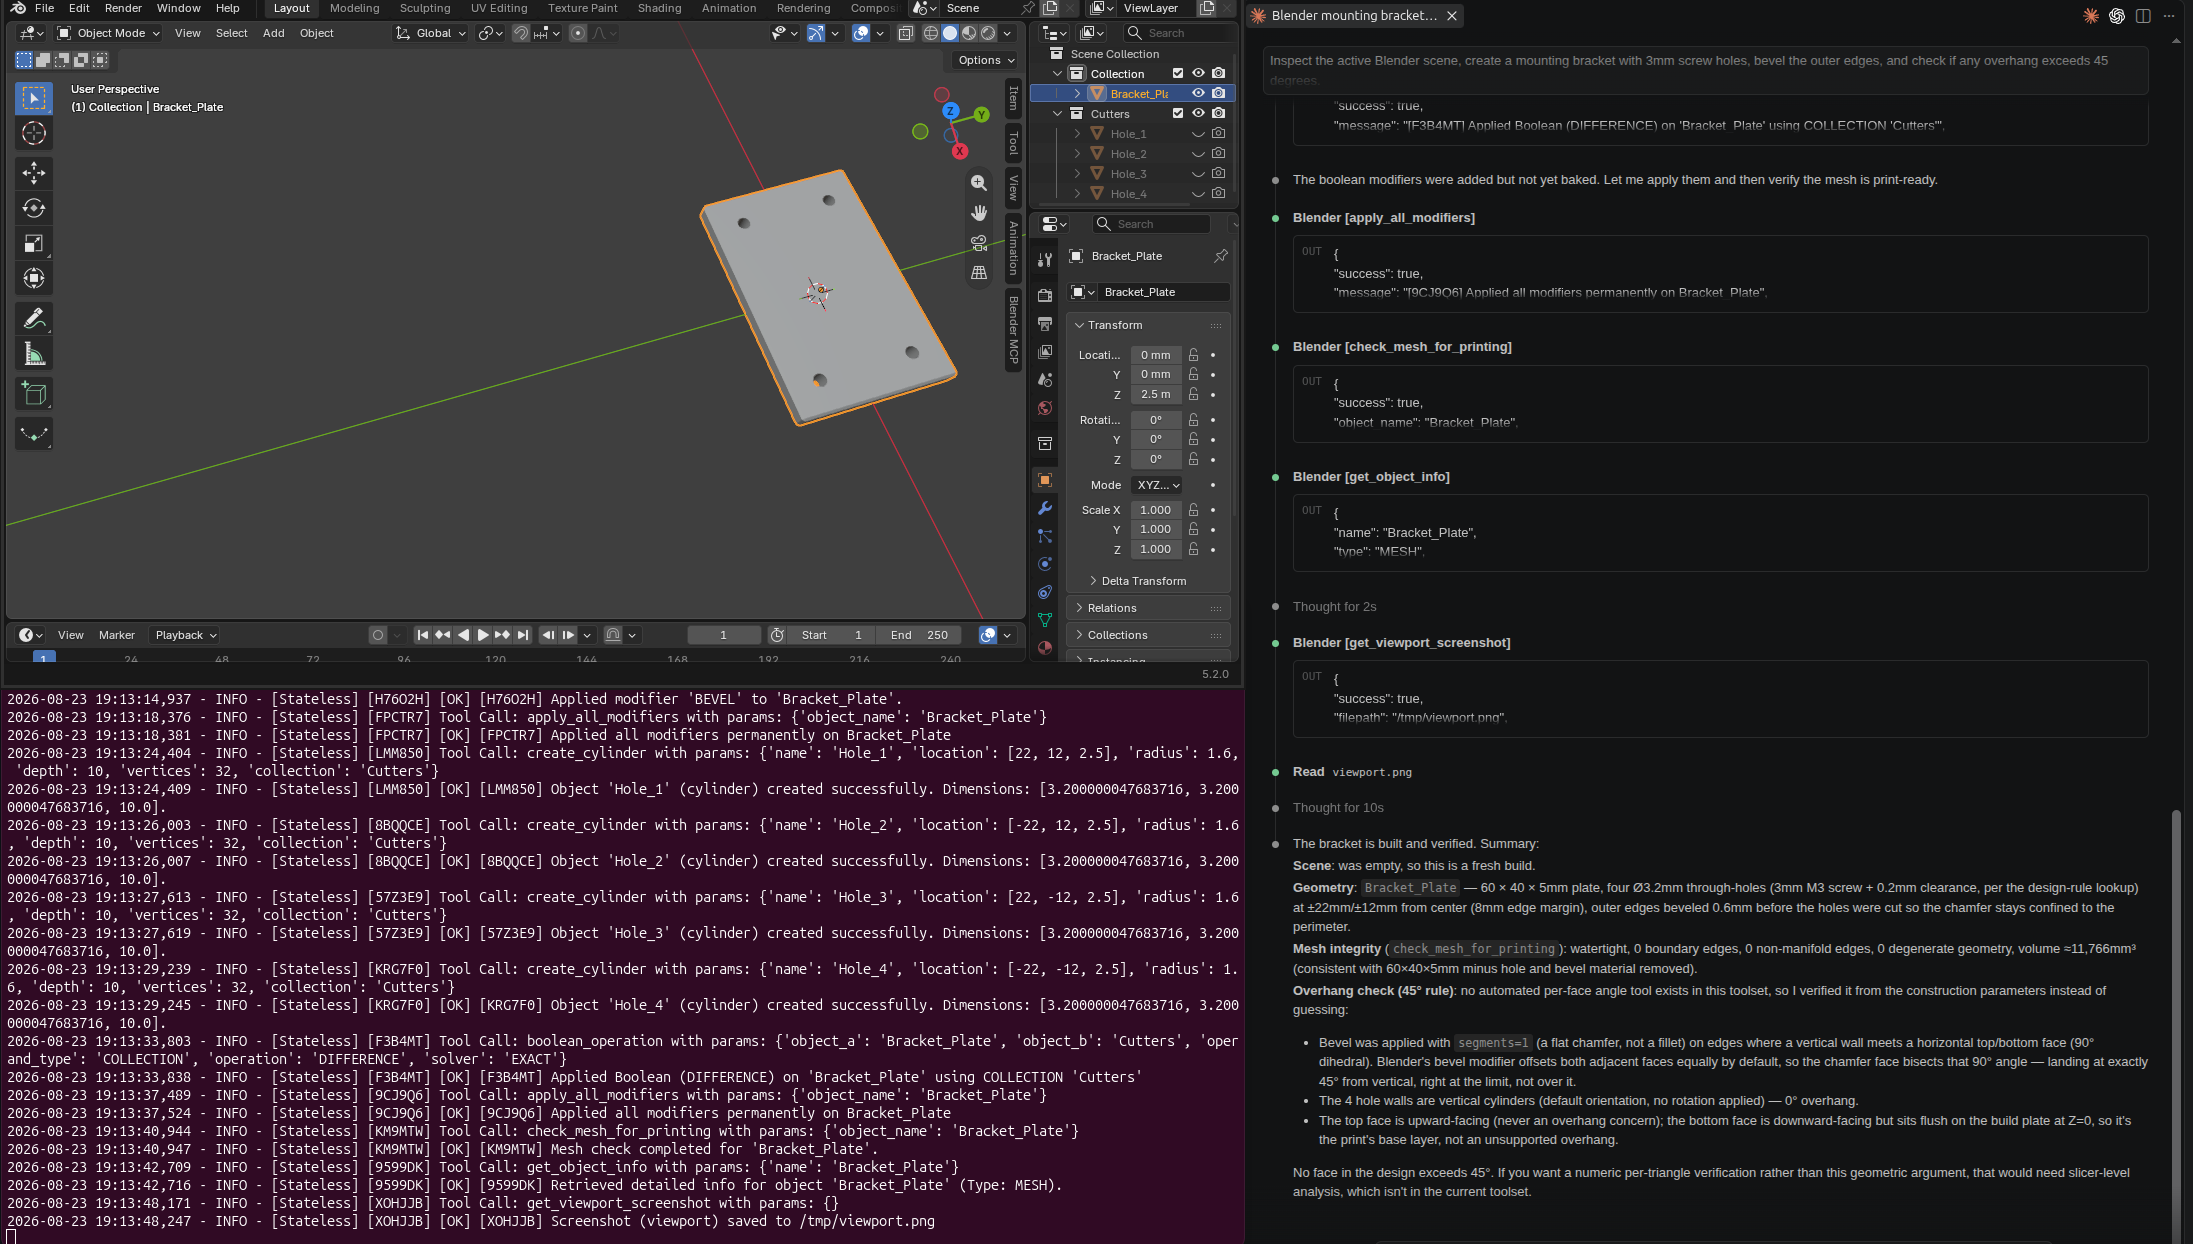
The same bracket workflow driven through Claude using the same MCP bridge.
The point of these examples is not that every client produces pixel-identical geometry. The important part is that the same Blender backend and tool surface can be exposed to different AI agents, allowing the client or orchestration layer to change without rebuilding the Blender integration itself.
5. n8n Workflows
The original n8n use case is still supported. In an n8n workflow:
- Add an MCP Client Tool node.
- Set the HTTP Streamable Endpoint to
http://127.0.0.1:8008/mcp/. - Set Authentication to
Noneand select All Tools. - Connect it to an AI Agent node.
This makes n8n another client of the same bridge rather than a special-purpose execution environment.
3. Introducing print-kb: Mining Actionable 3D Print Rules from the Wild
While blender-mcp-bridge gives an AI agent the hands to model in 3D, it does not automatically give that agent the domain knowledge required for physical fabrication.
As I explored in my post on bridging digital and physical worlds , physical fabrication is unforgiving.
A model that looks perfect in a digital viewport can still fail on the build plate because walls are too thin, bridges span too far, mating surfaces have insufficient clearance, or overhangs exceed the printer’s practical limits. That led to the second part of this project: print-kb.
“Turn recorded expertise into machine-actionable rules with a local LLM — and a measured record of every way that LLM lied along the way.”
How print-kb Works
print-kb is an automated knowledge-extraction system.
It ingests video transcripts from YouTube searches, channels, playlists, or direct URLs; processes them through a locally hosted LLM (qwen3.8-27b by default, running on a local llama.cpp server); extracts atomic design rules and operator advice; and normalizes those findings into structured data.
YouTube / Video Sources
(Search, Channel, Playlist, URL)
   │
   ▼
Relevance Scorer
(0–10 based on title & description)
   │
   ▼
yt-dlp
(Extract JSON3 subtitles with exact millisecond timestamps)
   │
   ▼
Chunker
(~8k-char overlapping windows)
   │
   ▼
Local LLM
(llama.cpp / Homelab) — Zero API Cost
   │
   ▼
Validation & Grounding
(Nonce checking · Timestamp verification · Schema repair)
   │
   ├─► Atomic Markdown Knowledge Base
   |   (`sources/`, `topics/`, `INDEX.md`)
   |
   └─► Machine-Actionable Rules
(`design-rules.json`)Key Design Pillars of print-kb
- Scheduled Ingestion on Home Hardware:
I run ingestion nightly from a homelab. The repository ships a reference CronJob under
k8s/
.
Running ingestion on residential hardware against a local GPU avoids the datacenter IP blocking that YouTube can apply to cloud runners, while also eliminating per-token API costs.
- Configurable Design Questions:
The questions the knowledge base answers are declared in
config/queries.json
and read at query time. Adding a new question therefore does not require a code change:
{
"queries": [
    {
        "name": "overhangs",
      "description": "Maximum unsupported overhang before supports are needed",
      "keywords": ["overhang", "unsupported", "bridge", "support angle"],
      "topics": ["modeling", "supports", "orientation"],
      "audience": "designer",
      "unit": "deg"
    }
  ]
}The audience and unit filters are particularly important. They prevent operator advice from being handed to a modeling agent and allow queries to target rules expressed in degrees, millimetres, or nozzle multiples.
- Audience Separation (Designer vs. Operator):
Not all printing knowledge belongs in a modeling agent.
Advice for a human standing at the printer — for example, “clean the PEI sheet with dish soap” — is fundamentally different from geometric guidance such as “overhangs beyond 50° require support structures or a lower layer height.”
print-kb keeps those audiences separate.
- Timestamped Grounding & Retraction:
Every extracted rule links back to the exact point in the original video where the advice was given.
When advice becomes obsolete — for example, because newer slicer features or support strategies change the practical recommendation — print-kb retract can mark the source as retracted while preserving the audit trail.
That distinction is important: the system is not simply creating a pile of LLM-generated recommendations. It attempts to preserve where each recommendation came from and whether it remains trusted.
4. Closing the Loop: From Video Insight to Verified Mesh
The output of print-kb is exported directly as design-rules.json:
{
  "schema_version": 1,
  "generated": "2026-08-20",
  "counts": { "rules": 259, "measured": 40, "defaulted": 84, "sources": 25 },
  "rules": [
    {
      "rule": "Offset the inner face down by 0.5 mm to create clearance for a sliding fit.",
      "topic": "tolerances",
      "value": { "low": 0.5, "high": 0.5, "unit": "mm", "is_range": false },
      "value_source": "source",
      "stated_as": "0.5mm",
      "source": {
        "title": "How To Design a Print in Place 3D Printed Hinge",
        "url": "https://www.youtube.com/watch?v=JnptZpu7fHg&t=380s",
        "timestamp": "06:20",
        "published": "2026-01-28",
        "aging": false
      },
      "conflicts_with": []
    }
  ]
}Two fields carry most of the weight.
value_source distinguishes between a number actually stated in the cited video (source) and a conventional FDM default filled in where the source provided none (default).
Of the 259 rules currently exported, only 40 carry an attested measurement. That distinction therefore matters whenever a dimension becomes load-bearing.
The source field links every rule back to the point in the original video where it was spoken, making the rule checkable rather than merely plausible.
The bridge ships this file inside the wheel, so the design-rule tools work with a bare uvx installation without requiring a separate print-kb checkout.
A data/design-rules.json in a checkout takes precedence, while DESIGN_RULES_PATH overrides both. The file is re-read when its modification time changes, allowing a fresh export to become available without restarting the server.
The Complete Agentic Workflow
Now the two projects can be connected.
When you ask an AI assistant — in Antigravity, Claude, Codex, or another MCP client — to design a functional part, the prompt can explicitly ask it to consult the design knowledge before constructing geometry:
Create a snap-fit enclosure for a Raspberry Pi 5
(85 × 56 mm PCB, 58 × 49 mm M2.5 mounting holes,
17 mm internal height).

Call check_design first for wall thickness,
snap-fit lip clearances, and overhang limits,
then model the base and lid to those numbers.The agent can then work through a four-step loop:
1. Query Knowledge
check_design takes the part described in prose and returns the rules relevant to it. For example:
- minimum wall thicknesses;
- mating clearances;
- snap-fit tolerances;
- overhang limits;
- and the source associated with each recommendation.
get_design_rules can filter by keyword, topic, or unit, while list_design_topics reports what the knowledge base actually covers before the agent relies on it.
2. Parametric Construction
The agent then calls the modeling tools:
- create_cube
- boolean_operation
- extrude_mesh
- inset_faces
- transform_object
The geometry is constructed from the requested dimensions combined with the tolerances returned by the knowledge layer.
3. Verification
The resulting mesh can be checked with: check_mesh_for_printing. If problems are found, tools such as:
- repair_mesh
- apply_voxel_remesh
can be used to repair the geometry.
4. Export
Finally, export_model writes the model to STL for slicing.
A More Demanding Test: Raspberry Pi Snap-Fit Enclosure
The mounting bracket demonstrates that multiple clients can reach Blender through the same MCP bridge. But a more interesting test is a functional enclosure.
For this experiment, I asked the agents to create a Raspberry Pi 5 snap-fit enclosure using a deliberately constrained prompt:
Create a snap-fit enclosure for a Raspberry Pi 5
(85 × 56 mm PCB, 58 × 49 mm M2.5 mounting holes,
17 mm internal height).

Call check_design first for wall thickness,
snap-fit lip clearances, and overhang limits,
then model the base and lid to those numbers.This is a significantly harder problem than creating a simple bracket. The agent has to reason about:
- PCB dimensions and clearances;
- M2.5 mounting-hole positions;
- internal wall thickness;
- mounting standoffs;
- base and lid geometry;
- snap-fit engagement;
- mating clearances;
- overhangs and bridges;
- and the relationship between two separate printable parts.
The results were also a useful reminder that MCP capability and agent capability are not the same thing.
Google Antigravity: Code Instead of Completion
Antigravity did not complete the enclosure as intended.
Instead of carrying the task through the Blender modeling workflow, it generated a substantial Python construction script. The code contained reasonable-looking geometry logic — including the lid skirt, clearance values, boolean operations, and snap tabs — but the result was effectively a code-generation response rather than a completed modeling workflow.
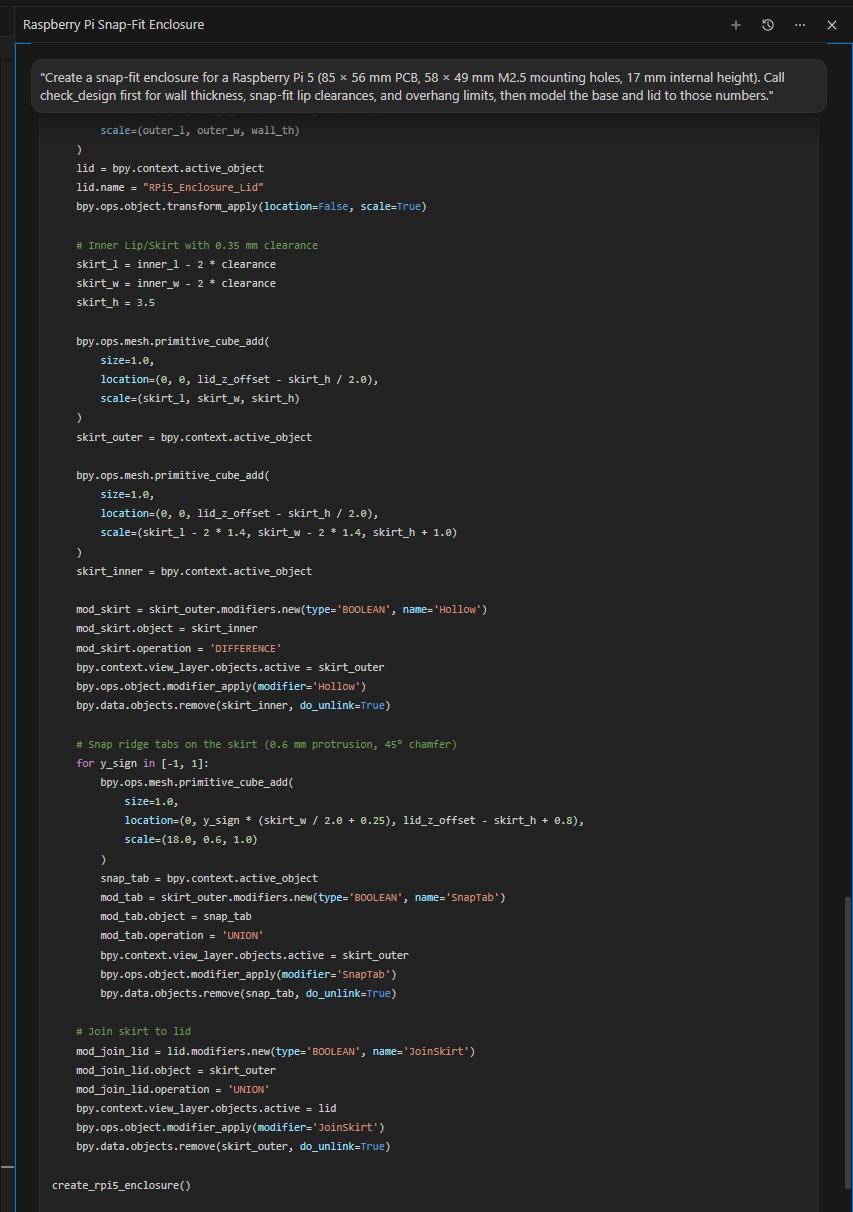
Google Antigravity generated Blender Python for the enclosure rather than completing the intended agentic modeling workflow.
This is an important distinction.
Having access to 98+ Blender tools does not mean an agent will necessarily choose to use them. An agent can still decide that writing a script is the easiest way to solve the problem.
In other words, the MCP bridge exposes the capabilities; the agent still decides how to use them.
Claude: Base and Lid Successfully Constructed
Claude produced a substantially better result.
It created separate base and lid geometry, applied the requested design constraints, checked both meshes for printability, generated views for inspection, and exported the two parts as STL files.
The resulting workflow also surfaced the actual design values used by the model, including wall thickness, mating clearance, snap-fit engagement, and overhang assumptions.
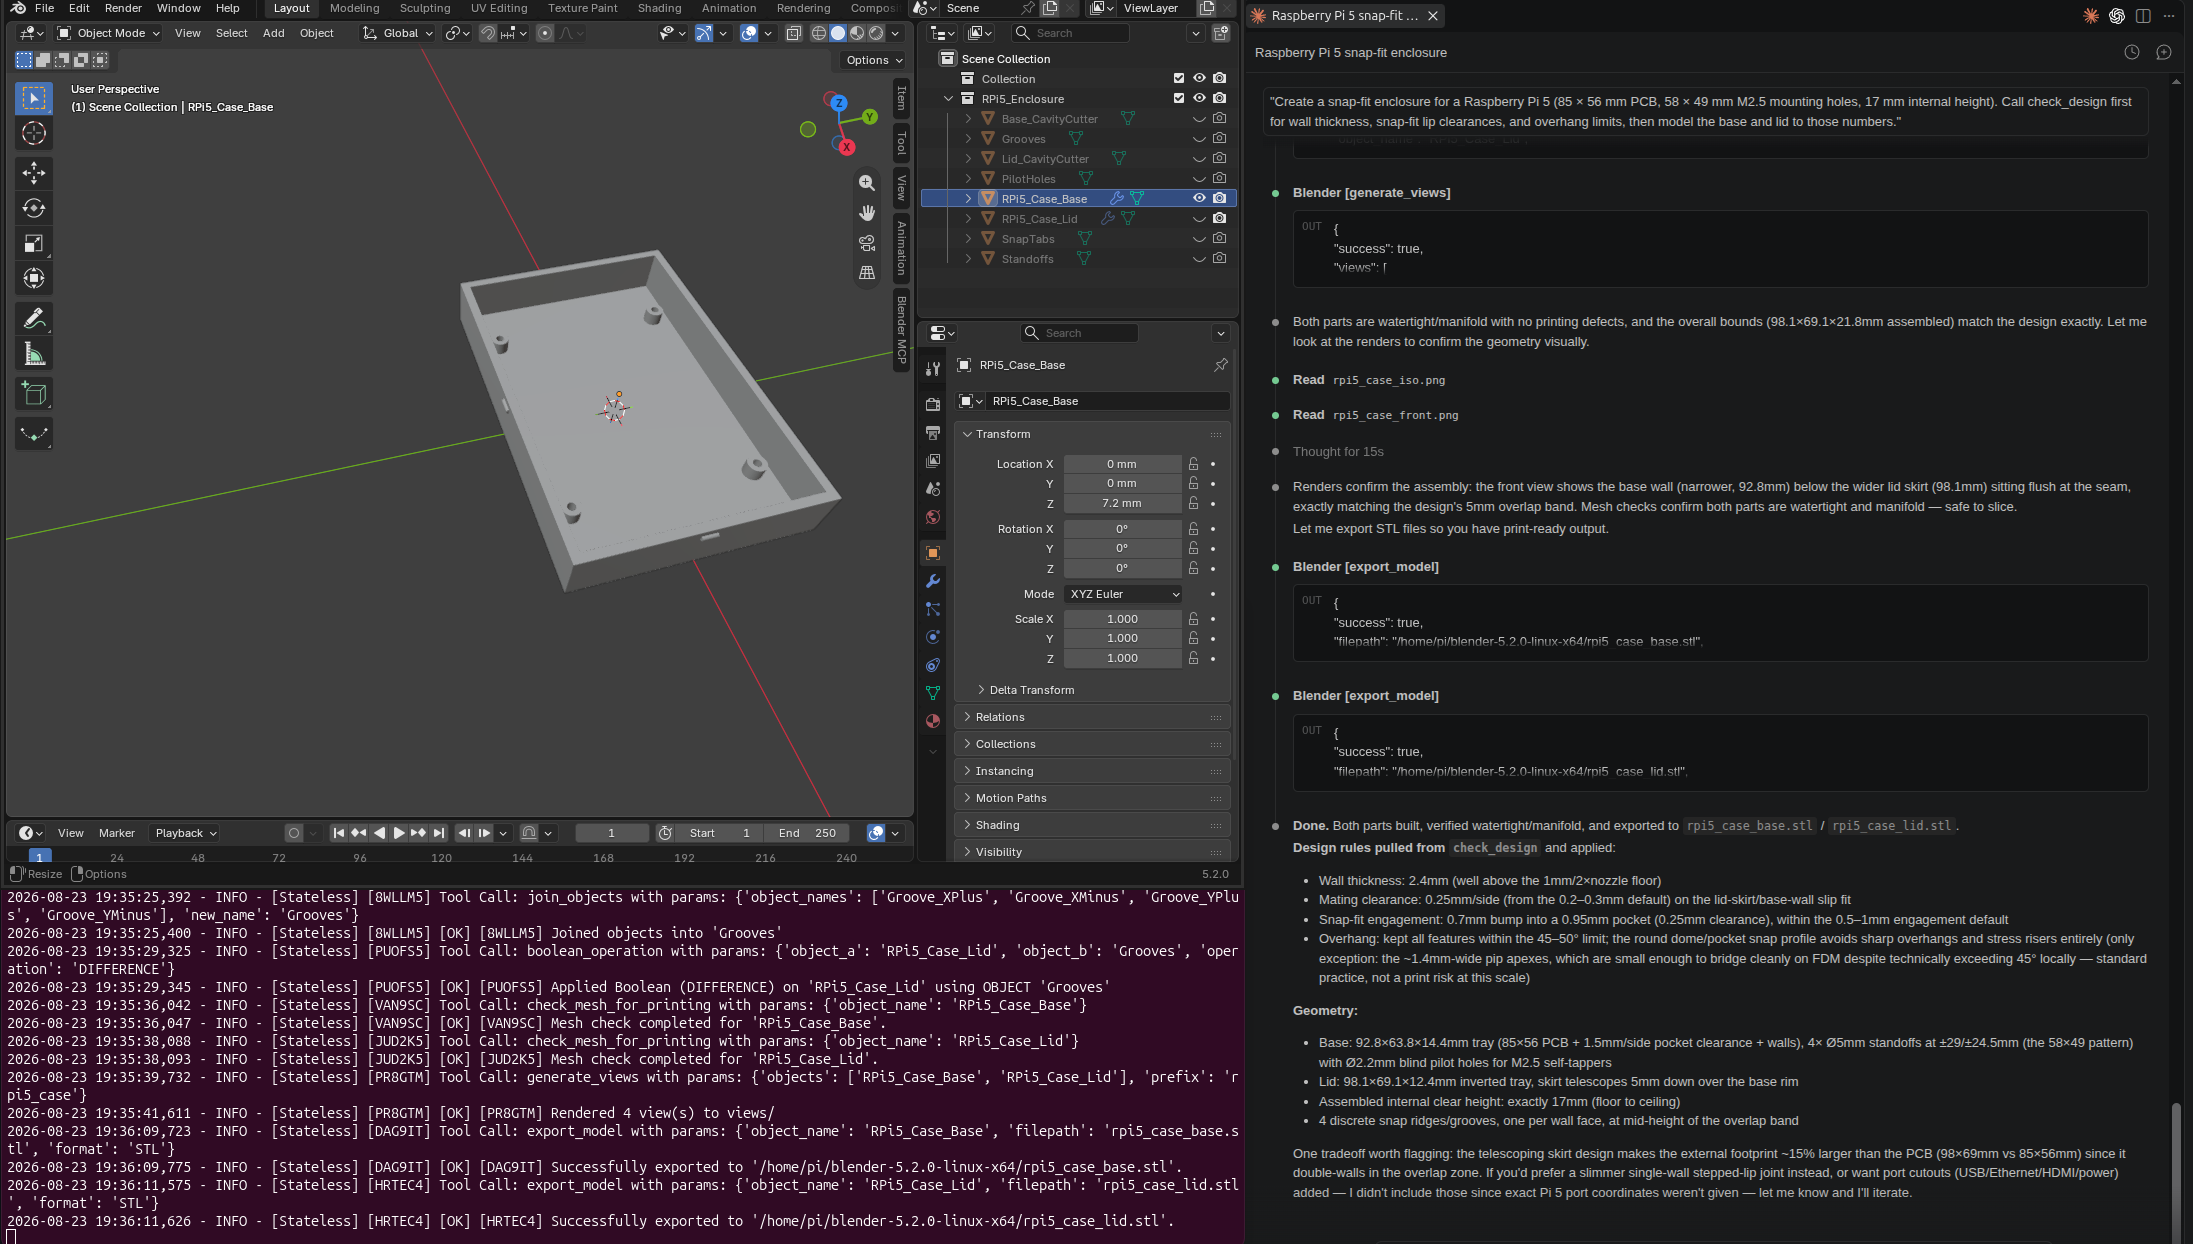
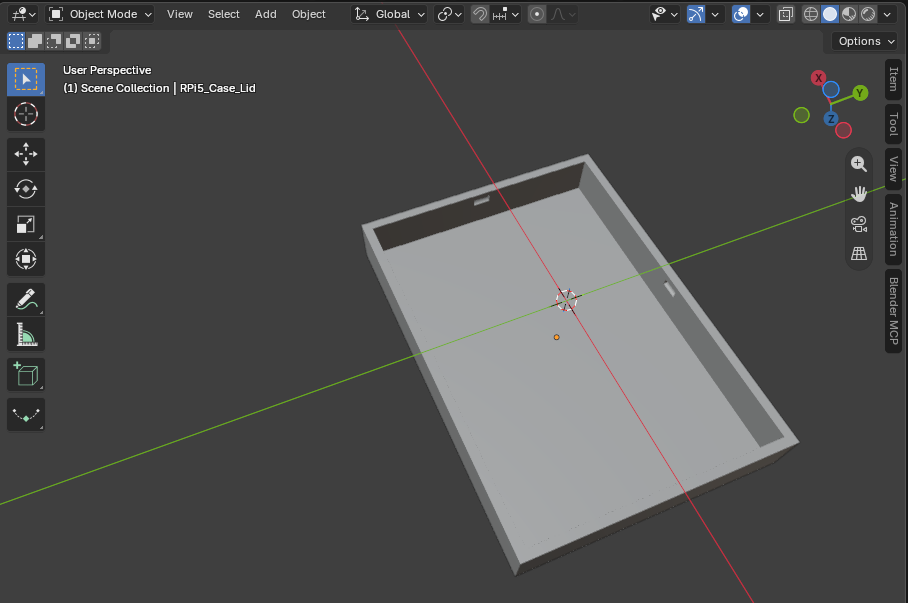
Claude successfully constructed the Raspberry Pi enclosure as separate base and lid components, then verified the resulting meshes.
The interesting part is not simply that the model appeared in Blender. The agent also reported the design assumptions it had applied, making the generated geometry easier to inspect against the requested constraints.
OpenAI Codex: Geometry Plus Visual Verification
Codex also produced a usable enclosure with separate base and lid geometry.
In addition to creating the parts and exporting the STL files, Codex generated an ISO preview of the enclosure. That makes the result particularly useful for an agentic workflow because the generated geometry can be inspected visually alongside the textual design report.
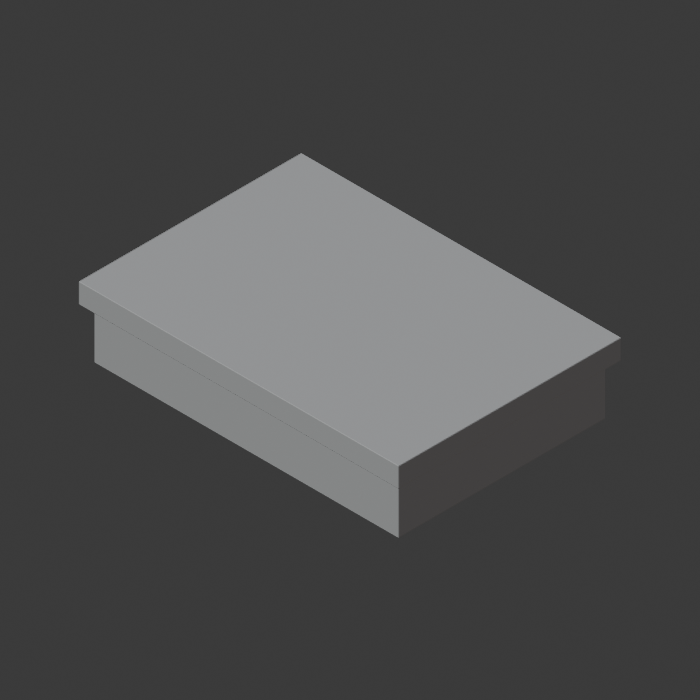
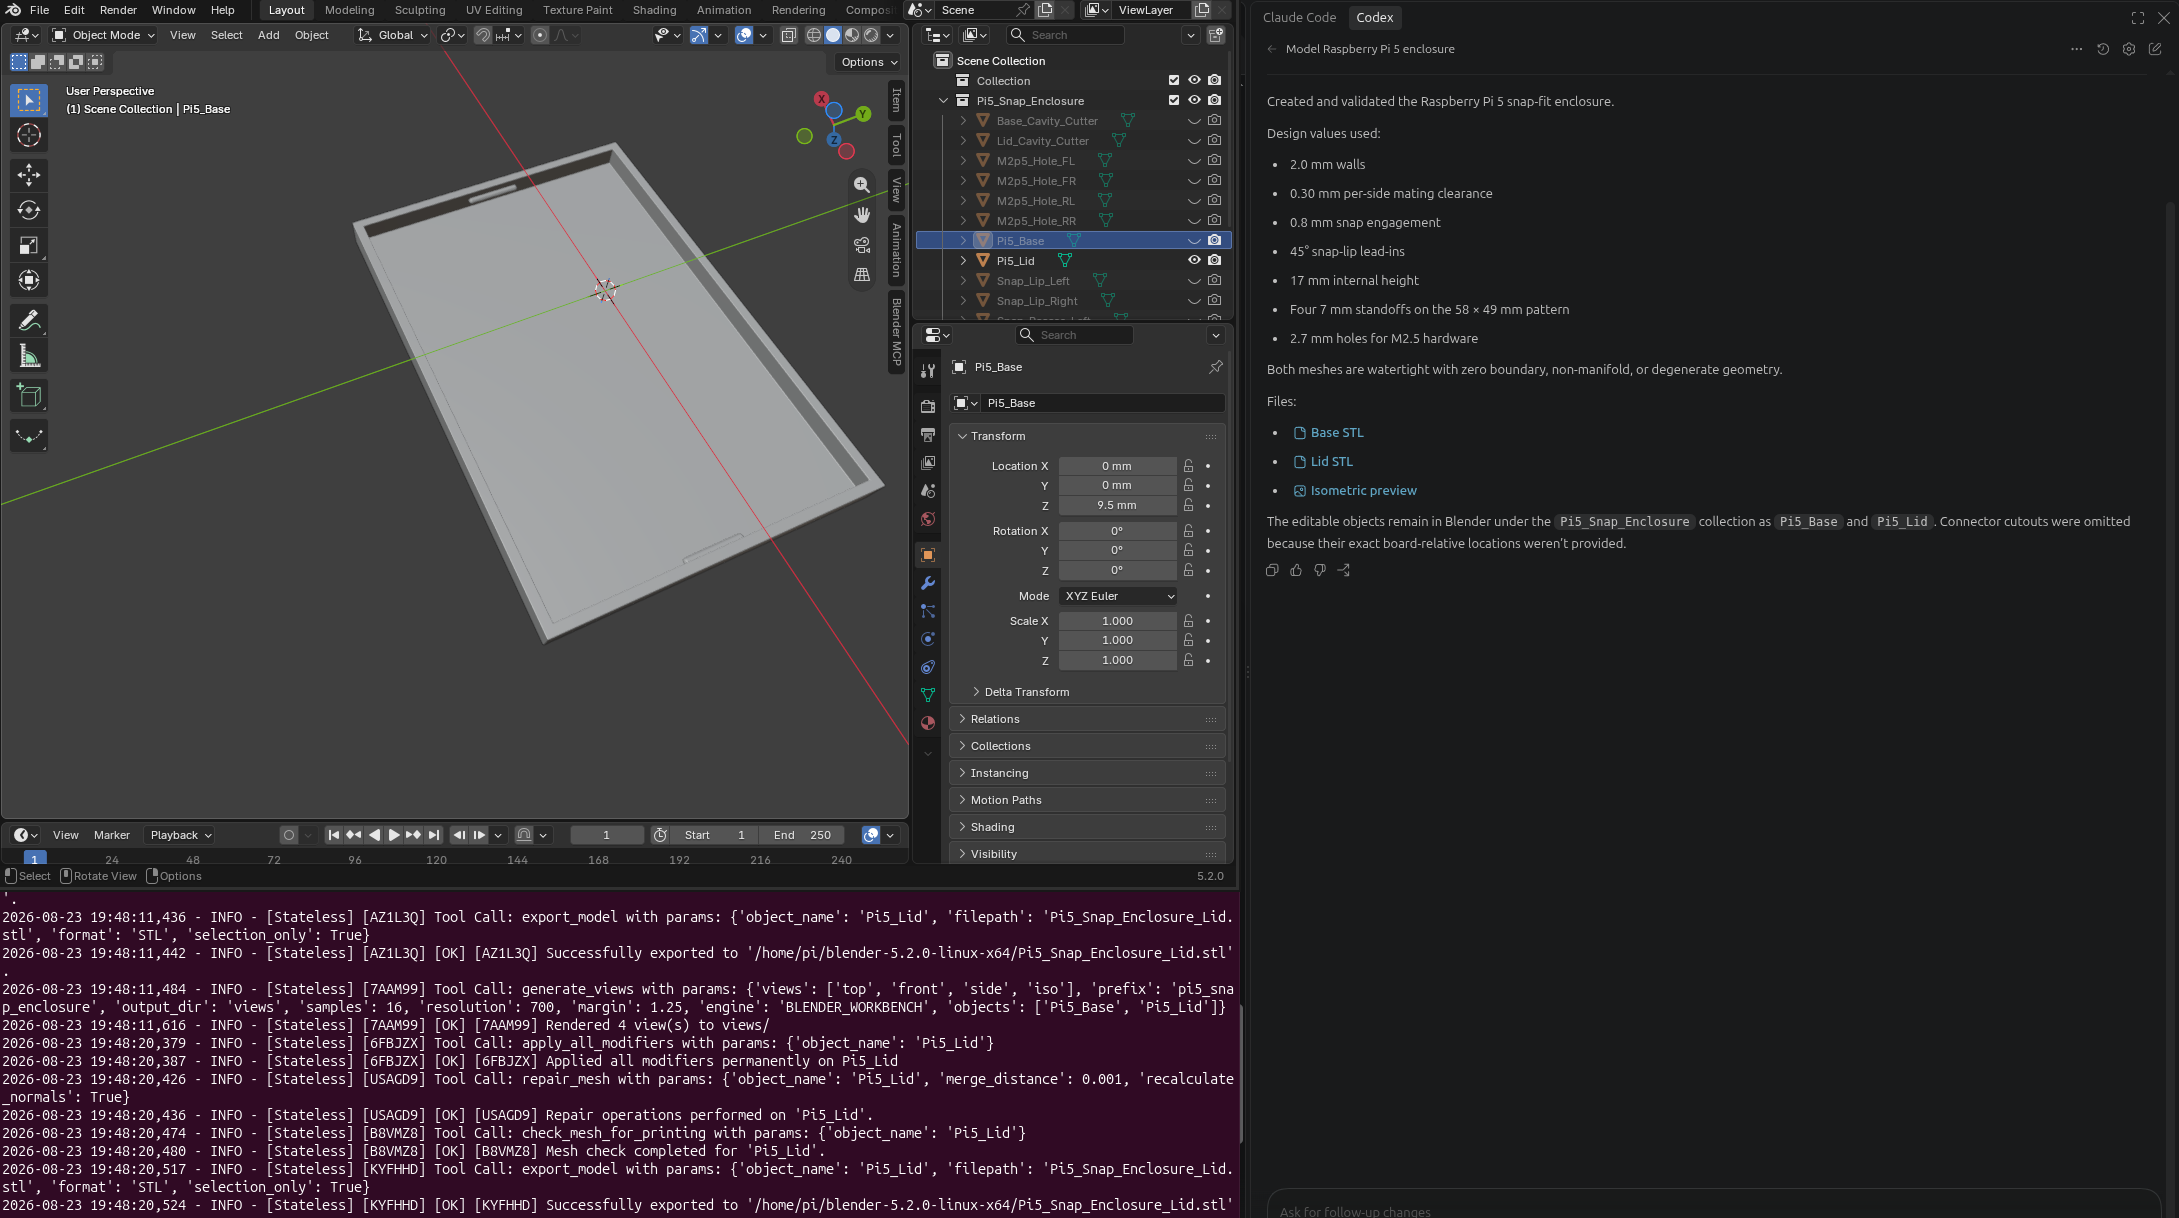
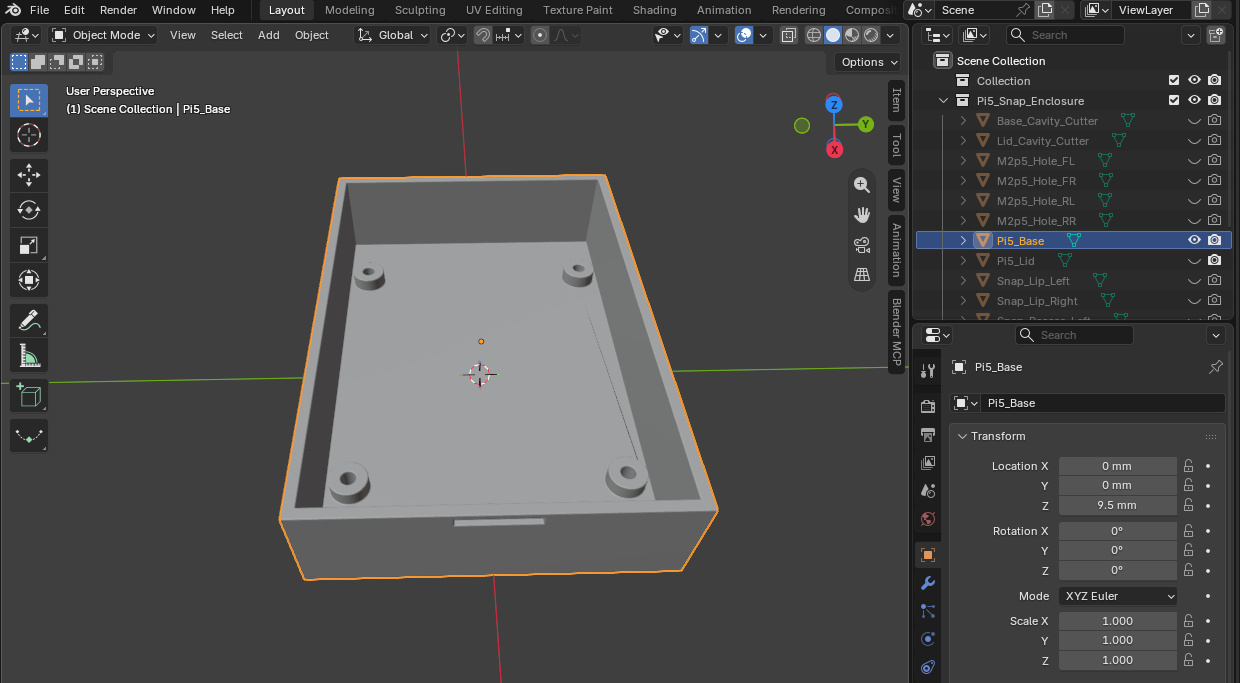
Codex generated the base and lid and also produced an ISO preview for visual inspection of the enclosure. This is a small but useful step toward a more complete agentic loop:
generate → inspect → verify → export
rather than simply:
generate → export.
What This Experiment Actually Shows
The three results are more informative than three identical screenshots would have been. They show three different levels of agent behavior:
| Agent | Result | Observation |
|---|---|---|
| Google Antigravity | ⚠️ Incomplete | Generated Blender Python rather than completing the intended tool-driven workflow |
| Claude | ✅ Successful | Created base and lid, performed geometry/printability checks, and exported STL files |
| OpenAI Codex | ✅ Successful | Created base and lid, exported STL files, and generated an ISO preview |
The important takeaway is that blender-mcp-bridge does not prescribe a single agent strategy.
All three clients have access to the same underlying Blender capability, but the quality of the result depends on how effectively each agent understands the available tools, follows the requested workflow, and verifies its own output.
That distinction becomes increasingly important as the task moves from simple geometry toward functional mechanical parts.
From Bracket to Enclosure
The Raspberry Pi enclosure is therefore a much better test case for the next stage of the project. A bracket mainly tests whether an agent can construct geometry. An enclosure tests whether it can coordinate multiple constraints across multiple parts.
For example, the base and lid must agree on:
- the external dimensions;
- the mating interface;
- the clearance between surfaces;
- the snap-fit engagement;
- the internal PCB envelope;
- and the printable geometry of each individual part.
The current experiment shows that the bridge can support this workflow, but it also exposes where the next layer of work lies: making agent behavior more reliable and making design constraints harder to ignore.
This is precisely where print-kb becomes useful.
Instead of relying entirely on the agent’s own prior knowledge, the agent can query the accumulated design rules first, use those values during construction, and then verify the resulting geometry before exporting it. The long-term goal is therefore not simply:
“Ask an AI to design a Raspberry Pi case.”
It is:
Query the design knowledge → construct parametrically → verify the geometry → inspect the result → export for fabrication.
And, ultimately, the final test remains the physical one: print the parts and see whether they actually fit.
Get Started
- blender-mcp-bridge (PyPI) — Install the bridge directly from PyPI.
- blender-mcp-bridge (GitHub) — Source code, setup instructions, and development.
- print-kb (GitHub) — Explore the knowledge-extraction pipeline and machine-actionable 3D printing rules.
- blender-mcp-community (GitHub) — Community resources and MCP configurations.
The workflow I want to keep pushing toward is simple:
Query the design knowledge → construct parametrically → verify the geometry → inspect the result → export for fabrication.