
This post covers two parts of my homelab setup.
The first describes building a highly available Kubernetes cluster using Talos Linux with three control plane nodes and a dedicated worker node. The second covers running a fully local, air-gapped draw.io instance and integrating it with an MCP server for AI-assisted diagram generation.
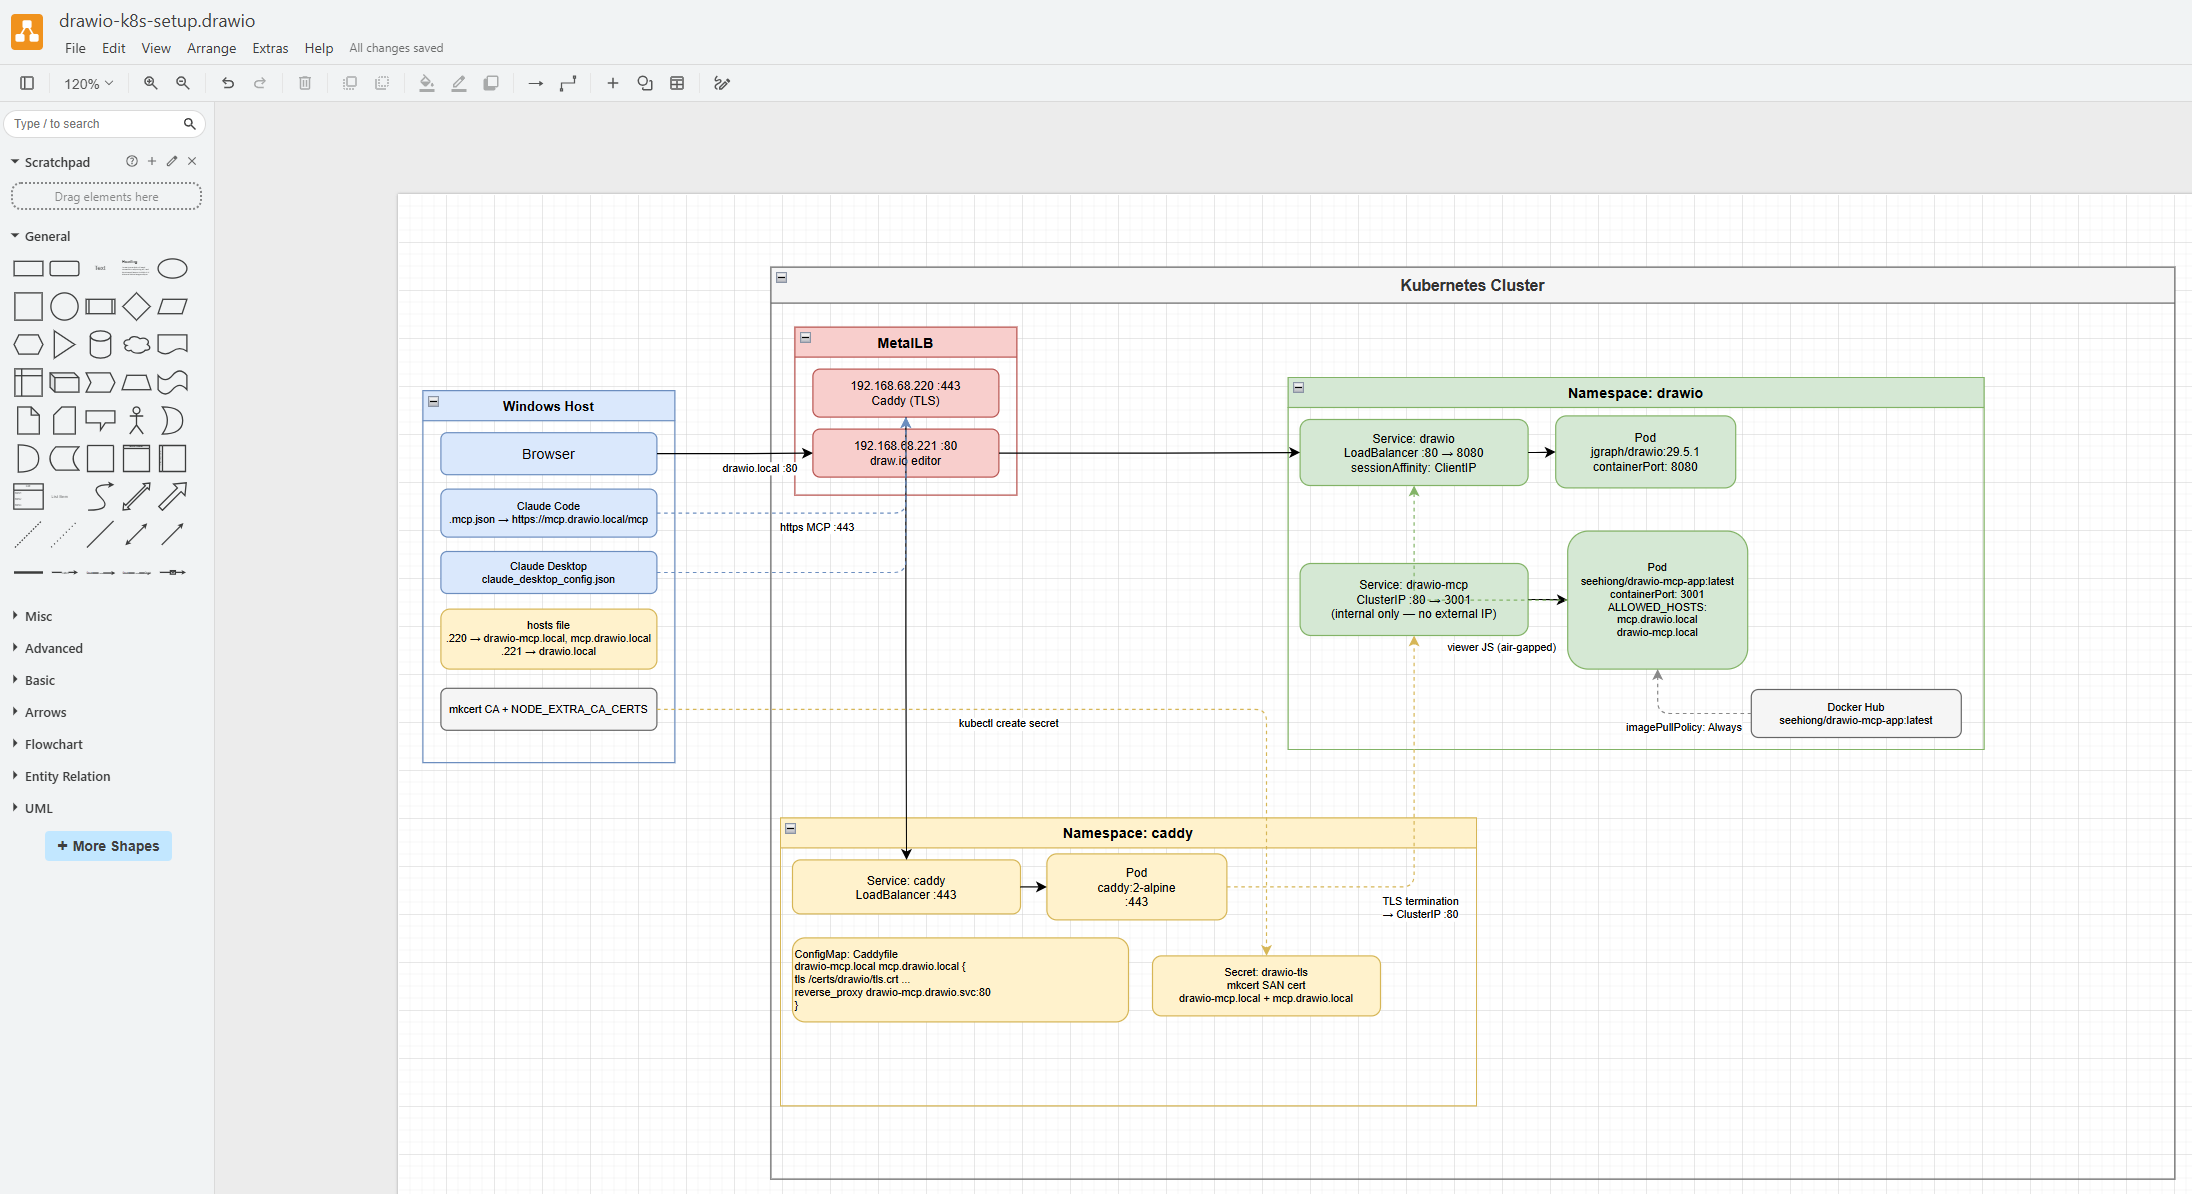
Architecture Overview
Before diving into the individual components, the following diagram shows the overall architecture of the setup.
Installation
In my previous blog post , I covered how a single-node cluster is created. Here, I detail the steps for the 3-master-node HA setup.
Why 3 Control Plane Nodes?
The move from a single control plane node to three was driven by two practical constraints.
Stability — etcd, which stores all cluster state, requires a quorum of nodes to function. With a single control plane node, any disruption (reboot, hardware fault, or upgrade) takes the Kubernetes API server offline. With 3 nodes, the cluster tolerates the loss of 1 node and continues operating normally.
Talos OS upgrades — this was the immediate trigger. On a single-node control plane, talosctl upgrade reboots the node to apply the new Talos image. Since there is no other control plane node to maintain etcd quorum during the reboot, the upgrade stalls and the cluster becomes unresponsive. Worker node upgrades are unaffected because workers do not participate in the etcd quorum and can be rebooted independently. With 3 control plane nodes, each node can be upgraded one at a time while the remaining two keep etcd quorum and the API server available throughout.
Preparation
# For initial install
choco install talosctl

# For upgrading
choco upgrade talosctl

# For WSL install
brew install siderolabs/tap/talosctl

# For checking the ethernet links
talosctl -n 192.168.68.115 get links
# NODE             NAMESPACE   TYPE         ID             VERSION   ALIAS   TYPE       KIND     HW ADDR                                           OPER STATE   LINK STATE
# 192.168.68.115   network     LinkStatus   enp3s0         4                 ether               18:db:f2:4a:f1:ad                                 up           true

# To upgrade existing nodes
talosctl upgrade -n 192.168.68.113 --image ghcr.io/siderolabs/installer:v1.12.4

# For a reset
talosctl -n 192.168.68.115 reset --system-labels-to-wipe=EPHEMERAL --system-labels-to-wipe=STATE --graceful=false --rebootPreparing Image
For a fresh install, download the ISO image from the Talos releases page . My node layout is as follows:
192.168.68.100 - virtual-ip (VIP)
192.168.68.115 - control-1
192.168.68.116 - control-2
192.168.68.117 - control-3
192.168.68.113 - worker-1The virtual IP (VIP) floats between the control plane nodes using Talos’ built-in failover mechanism. It is the stable endpoint used for the Kubernetes API, so that if any single control plane node goes down, the API remains reachable.
Creating Cluster
Note that the gen config command targets the VIP (192.168.68.100), not a single control plane node. This ensures the generated kubeconfig and node configs reference the HA endpoint from the start.
# Generate cluster configs — use the VIP as the Kubernetes API endpoint
talosctl gen config homelab https://192.168.68.100:6443 --force
# Sample output
# generating PKI and tokens
# created ...\controlplane.yaml
# created ...\worker.yaml
# created ...\talosconfigSetting up the Control Nodes
This is my control-1.patch:
machine:
  network:
    hostname: control-1
    interfaces:
    - interface: enp3s0
      dhcp: true
      vip:
        ip: 192.168.68.100
  install:
    disk: /dev/sda
    image: ghcr.io/siderolabs/installer:v1.12.4
    wipe: true
  kubelet:
    extraMounts:
      - destination: /var/mnt
        type: bind
        source: /var/mnt
        options:
          - bind
          - rw
    defaultRuntimeSeccompProfileEnabled: false
  time:
    disabled: false
    servers:
      - time.cloudflare.com
cluster:
  apiServer:
    admissionControl:
      - name: PodSecurity
        configuration:
          apiVersion: pod-security.admission.config.k8s.io/v1
          defaults:
            audit: privileged
            audit-version: latest
            enforce: privileged
            enforce-version: latest
            warn: privileged
            warn-version: latest
          exemptions:
            namespaces: []
            runtimeClasses: []
            usernames: []
kind: PodSecurityConfigurationprivileged across the board, which effectively disables pod security restrictions cluster-wide. This is convenient for a homelab but is not recommended for production environments.
To apply the config:
# Issued from WSL

# Patch the base controlplane.yaml with the node-specific patch
talosctl machineconfig patch controlplane.yaml --patch @control-1.patch --output control-1.yaml

# Set the talosctl context to point at the first control plane node
talosctl config endpoint 192.168.68.115
talosctl config node 192.168.68.115

# Apply config — use --insecure on a fresh (unconfigured) node since it has no TLS cert yet
talosctl apply-config -n 192.168.68.115 --file control.yaml --insecure

# Bootstrap the cluster — this must be run **once**, on the first control plane node only.
talosctl bootstrap --nodes 192.168.68.115 --endpoints 192.168.68.115 --talosconfig talosconfigFor the 2nd and 3rd control plane nodes, the patch is identical except for the hostname and interface name. For example, control-2.patch changes hostname: control-2 and interface: enp4s0 (or whichever NIC that node uses), and so on for control-3.
Apply them the same way (skip bootstrap — it only runs once):
talosctl machineconfig patch controlplane.yaml --patch @control-2.patch --output control-2.yaml
talosctl apply-config -n 192.168.68.116 --file control-2.yaml --insecure

talosctl machineconfig patch controlplane.yaml --patch @control-3.patch --output control-3.yaml
talosctl apply-config -n 192.168.68.117 --file control-3.yaml --insecureOnce all control plane nodes are running, verify the etcd cluster membership and retrieve the kubeconfig:
talosctl -n 192.168.68.100 etcd members
# NODE             ID                 HOSTNAME    PEER URLS                     CLIENT URLS                   LEARNER
# 192.168.68.100   0ccbc2fb2bfb5c65   control-3   https://192.168.68.117:2380   https://192.168.68.117:2379   false
# 192.168.68.100   a471be26dbba6db0   control-2   https://192.168.68.116:2380   https://192.168.68.116:2379   false
# 192.168.68.100   c32e23f05c55eff7   control-1   https://192.168.68.115:2380   https://192.168.68.115:2379   false

# If a node shows LEARNER=true and is stuck, remove it using the ID from the output above,
# then re-apply that node's config (talosctl apply-config) to let it rejoin cleanly
talosctl -n 192.168.68.100 etcd remove-member 0ccbc2fb2bfb5c65

# Retrieve the kubeconfig and merge it into your local ~/.kube/config
talosctl kubeconfig --nodes 192.168.68.100 --endpoints 192.168.68.100 --talosconfig talosconfig --mergeSetting up the Worker Node
This is my worker-1.patch:
machine:
  network:
    hostname: worker-1
  install:
    disk: /dev/nvme0n1
    image: ghcr.io/siderolabs/installer:v1.12.4
    wipe: true
  kubelet:
    extraMounts:
      - destination: /var/mnt
        type: bind
        source: /var/mnt
        options:
          - bind
          - rw
  time:
    disabled: false
    servers:
- time.cloudflare.comApply the config to the worker:
# Issued from WSL
talosctl machineconfig patch worker.yaml --patch @worker-1.patch --output worker-1.yaml

# Use --insecure on a fresh node
talosctl apply-config -n 192.168.68.113 --file worker-1.yaml --insecure
talosctl dashboard -n 192.168.68.113Upgrading Kubernetes Version
To upgrade the Kubernetes version across the cluster:
# Dry run first to check for issues
talosctl --nodes 192.168.68.100 upgrade-k8s --to 1.35.0 --dry-run

# Apply the upgrade
talosctl --nodes 192.168.68.100 upgrade-k8s --to 1.35.0upgrade-k8s command is idempotent. If you encounter issues, ensure you are targeting the VIP and retry.
Local Path Provisioner
Download the upstream manifest and make two small modifications before applying it:
curl https://raw.githubusercontent.com/rancher/local-path-provisioner/v0.0.34/deploy/local-path-storage.yaml -O1. Set as the default StorageClass
In the StorageClass resource, add the annotation so that PVCs without an explicit storageClassName automatically use this provisioner:
kind: StorageClass
metadata:
  name: local-path
  annotations:
storageclass.kubernetes.io/is-default-class: "true"2. Set the storage path
In the ConfigMap resource (local-path-config), update nodePathMap to point to /var/mnt — the path we mounted via kubelet.extraMounts in our node config:
data:
  config.json: |-
    {
      "nodePathMap": [
        {
          "node": "DEFAULT_PATH_FOR_NON_LISTED_NODES",
          "paths": ["/var/mnt"]
        }
      ]
}Then apply:
kubectl apply -f local-path-storage.yamlMetalLB
Download and install MetalLB:
curl https://raw.githubusercontent.com/metallb/metallb/v0.15.3/config/manifests/metallb-native.yaml -O

kubectl apply -f metallb-native.yamlOnce MetalLB is running, configure an IP address pool and an L2 advertisement so MetalLB can allocate external IPs to LoadBalancer services.
This is my metallb-ipaddresspool.yaml:
apiVersion: metallb.io/v1beta1
kind: IPAddressPool
metadata:
  name: first-pool
  namespace: metallb-system
spec:
  addresses:
- 192.168.68.220-192.168.68.240This is my metallb-l2advertisement.yaml:
apiVersion: metallb.io/v1beta1
kind: L2Advertisement
metadata:
  name: first-advert
  namespace: metallb-system
spec:
  ipAddressPools:
- first-poolApply both after MetalLB’s pods are running:
kubectl apply -f metallb-ipaddresspool.yaml
kubectl apply -f metallb-l2advertisement.yamlCaddy
Caddy acts as a reverse proxy exposed via a MetalLB LoadBalancer Service, routing HTTPS traffic to services inside the cluster based on hostname (SNI). This allows all .local services to share a single external IP with proper TLS, using certificates issued by a locally trusted CA (mkcert).
One-time Setup
Install mkcert and add its local Certificate Authority (CA) to your system trust store. This only needs to be done once per machine:
# Install mkcert
winget install FiloSottile.mkcert

# Install the local CA into your system trust store
mkcert -install

# Set NODE_EXTRA_CA_CERTS so Node.js apps (Claude Desktop, Claude Code, MCP Inspector) also trust the local CA
[System.Environment]::SetEnvironmentVariable("NODE_EXTRA_CA_CERTS", "$env:LOCALAPPDATA\mkcert\rootCA.pem", "Machine")Then deploy Caddy into the cluster. My all-in-one.yaml creates the namespace, ConfigMap (Caddyfile), Service (LoadBalancer), and Deployment:
apiVersion: v1
kind: Namespace
metadata:
  name: caddy
---
apiVersion: v1
kind: ConfigMap
metadata:
  name: caddy-config
  namespace: caddy
data:
  Caddyfile: |
    drawio-mcp.local mcp.drawio.local {
      tls /certs/drawio/tls.crt /certs/drawio/tls.key
      reverse_proxy drawio-mcp.drawio.svc.cluster.local:80
    }
---
apiVersion: v1
kind: Service
metadata:
  name: caddy
  namespace: caddy
  labels:
    app: caddy
spec:
  type: LoadBalancer
  ports:
  - name: https
    port: 443
    targetPort: 443
  selector:
    app: caddy
---
apiVersion: apps/v1
kind: Deployment
metadata:
  name: caddy
  namespace: caddy
spec:
  replicas: 1
  selector:
    matchLabels:
      app: caddy
  template:
    metadata:
      labels:
        app: caddy
    spec:
      containers:
      - name: caddy
        image: caddy:2-alpine
        imagePullPolicy: IfNotPresent
        ports:
        - containerPort: 443
        volumeMounts:
        - name: config
          mountPath: /etc/caddy/Caddyfile
          subPath: Caddyfile
        - name: certs-drawio
          mountPath: /certs/drawio
          readOnly: true
      volumes:
      - name: config
        configMap:
          name: caddy-config
      - name: certs-drawio
        secret:
secretName: drawio-tlskubectl apply -f all-in-one.yamlOnce the Service is created, MetalLB assigns it an IP. Retrieve it and add it to your hosts file:
kubectl get svc caddy -n caddy# C:\Windows\System32\drivers\etc\hosts
192.168.68.22x drawio-mcp.local
# add further .local entries here as you add servicesAdding a New HTTPS Service
For each new service, generate a certificate for its hostname, create a Kubernetes TLS secret in the caddy namespace, then add a new block to the Caddyfile in all-in-one.yaml and redeploy.
# Generate a cert for the hostname (e.g. drawio-mcp.local)
mkcert -cert-file drawio-mcp.local.pem -key-file drawio-mcp.local-key.pem drawio-mcp.local mcp.drawio.local

# Create namespace
kubectl create namespace caddy --dry-run=client -o yaml | kubectl apply -f -

# Create (or update) the TLS secret in the caddy namespace
kubectl create secret tls drawio-tls ^
  --cert=drawio-mcp.local.pem ^
  --key=drawio-mcp.local-key.pem ^
  --namespace=caddy ^
--dry-run=client -o yaml | kubectl apply -f -Then add a new volume and volumeMount entry to the Deployment for the new secret, add the hostname block to the Caddyfile, and reapply all-in-one.yaml.
Draw.io
The default draw.io at app.diagrams.net is a convenient cloud-hosted tool, but every diagram you create is processed — and potentially stored — via external servers. For office use or projects involving sensitive architecture, infrastructure layouts, or confidential workflows, that represents an unnecessary data exposure risk.
Running draw.io locally means diagrams never leave your network. There is no account, no telemetry, and no dependency on external availability. It is the same application — just fully self-contained.
The following is my all-in-one.yaml, based on the official
docker-drawio
project and adapted for this cluster:
apiVersion: v1
kind: Namespace
metadata:
  name: drawio
---
apiVersion: v1
kind: Service
metadata:
  name: drawio
  namespace: drawio
  labels:
    app: draw.io
spec:
  type: LoadBalancer
  sessionAffinity: ClientIP
  sessionAffinityConfig:
    clientIP:
      timeoutSeconds: 3600
  ports:
  - name: http
    port: 80
    targetPort: 8080
  selector:
    app: draw.io
---
apiVersion: apps/v1
kind: Deployment
metadata:
  name: drawio
  namespace: drawio
spec:
  replicas: 1
  selector:
    matchLabels:
      app: draw.io
  template:
    metadata:
      labels:
        app: draw.io
    spec:
      containers:
      - image: docker.io/jgraph/drawio:29.5.1
        imagePullPolicy: IfNotPresent
        name: drawio
        ports:
- containerPort: 8080kubectl apply -f all-in-one.yamlOnce deployed, check the assigned MetalLB IP from the K9s dashboard under Services:
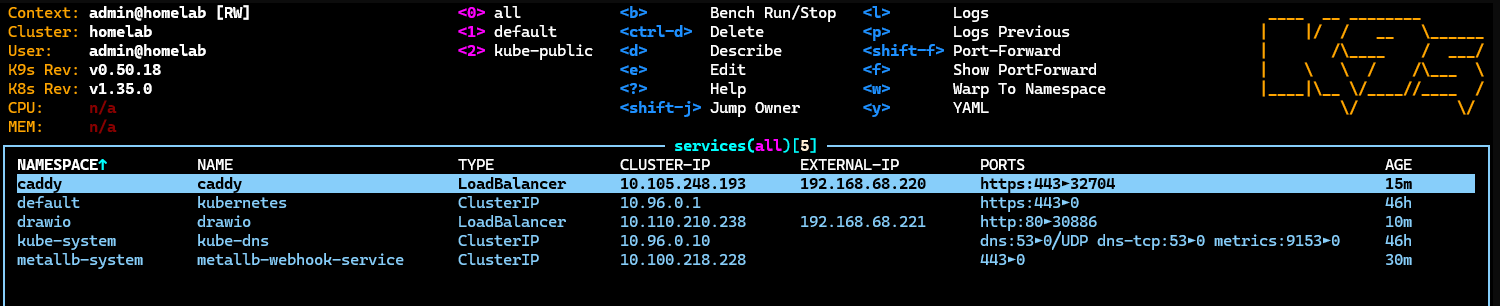
Add the IP to your hosts file:
# C:\Windows\System32\drivers\etc\hosts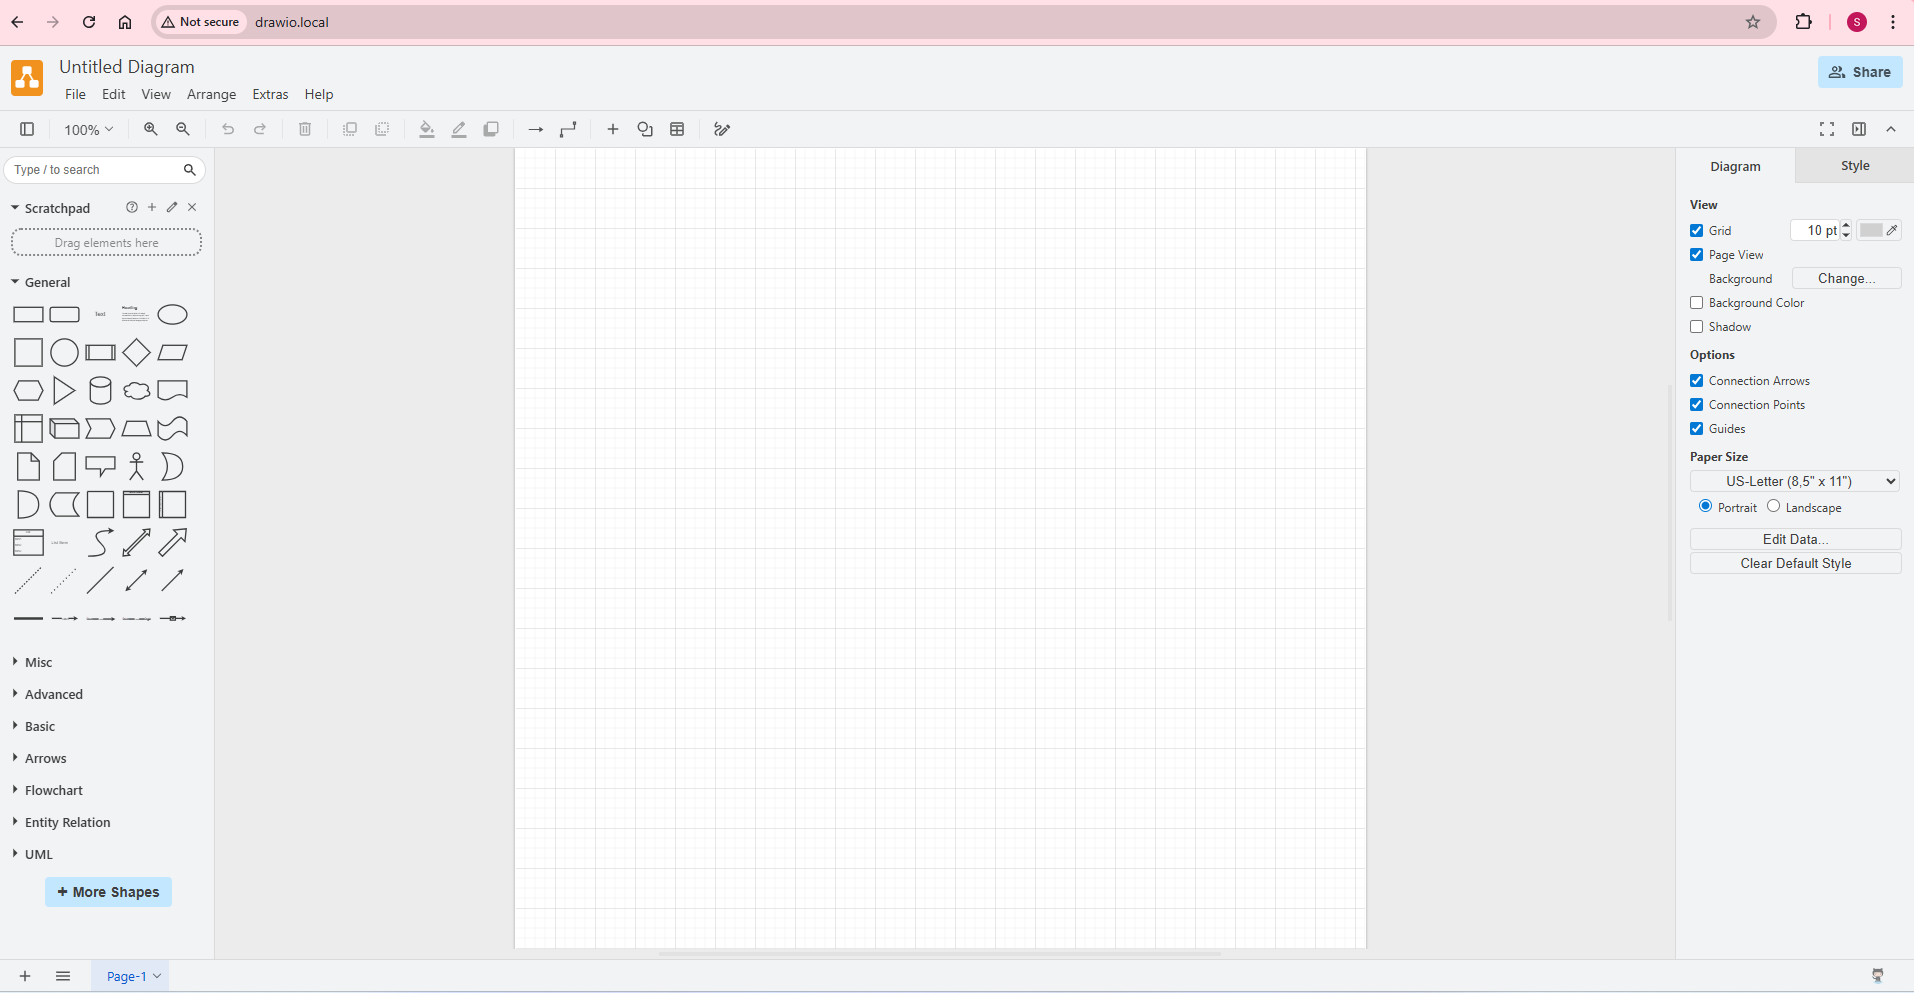
192.168.68.22x drawio.localNavigate to http://drawio.local and you can start diagramming locally right away:
Draw.io-MCP
drawio-mcp is the official draw.io MCP (Model Context Protocol) server that enables LLMs to create and open diagrams in the draw.io editor.
The upstream server hardcodes references to app.diagrams.net and viewer.diagrams.net, which prevents it from working with a locally hosted instance. To make it work with our local draw.io instance, the image needs two build-time patches:
- URL redirect — replace all
diagrams.netreferences inshared.jswithhttp://drawio.local/so the MCP server points at the local instance instead of the internet ALLOWED_HOSTSsupport — inject environment variable support intoindex.jsso we can restrict which hostnames the server accepts (required when running behind a reverse proxy like Caddy)
This is my Dockerfile:
FROM node:22-slim AS build
WORKDIR /app
RUN apt-get update && apt-get install -y --no-install-recommends ca-certificates git && rm -rf /var/lib/apt/lists/* && \
    git clone --depth 1 --filter=blob:none --sparse https://github.com/jgraph/drawio-mcp.git . && \
    git sparse-checkout set mcp-app-server && \
    cd mcp-app-server && \
    npm install --omit=dev && \
    node -e " \
      const fs = require('fs'); \
      const idx = 'src/index.js'; \
      fs.writeFileSync(idx, fs.readFileSync(idx, 'utf8').replace( \
        'const app = createMcpExpressApp();', \
        'const allowedHosts = process.env.ALLOWED_HOSTS ? process.env.ALLOWED_HOSTS.split(\",\") : undefined; const app = createMcpExpressApp({ allowedHosts });' \
      )); \
      const shared = 'src/shared.js'; \
      fs.writeFileSync(shared, fs.readFileSync(shared, 'utf8') \
        .replace(/https:\/\/viewer\.diagrams\.net\//g, 'http://drawio.local/') \
        .replace(/https:\/\/app\.diagrams\.net\//g, 'http://drawio.local/') \
      ); \
      const patched = fs.readFileSync(idx, 'utf8'); \
      if (!patched.includes('allowedHosts')) throw new Error('PATCH FAILED: allowedHosts not found in index.js'); \
    "

FROM node:22-slim
WORKDIR /app
COPY --from=build /app/mcp-app-server ./
ENV PORT=3001
EXPOSE 3001
CMD ["node", "src/index.js"]Build and push to your own registry:
docker build -t seehiong/drawio-mcp-app:latest .
docker push seehiong/drawio-mcp-app:latestseehiong/drawio-mcp-app:latest directly in the deployment below.
This is my all-in-one.yaml:
apiVersion: v1
kind: Service
metadata:
  name: drawio-mcp
  namespace: drawio
  labels:
    app: drawio-mcp
spec:
  type: LoadBalancer
  ports:
  - name: http
    port: 80
    targetPort: 3001
  selector:
    app: drawio-mcp
---
apiVersion: apps/v1
kind: Deployment
metadata:
  name: drawio-mcp
  namespace: drawio
spec:
  replicas: 1
  selector:
    matchLabels:
      app: drawio-mcp
  template:
    metadata:
      labels:
        app: drawio-mcp
    spec:
      containers:
      - image: seehiong/drawio-mcp-app:latest
        imagePullPolicy: Always
        name: drawio-mcp
        ports:
        - containerPort: 3001
        env:
        - name: PORT
          value: "3001"
        - name: ALLOWED_HOSTS
value: "mcp.drawio.local,drawio-mcp.local"ALLOWED_HOSTS.
Deploy the DrawIO-MCP service:
kubectl apply -f all-in-one.yamlTo verify the MCP server is running correctly, use MCP Inspector:
$env:NODE_EXTRA_CA_CERTS="$env:LOCALAPPDATA\mkcert\rootCA.pem"; npx @modelcontextprotocol/inspector
# Starting MCP inspector...
#
# 🚀 MCP Inspector is up and running at:
#    http://localhost:6274/?MCP_PROXY_AUTH_TOKEN=ec8b22e47f78a2b66feda80a9ba715ca4f2af8f08e8f6899779c1a50091307e9
#
# 🌐 Opening browser...
# ⚙️ Proxy server listening on localhost:6277
# 🔑 Session token: ec8b22e47f78a2b66feda80a9ba715ca4f2af8f08e8f6899779c1a50091307e9
#    Use this token to authenticate requests or set DANGEROUSLY_OMIT_AUTH=true to disable auth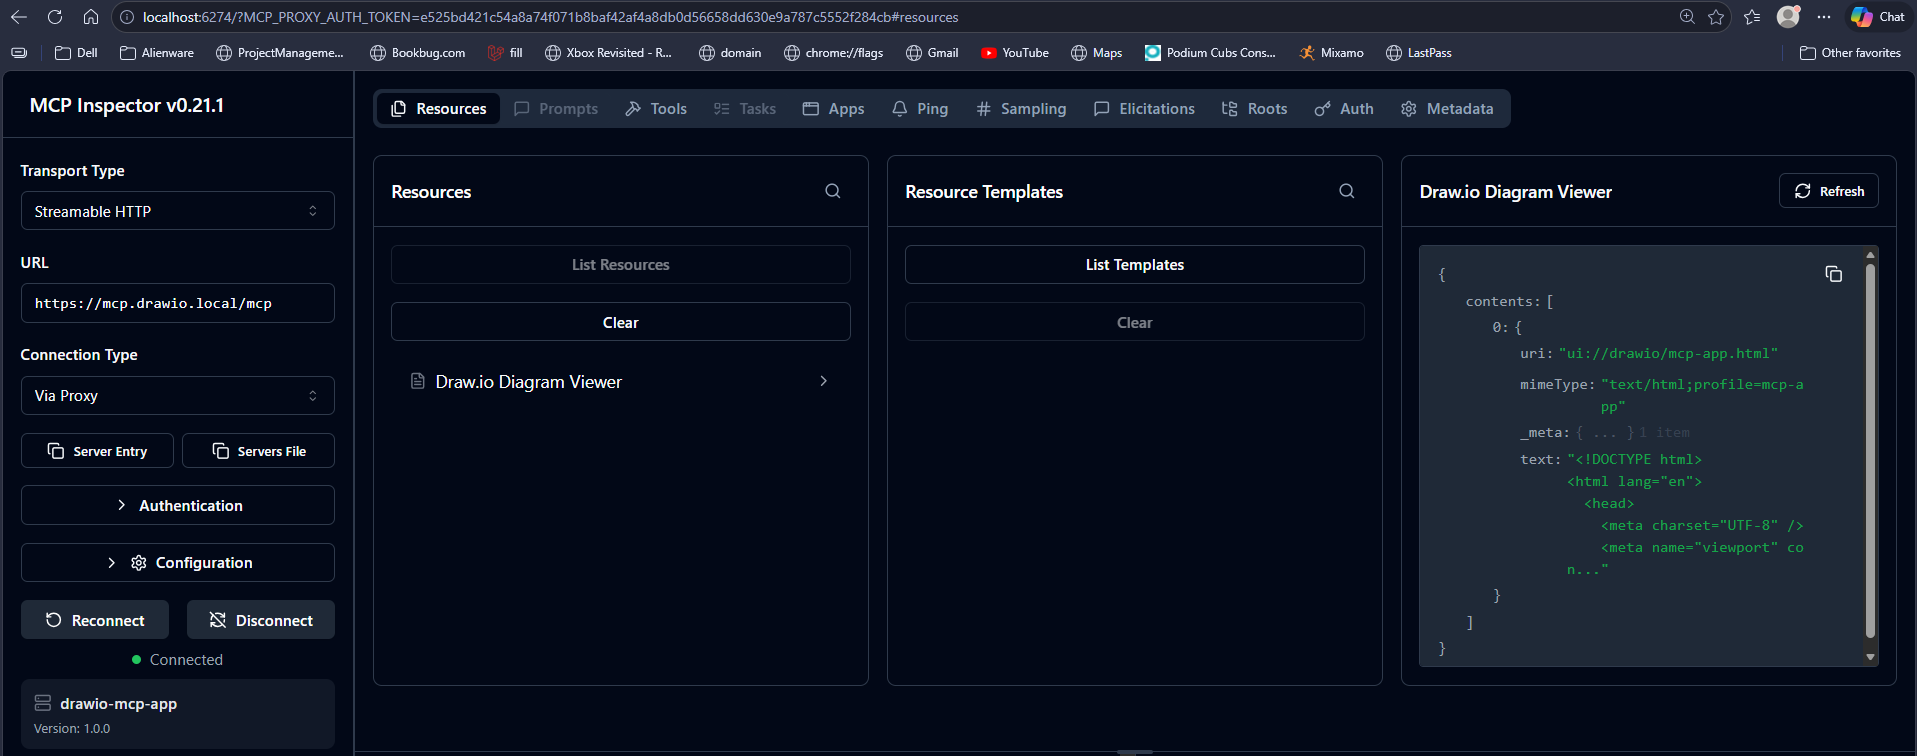
In Action
With the full stack running, the DrawIO-MCP server is accessible from Claude Code via .mcp.json. Below is the working setup, along with a note on why Claude Desktop’s custom connector cannot connect to a local MCP server without OAuth.
Claude Code (VSCode Extension)
Claude Code reads MCP server configuration from a .mcp.json file at the root of your project. Add the following to wire it up:
{
  "mcpServers": {
    "drawio": {
      "type": "http",
      "url": "https://mcp.drawio.local/mcp"
    }
  }
}mcp.drawio.local.
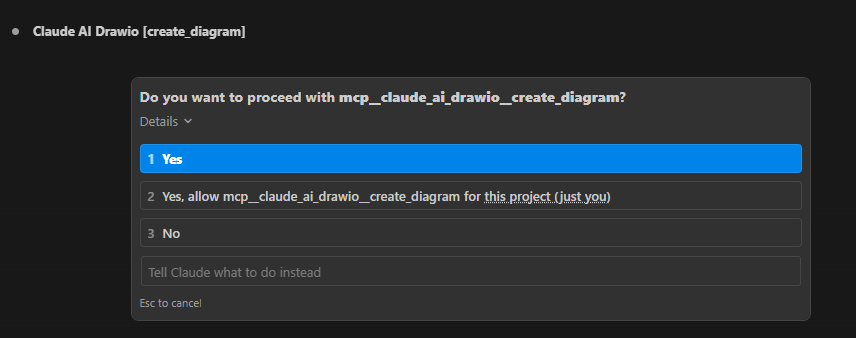
With this in place, prompt Claude Code: Create a draw.io diagram of my Kubernetes setup. Claude Code requests permission before calling the MCP tool:
Claude Code calls the create_diagram tool on the DrawIO-MCP server and returns the diagram as draw.io XML. A sample of the output:
<mxGraphModel dx="1422" dy="762" grid="1" gridSize="10" guides="1" tooltips="1" connect="1" arrows="1" fold="1" page="1" pageScale="1" pageWidth="1500" pageHeight="900" math="0" shadow="0">
<root>
<mxCell id="0" />
<mxCell id="1" parent="0" />
<!-- Windows Host -->
<mxCell id="winhost" value="Windows Host" style="swimlane;startSize=25;fillColor=#dae8fc;strokeColor=#6c8ebf;fontStyle=1;fontSize=11;" vertex="1" parent="1">
<mxGeometry x="20" y="160" width="210" height="310" as="geometry" />
</mxCell>
<mxCell id="browser" value="Browser" style="rounded=1;whiteSpace=wrap;html=1;fillColor=#dae8fc;strokeColor=#6c8ebf;" vertex="1" parent="winhost">
<mxGeometry x="15" y="35" width="180" height="35" as="geometry" />
</mxCell>
<mxCell id="claudecode" value="Claude Code
.mcp.json → https://mcp.drawio.local/mcp" style="rounded=1;whiteSpace=wrap;html=1;fillColor=#dae8fc;strokeColor=#6c8ebf;fontSize=9;" vertex="1" parent="winhost">
<mxGeometry x="15" y="82" width="180" height="40" as="geometry" />
</mxCell>
<mxCell id="claudedesktop" value="Claude Desktop
claude_desktop_config.json" style="rounded=1;whiteSpace=wrap;html=1;fillColor=#dae8fc;strokeColor=#6c8ebf;fontSize=9;" vertex="1" parent="winhost">
<mxGeometry x="15" y="134" width="180" height="35" as="geometry" />
</mxCell>
<mxCell id="hosts" value="hosts file
.220 → drawio-mcp.local, mcp.drawio.local
.221 → drawio.local" style="rounded=1;whiteSpace=wrap;html=1;fillColor=#fff2cc;strokeColor=#d6b656;fontSize=9;" vertex="1" parent="winhost">
<mxGeometry x="15" y="182" width="180" height="50" as="geometry" />
</mxCell>
<mxCell id="mkcert" value="mkcert CA + NODE_EXTRA_CA_CERTS" style="rounded=1;whiteSpace=wrap;html=1;fillColor=#f5f5f5;strokeColor=#666;fontSize=9;" vertex="1" parent="winhost">
<mxGeometry x="15" y="248" width="180" height="35" as="geometry" />
</mxCell>
...Save the output as a .drawio file and open it at http://drawio.local. After minor alignment adjustments, the result:
Claude Desktop
Claude Desktop’s Settings → Integrations → Add custom connector supports remote MCP servers, but it requires the server to implement OAuth 2.0 — it performs an OAuth discovery handshake before establishing the connection. The local DrawIO-MCP server does not implement OAuth, so this approach will not work against a self-hosted endpoint.
For Claude Desktop integration, the currently supported path is to wait for local MCP support (STDIO transport) or use an MCP-capable client that does not impose an OAuth requirement, such as Claude Code via .mcp.json.
Going Further: Full Local Inference
The setup so far keeps all diagram data local, but inference still calls out to Anthropic’s API. For a fully air-gapped environment — no external network calls at all — the final step is replacing the cloud-hosted LLM with a locally hosted model.
Ollama makes this straightforward. Start a local inference server with:
ollama serveOllama exposes an OpenAI-compatible API at http://localhost:11434. Any MCP client that supports a configurable inference endpoint can be pointed here instead of a cloud provider. Tools such as
Open WebUI
and
Continue.dev
both support this and can connect to MCP servers — including the local https://mcp.drawio.local/mcp endpoint set up in this post.
With Ollama running locally and an MCP-capable client configured to use it, the entire stack — cluster, diagramming, inference, and tooling — operates within the local network with no external dependencies.
Conclusion
This post covered two complementary parts of my homelab build.
The first was migrating from a single-node to a 3-master-node Talos Linux cluster. The single node worked well for day-to-day workloads, but the inability to perform in-place Talos OS upgrades was a hard blocker. Moving to 3 control plane nodes resolved that — the etcd quorum allows rolling upgrades node by node with no cluster downtime. The addition of a VIP, MetalLB for bare-metal load balancing, and the local path provisioner for persistent storage rounds out a cluster that is now stable enough to run production-grade homelab workloads.
The second was building a fully local, privacy-preserving diagramming stack. Self-hosting draw.io eliminates the data exposure inherent in cloud-based tool, which is particularly important when the diagrams describe real infrastructure. Fronting it with Caddy and mkcert gives proper HTTPS on .local hostnames without any public CA dependency. Wiring in the DrawIO-MCP server then makes the whole thing accessible to AI assistants — Claude Code can generate and open diagrams directly in the local editor without any data leaving the network.
The end result is a homelab that is both resilient and self-contained, with AI tooling that operates entirely within the local environment.