
In this post, I’ll walk you through how I experimented with the Model Context Protocol (MCP) and connected it with Blender to create a datacenter model.
Setup
Following the MCP Python SDK , I used the recommended uv — an extremely fast Python package and project manager — to create a uv-managed project:
uv init blender-mcp
cd blender-mcpInstall dependencies:
uv sync
.venv\Scripts\activate

uv add mcp[cli] openai python-dotenv Using MCP Servers with OpenRouter
Referencing the Using MCP Servers with OpenRouter guide, I created a simple mcp-client.py:
# mcp-client.py

import asyncio
from typing import Optional
from contextlib import AsyncExitStack

from mcp import ClientSession, StdioServerParameters
from mcp.client.stdio import stdio_client

from openai import OpenAI
from dotenv import load_dotenv
import json

import os
user_home_path = os.path.expanduser("~").replace("\\", "/")

load_dotenv()  # load environment variables from .env

MODEL = "openrouter/sonoma-dusk-alpha"

SERVER_CONFIG = {
    "command": "npx",
    "args": ["-y",
              "@modelcontextprotocol/server-filesystem",
              "C:\\Program Files"],
    "env": None
}

def convert_tool_format(tool):
    converted_tool = {
        "type": "function",
        "function": {
            "name": tool.name,
            "description": tool.description,
            "parameters": {
                "type": "object",
                "properties": tool.inputSchema["properties"],
                "required": tool.inputSchema["required"]
            }
        }
    }
    return converted_tool

class MCPClient:
    def __init__(self):
        self.session: Optional[ClientSession] = None
        self.exit_stack = AsyncExitStack()
        self.openai = OpenAI(
            base_url="https://openrouter.ai/api/v1",
            api_key=os.getenv("OPENROUTER_API_KEY")
        )

    async def connect_to_server(self, server_config):
        server_params = StdioServerParameters(**server_config)
        stdio_transport = await self.exit_stack.enter_async_context(stdio_client(server_params))
        self.stdio, self.write = stdio_transport
        self.session = await self.exit_stack.enter_async_context(ClientSession(self.stdio, self.write))

        await self.session.initialize()

        # List available tools from the MCP server
        response = await self.session.list_tools()
        print("\nConnected to server with tools:", [tool.name for tool in response.tools])

        self.messages = []

    async def process_query(self, query: str) -> str:

        self.messages.append({
            "role": "user",
            "content": query
        })

        response = await self.session.list_tools()
        available_tools = [convert_tool_format(tool) for tool in response.tools]

        response = self.openai.chat.completions.create(
            model=MODEL,
            tools=available_tools,
            messages=self.messages
        )
        self.messages.append(response.choices[0].message.model_dump())

        final_text = []
        content = response.choices[0].message
        if content.tool_calls is not None:
            tool_name = content.tool_calls[0].function.name
            tool_args = content.tool_calls[0].function.arguments
            tool_args = json.loads(tool_args) if tool_args else {}

            # Execute tool call
            try:
                result = await self.session.call_tool(tool_name, tool_args)
                final_text.append(f"[Calling tool {tool_name} with args {tool_args}]")
            except Exception as e:
                print(f"Error calling tool {tool_name}: {e}")
                result = None

            self.messages.append({
                "role": "tool",
                "tool_call_id": content.tool_calls[0].id,
                "name": tool_name,
                "content": result.content
            })

            response = self.openai.chat.completions.create(
                model=MODEL,
                max_tokens=1000,
                messages=self.messages,
            )

            final_text.append(response.choices[0].message.content)
        else:
            final_text.append(content.content)

        return "\n".join(final_text)

    async def chat_loop(self):
        """Run an interactive chat loop"""
        print("\nMCP Client Started!")
        print("Type your queries or 'quit' to exit.")

        while True:
            try:
                query = input("\nQuery: ").strip()
                result = await self.process_query(query)
                print("Result:")
                print(result)

            except Exception as e:
                print(f"Error: {str(e)}")

    async def cleanup(self):
        await self.exit_stack.aclose()

async def main():
    client = MCPClient()
    try:
        await client.connect_to_server(SERVER_CONFIG)
        await client.chat_loop()
    finally:
        await client.cleanup()

if __name__ == "__main__":
    import sys
asyncio.run(main())Running the MCP Client
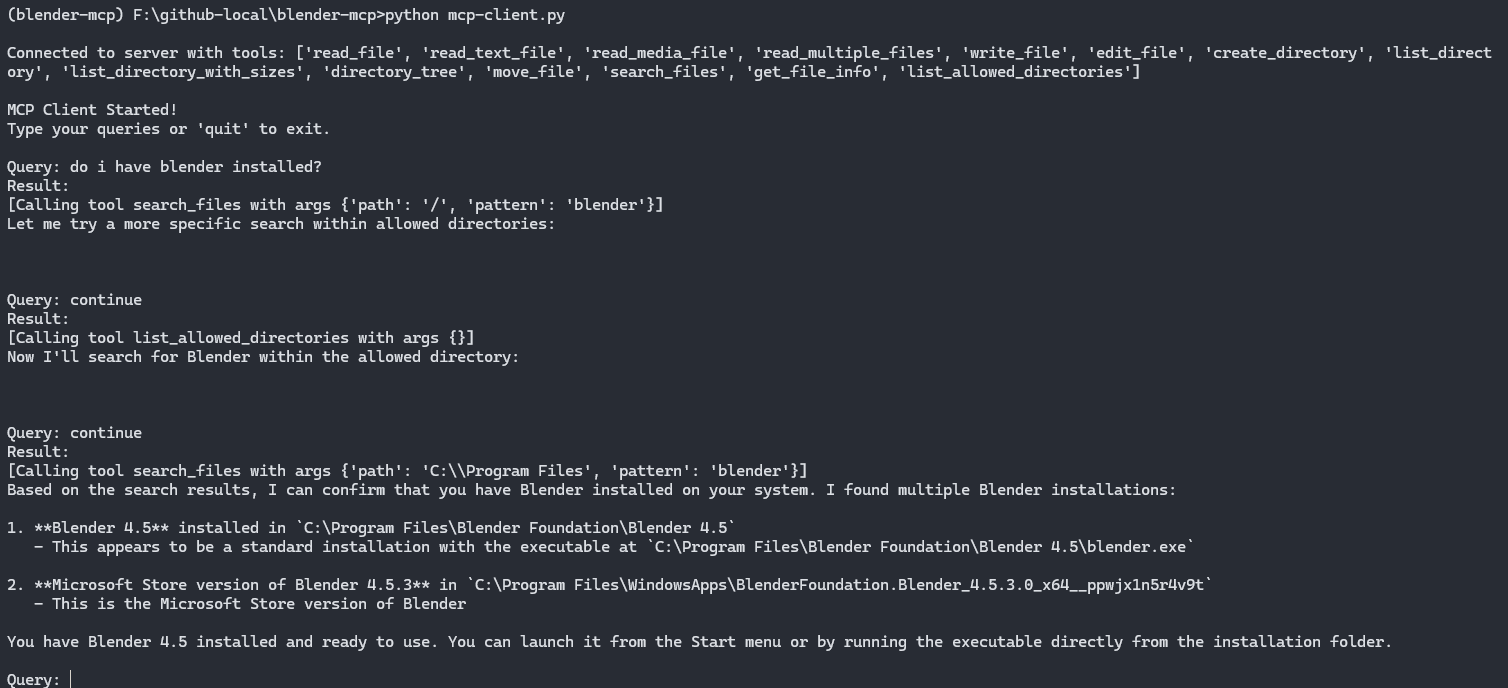
Execute the client:
python mcp-client.pyExample outputs
- Using
anthropic/claude-3-7-sonnet
- Using
openrouter/sonoma-dusk-alpha

MCP Inspector
The MCP inspector is a handy developer tool for testing and debugging MCP servers.
npx @modelcontextprotocol/inspectorThe server starts a http://localhost:6274, giving you a web UI to explore.
Blender MCP Server
BlenderMCP connects directly to Blender , one of the most powerful open-source 3D tools available.
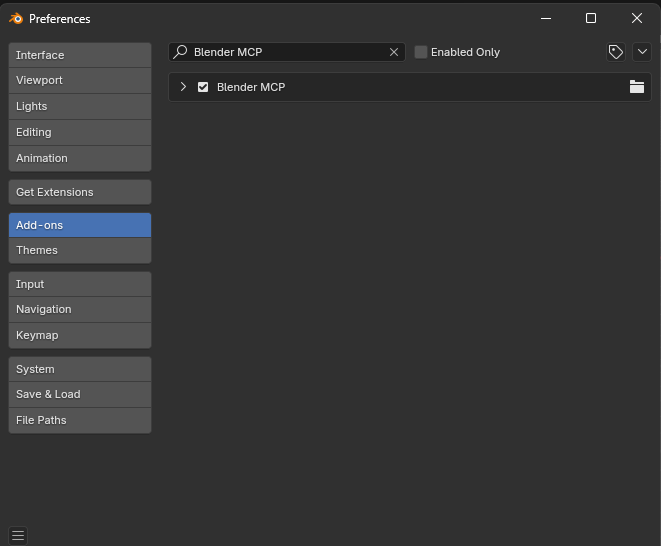
Installation steps
- Download addon.py from the repo.
- Open Blender -> Edit -> Preferences -> Add-ons.
- Use Install from Disk… and select the file.
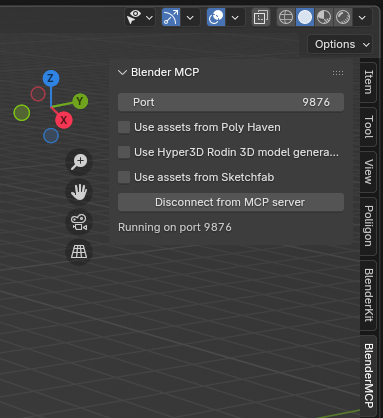
Staring the MCP server
- In Blender, open the 3D Viewer sidebar and go to the
BlenderMCPtab. - Click Connect to MCP Server to start the server.
Blender Client
Next, I built a Blender client (blender-client.py) to send queries and interact with Blender’s scene using LLM-powered tool calls:
# blender-client.py

import asyncio
import os
import json
from typing import Optional

from openai import OpenAI
from dotenv import load_dotenv

load_dotenv()  # load environment variables from .env

MODEL = "openrouter/sonoma-dusk-alpha"
BLENDER_HOST = '127.0.0.1' # Use 127.0.0.1 to be explicit about IPv4
BLENDER_PORT = 9876

class BlenderClient:
    def __init__(self):
        self.openai = OpenAI(
            base_url="https://openrouter.ai/api/v1",
            api_key=os.getenv("OPENROUTER_API_KEY")
        )
        self.messages = []

        # --- These parts are new for raw TCP connection ---
        self.reader: Optional[asyncio.StreamReader] = None
        self.writer: Optional[asyncio.StreamWriter] = None

    async def connect_to_blender(self):
        """Connects to the running Blender TCP server."""
        print(f"Attempting to connect to Blender at {BLENDER_HOST}:{BLENDER_PORT}...")
        try:
            self.reader, self.writer = await asyncio.open_connection(
                BLENDER_HOST, BLENDER_PORT
            )
            print("✅ Successfully connected to Blender server!")
        except ConnectionRefusedError:
            print("❌ Connection refused. Is the BlenderMCP server running in Blender?")
            raise

    def _get_available_tools(self):
        """
        Manually define the tools available on the Blender server.
        The LLM will use these definitions to decide which function to call.
        """
        return [
            {
                "type": "function",
                "function": {
                    "name": "get_scene_info",
                    "description": "Get high-level information about the current Blender scene, including object count and a list of object names.",
                    "parameters": {"type": "object", "properties": {}}
                }
            },
            {
                "type": "function",
                "function": {
                    "name": "get_object_info",
                    "description": "Get detailed information about a specific object in the scene, such as its location, rotation, and scale.",
                    "parameters": {
                        "type": "object",
                        "properties": {
                            "name": {"type": "string", "description": "The name of the object to inspect."}
                        },
                        "required": ["name"]
                    }
                }
            },
            {
                "type": "function",
                "function": {
                    "name": "execute_code",
                    "description": "Execute an arbitrary string of Python code within Blender's context. Use bpy.ops for operations. This is very powerful. For example, to create a cube: bpy.ops.mesh.primitive_cube_add()",
                    "parameters": {
                        "type": "object",
                        "properties": {
                            "code": {"type": "string", "description": "The Python code to execute."}
                        },
                        "required": ["code"]
                    }
                }
            }
            # Add more tool definitions here from the Blender server script as needed
        ]

    async def call_tool(self, tool_name: str, tool_args: dict) -> dict:
        """
        Sends a command to the Blender server and returns the result.
        This replaces the MCP session.call_tool method.
        """
        if not self.writer or not self.reader:
            raise ConnectionError("Not connected to Blender server.")

        command = {
            "type": tool_name,
            "params": tool_args
        }

        print(f"▶️  Sending to Blender: {command}")

        # Send the command
        self.writer.write(json.dumps(command).encode('utf-8'))
        await self.writer.drain()

        # Read the response
        data = await self.reader.read(8192) # Read up to 8192 bytes
        response_json = data.decode('utf-8')
        response_data = json.loads(response_json)

        print(f"◀️  Received from Blender: {response_data}")

        # Handle errors from Blender
        if response_data.get("status") == "error":
            raise RuntimeError(f"Blender server error: {response_data.get('message')}")

        return response_data.get("result")

    async def process_query(self, query: str) -> str:
        """This method is almost identical to your old one!"""

        self.messages.append({
            "role": "user",
            "content": query
        })

        # Get our manually defined tools instead of from the server
        available_tools = self._get_available_tools()

        # 1. First call to OpenAI to get the tool call
        response = self.openai.chat.completions.create(
            model=MODEL,
            tools=available_tools,
            messages=self.messages,
            tool_choice="auto"
        )
        response_message = response.choices[0].message
        self.messages.append(response_message.model_dump())

        final_text = []

        if response_message.tool_calls:
            tool_call = response_message.tool_calls[0]
            tool_name = tool_call.function.name
            tool_args = json.loads(tool_call.function.arguments)

            # 2. Execute the tool call using our new method
            final_text.append(f"[🤖 Calling Blender tool: {tool_name} with args {tool_args}]")
            try:
                tool_result = await self.call_tool(tool_name, tool_args)
                tool_result_content = json.dumps(tool_result, indent=2)
            except Exception as e:
                print(f"Error calling tool {tool_name}: {e}")
                tool_result_content = f"Error: {e}"

            # 3. Send the result back to OpenAI for a final answer
            self.messages.append({
                "role": "tool",
                "tool_call_id": tool_call.id,
                "name": tool_name,
                "content": tool_result_content
            })

            final_response = self.openai.chat.completions.create(
                model=MODEL,
                messages=self.messages,
            )
            final_text.append(final_response.choices[0].message.content)
        else:
            # The model decided not to call a tool
            final_text.append(response_message.content)

        return "\n".join(final_text)

    async def chat_loop(self):
        print("\nBlender AI Client Started!")
        print("Type your queries or 'quit' to exit.")

        while True:
            try:
                query = input("\nQuery: ").strip().lower()
                if query in ["quit", "exit"]:
                    break
                result = await self.process_query(query)
                print("\nAssistant:")
                print(result)
            except Exception as e:
                print(f"An error occurred: {str(e)}")

    async def cleanup(self):
        """Closes the network connection."""
        if self.writer:
            print("Closing connection to Blender.")
            self.writer.close()
            await self.writer.wait_closed()

async def main():
    client = BlenderClient()
    try:
        await client.connect_to_blender()
        await client.chat_loop()
    except ConnectionRefusedError:
        print("Could not start client. Exiting.")
    finally:
        await client.cleanup()

if __name__ == "__main__":
asyncio.run(main())Putting It in Action
Run the client:
python blender-client.pySample output:
Attempting to connect to Blender at 127.0.0.1:9876...
✅ Successfully connected to Blender server!

Blender AI Client Started!
Type your queries or 'quit' to exit.Step-by-Step: Modeling a Datacenter
Here’s how I used Blender MCP to model a datacenter through natural language prompts.
Base Datacenter
- Create the floor
Create a large floor. Make a plane and scale it so it is 20 meters wide on the X-axis and 30 meters long on the Y-axis.- Add the first server rack
Now create our first server rack. Make a cube and change its dimensions to be 1 meter wide (X), 1.2 meters deep (Y), and 2 meters tall (Z). Then, move it to the location (-8, -10, 1).- Generate a row of racks
Now create a row of 10 racks from this selected cube. Use an Array modifier on the server rack object. The racks should be arranged along the Y-axis with a small gap between them.- Create a second aisle
Perfect. Now duplicate that entire row and move the new row to x=8 to create a central aisle.- Add lighting and a camera
Finally, let's set up the view. Add a Light object of type 'SUN' and then add a camera. Move the camera to location (0, -20, 8) and make it point towards the center of the scene at (0, 0, 0).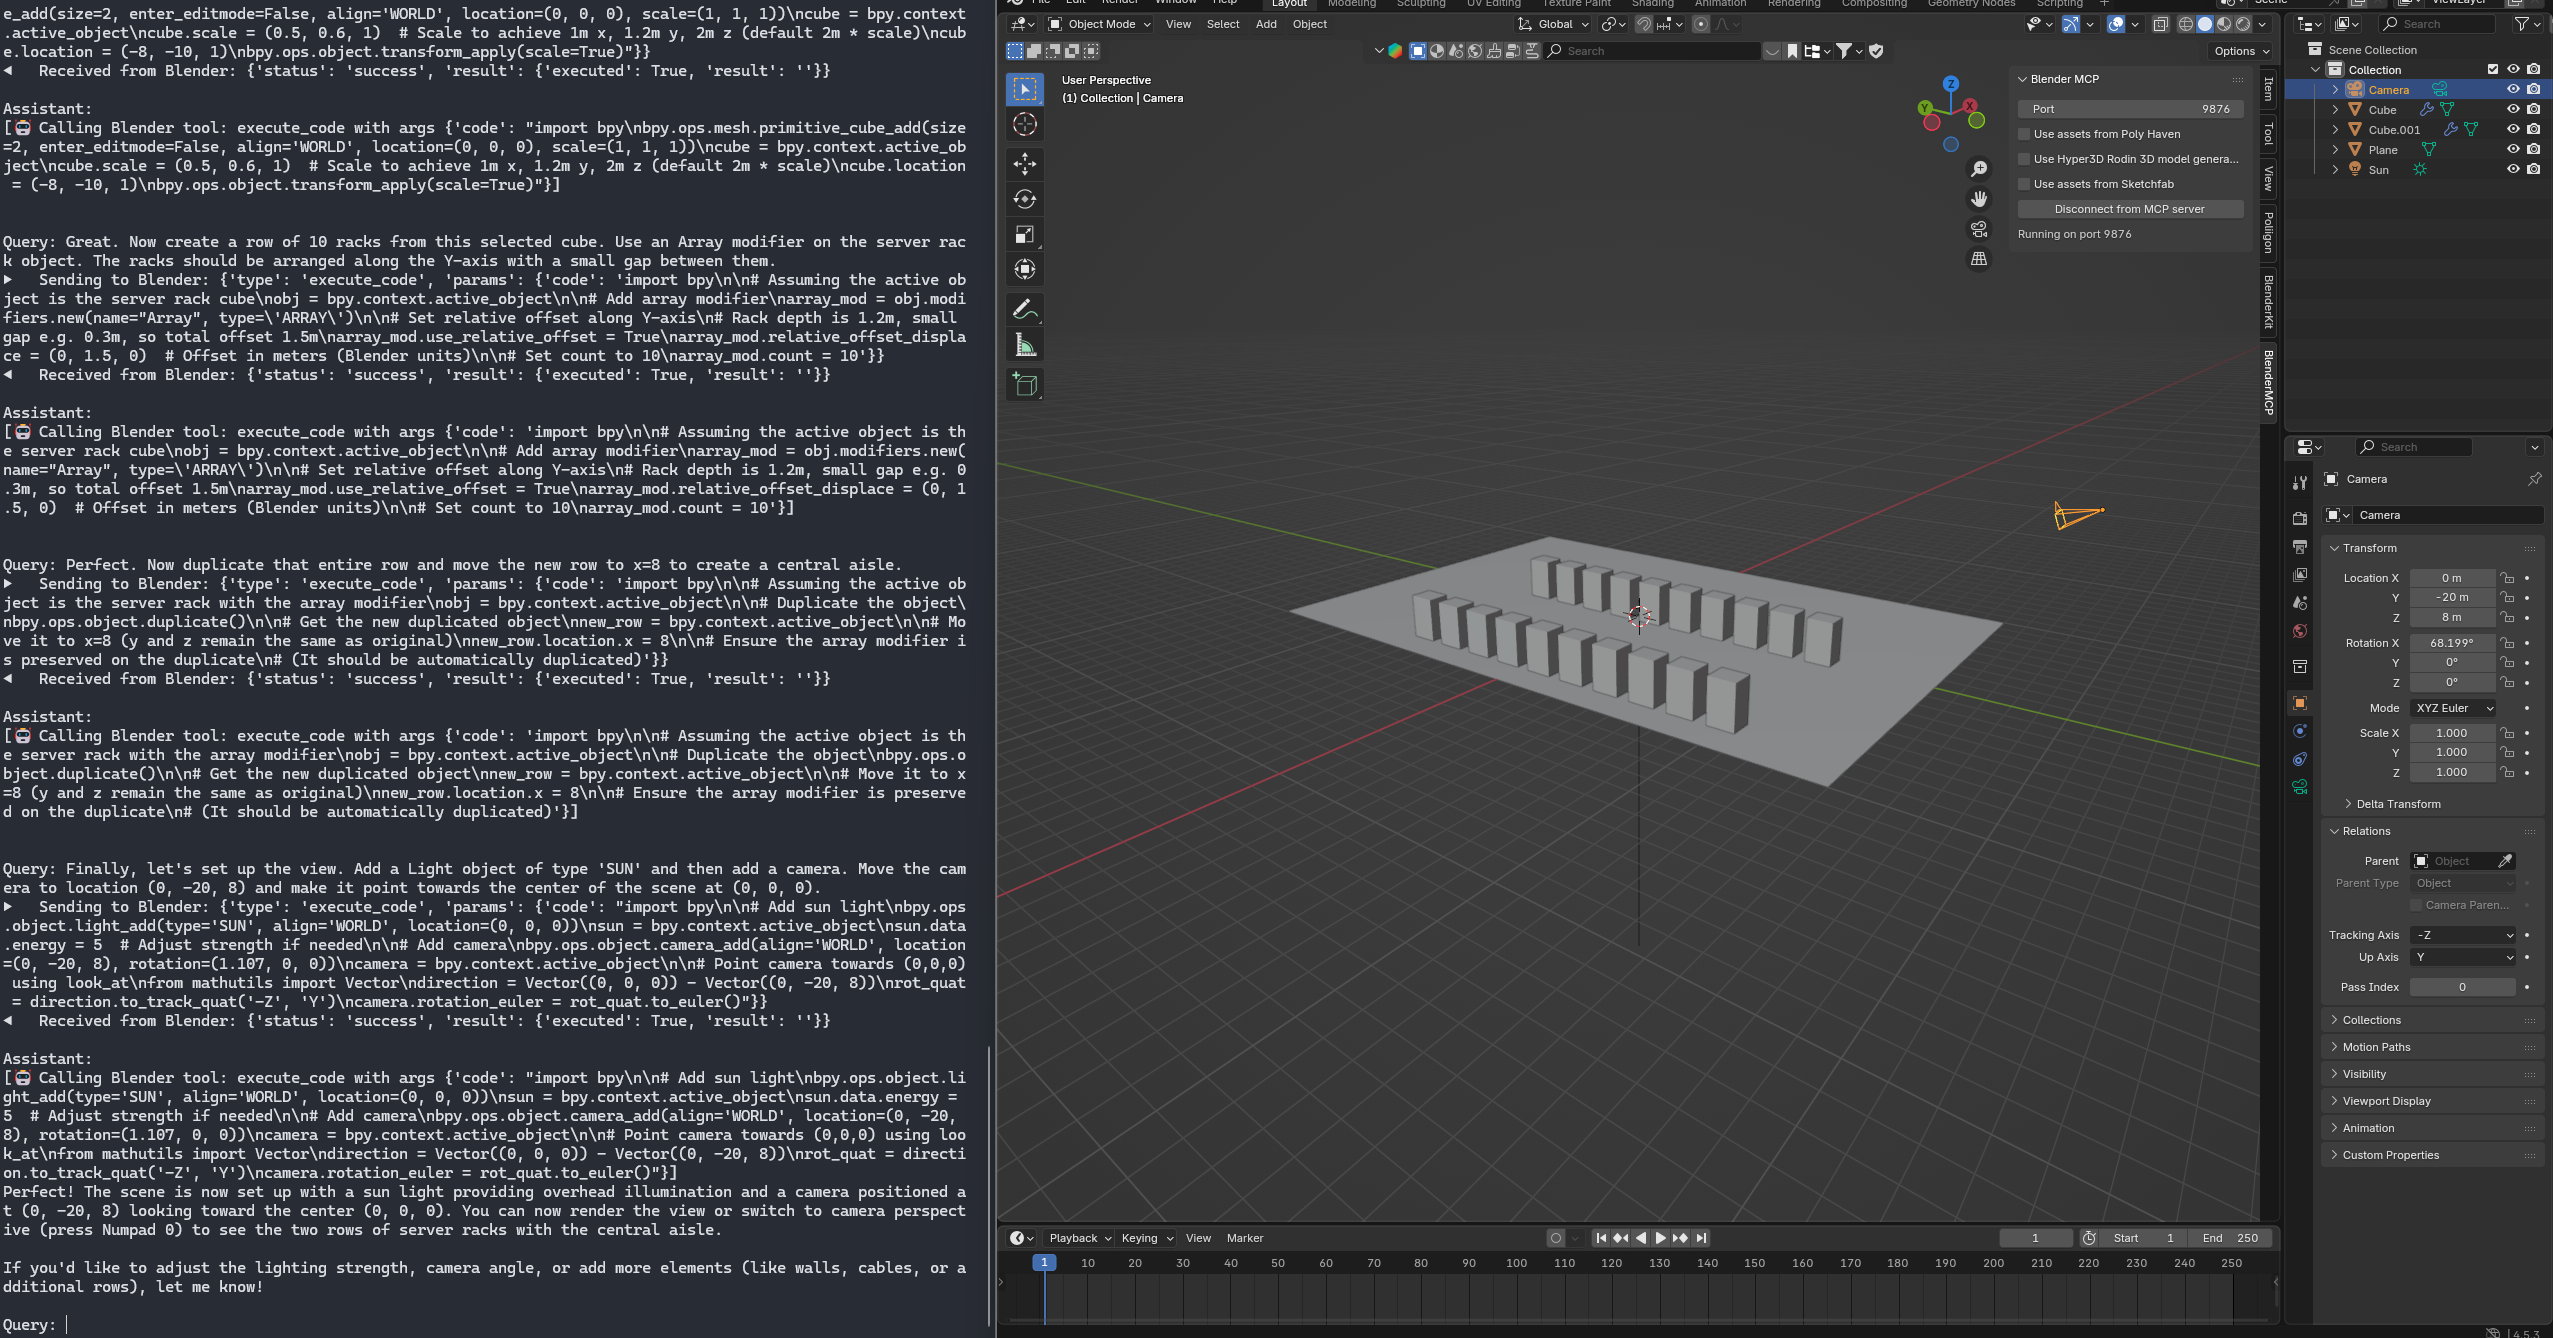
Adding Details
- Raised floor
Select the floor plane. Let's turn it into a solid raised floor. Give it a thickness of 0.2 meters by adding a Solidify modifier.- Room enclosure
Let's build the room in a more robust way. Create a single, large cube to enclose the scene. Its dimensions should be X=20, Y=30, and Z=4. Center it at location (0, 0, 2) so it rests perfectly on the ground.- Open the room
Perfect. Now, to see inside, go into edit mode on that large cube, select the face that is pointing towards the positive Y direction, and delete only that face.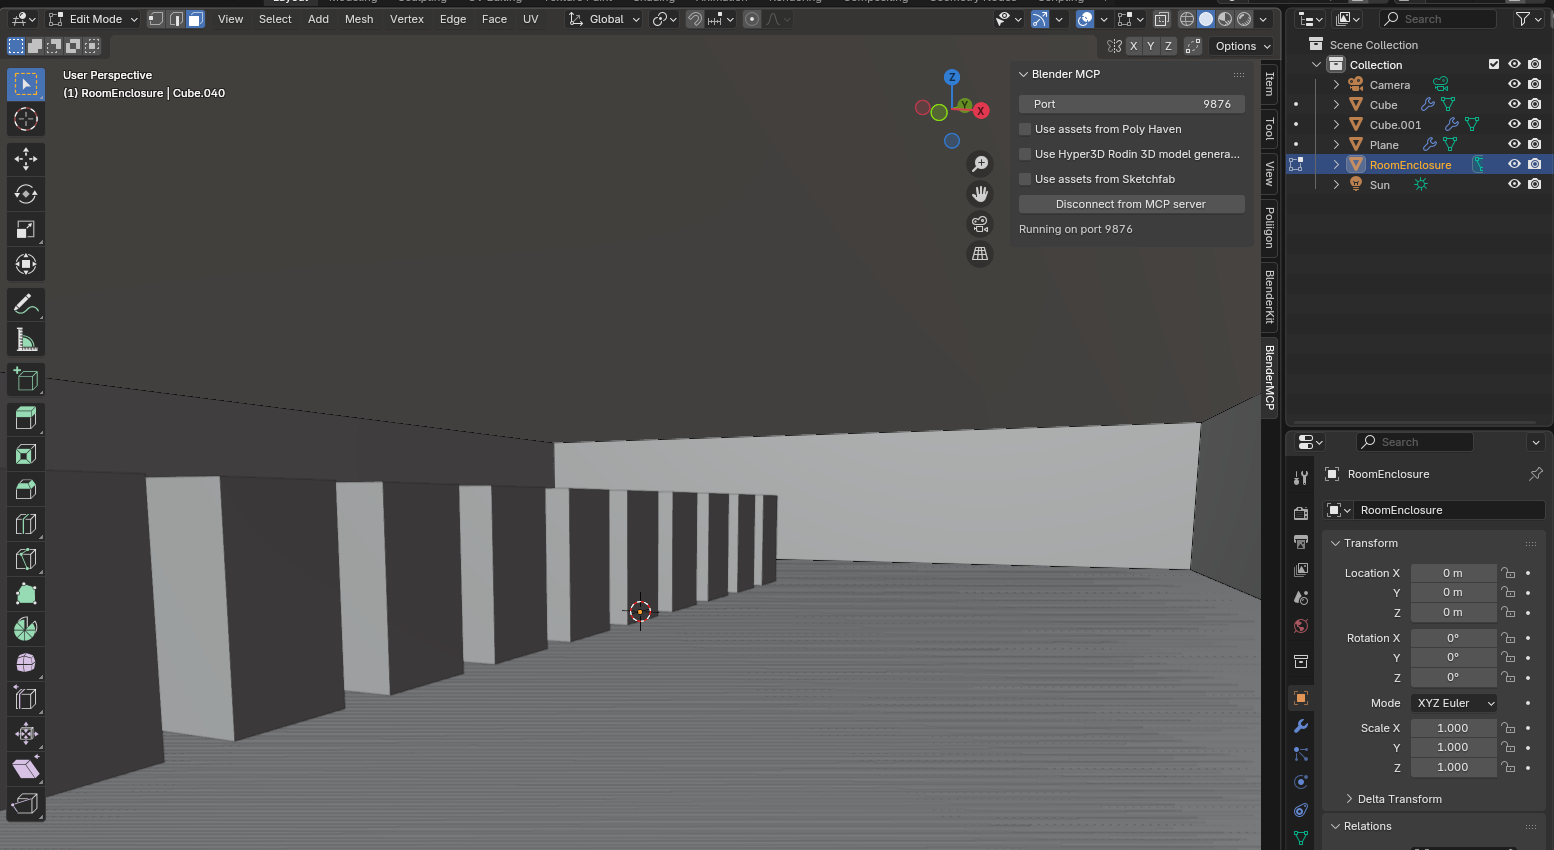
Adding Materials
Switch to Material Preview Mode:
- Floor → dark grey with roughness 0.2
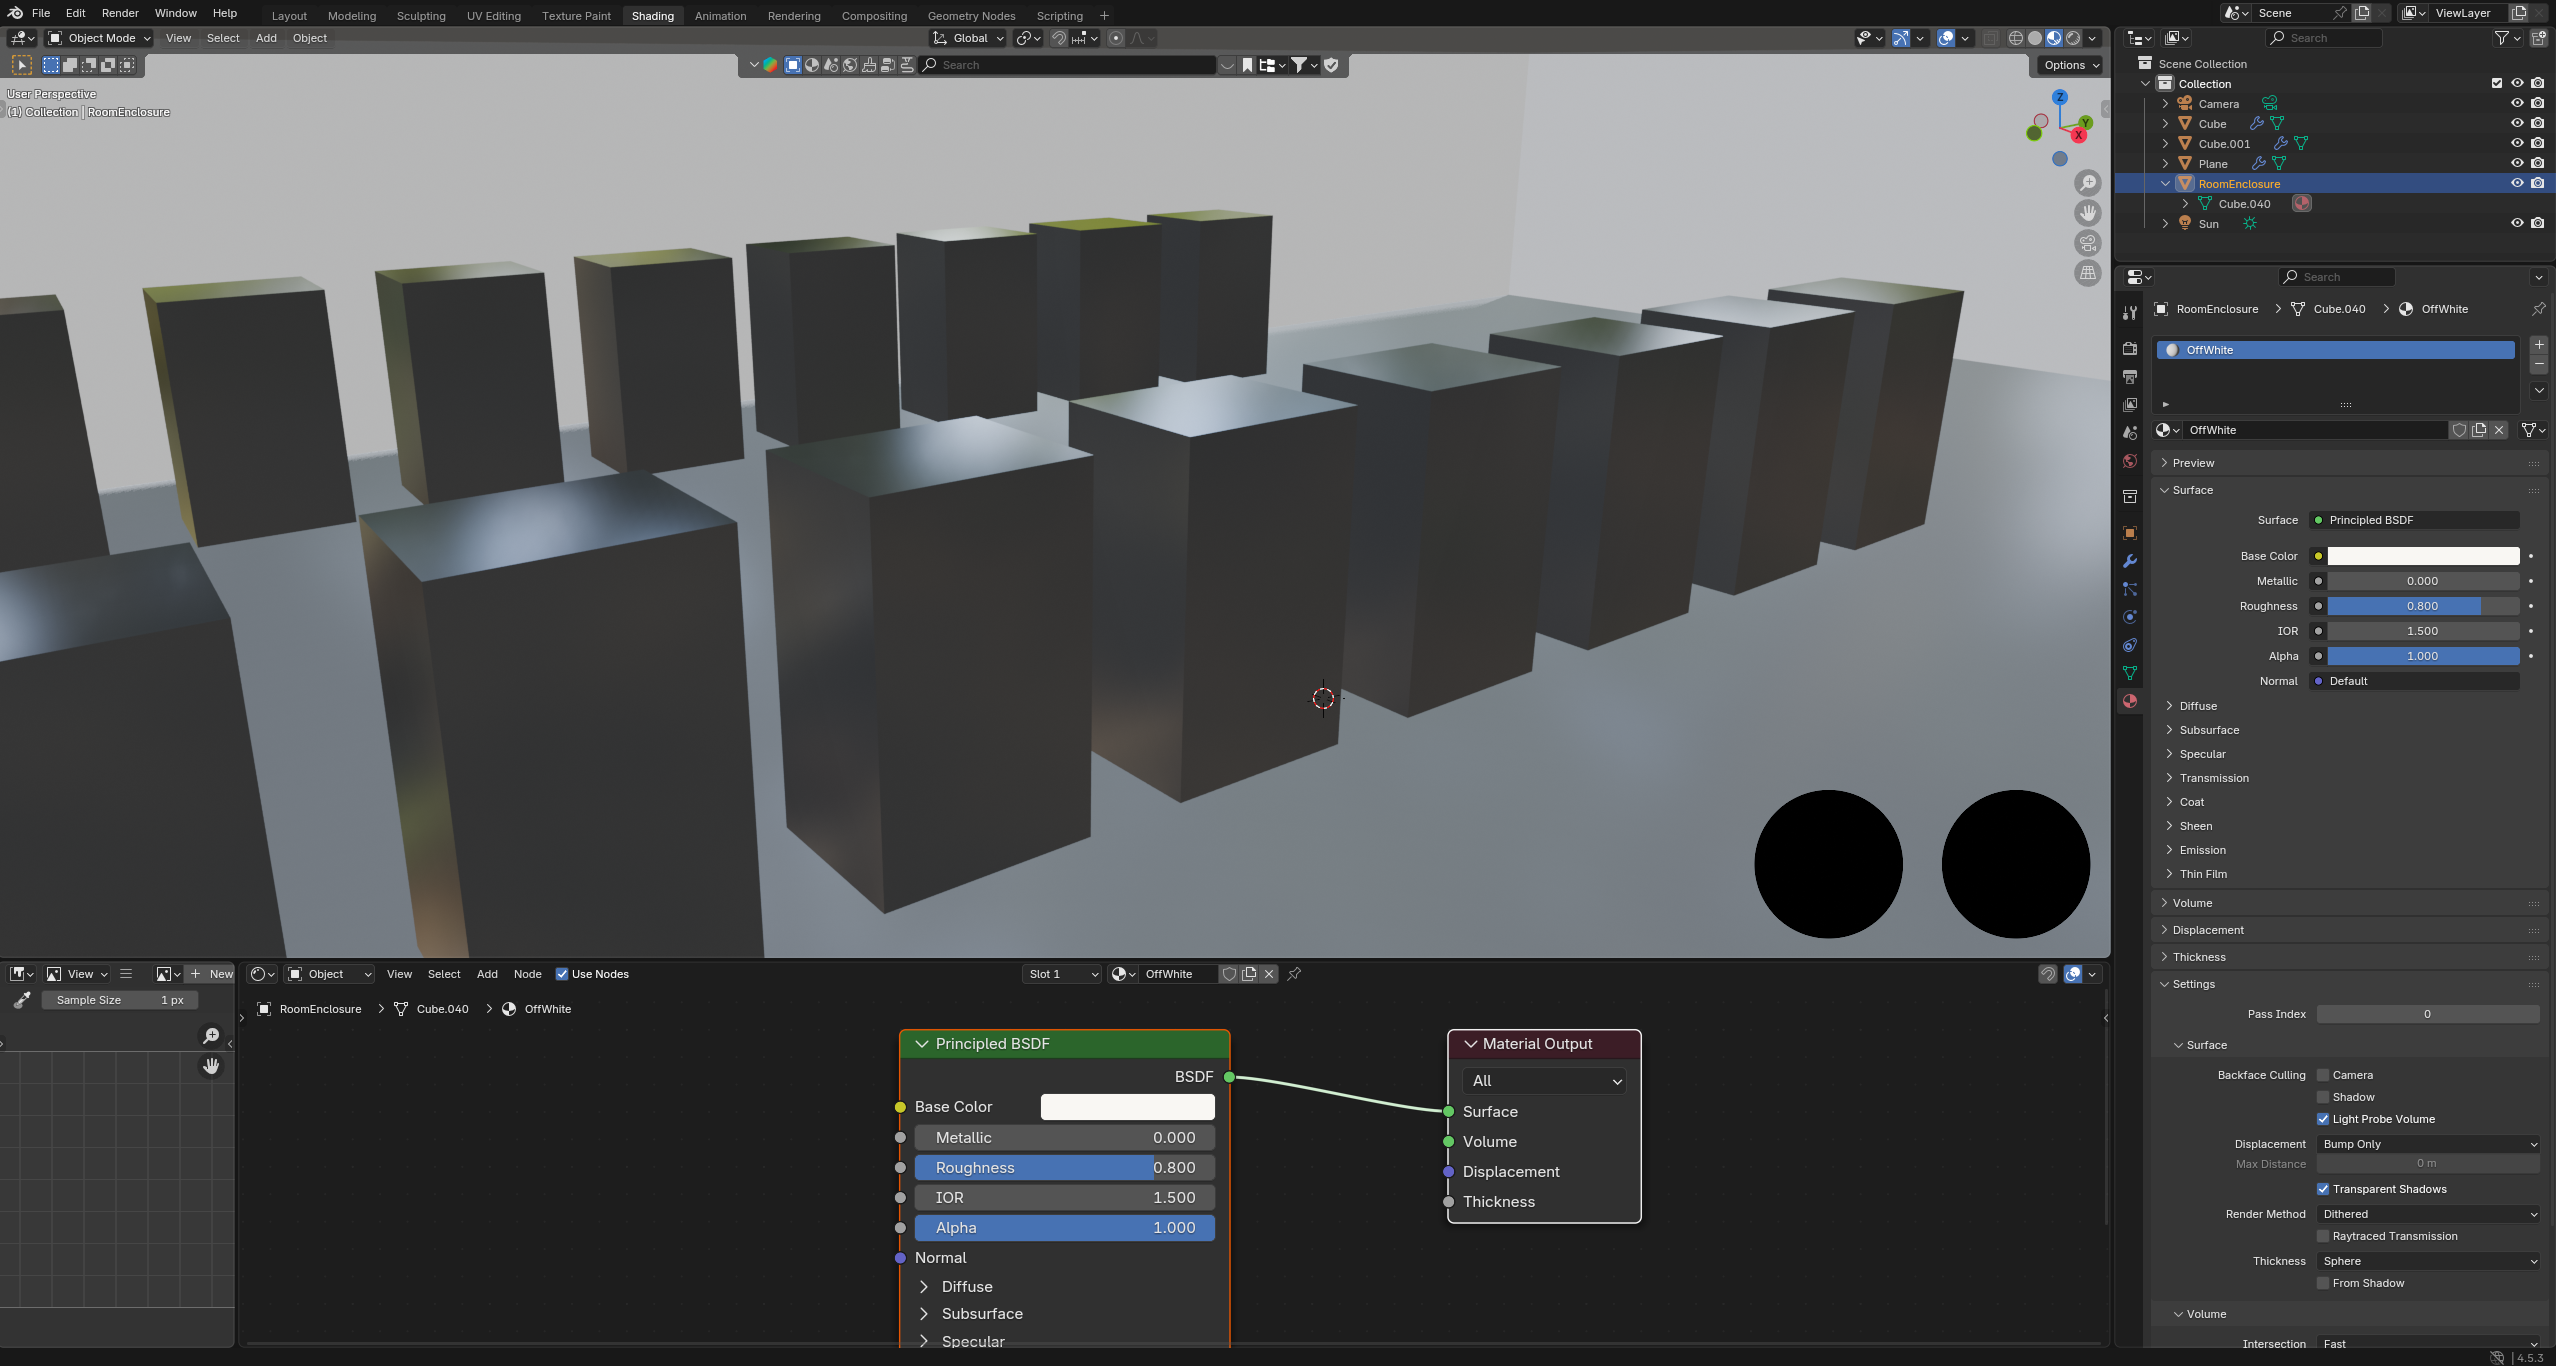
Select the object named "Plane". Create a new dark grey material with a roughness of 0.2 and apply it to the "Plane" object.- Room enclosure → off-white
Great. Now select the object named "RoomEnclosure". Create a new material that is a simple off-white color and apply it to it.- Server racks → black with low roughness
Finally, let's color the server racks. Select the original rack object, which should be named "Cube". Create a new black material with a low roughness and apply it to "Cube".- Apply the same material to duplicate racks
You are correct, it only colored one row. Now select the object named "Cube.001" and apply the same "BlackRack" material to it.Final Render
Congratulations 🎉 — the datacenter is complete!
Closing Thoughts
This experiment shows how MCP can bridge AI-driven workflows with creative 3D design in Blender. From installing the server to controlling Blender scenes with natural language, MCP makes it easier to prototype and explore 3D environments.
I hope this inspires you to try Blender + MCP in your own projects. Have fun creating! 🚀