It was an incredibly busy June, as I had the chance to participate in the World’s Largest Hackathon . Through this, I gained first-hand experience with Vibe Coding —a term coined by Andrej Karpathy —which refers to coding with the support of LLMs in an interactive and exploratory manner.
I started the project using Bolt.new , set up my backend quickly with Supabase , and deployed the frontend seamlessly using Netlify . In this post, I’ll share how I took the project further by running bolt.diy locally—experimenting with different models through OpenRouter and deploying my own LLM-assisted text utility tool, TextForge.
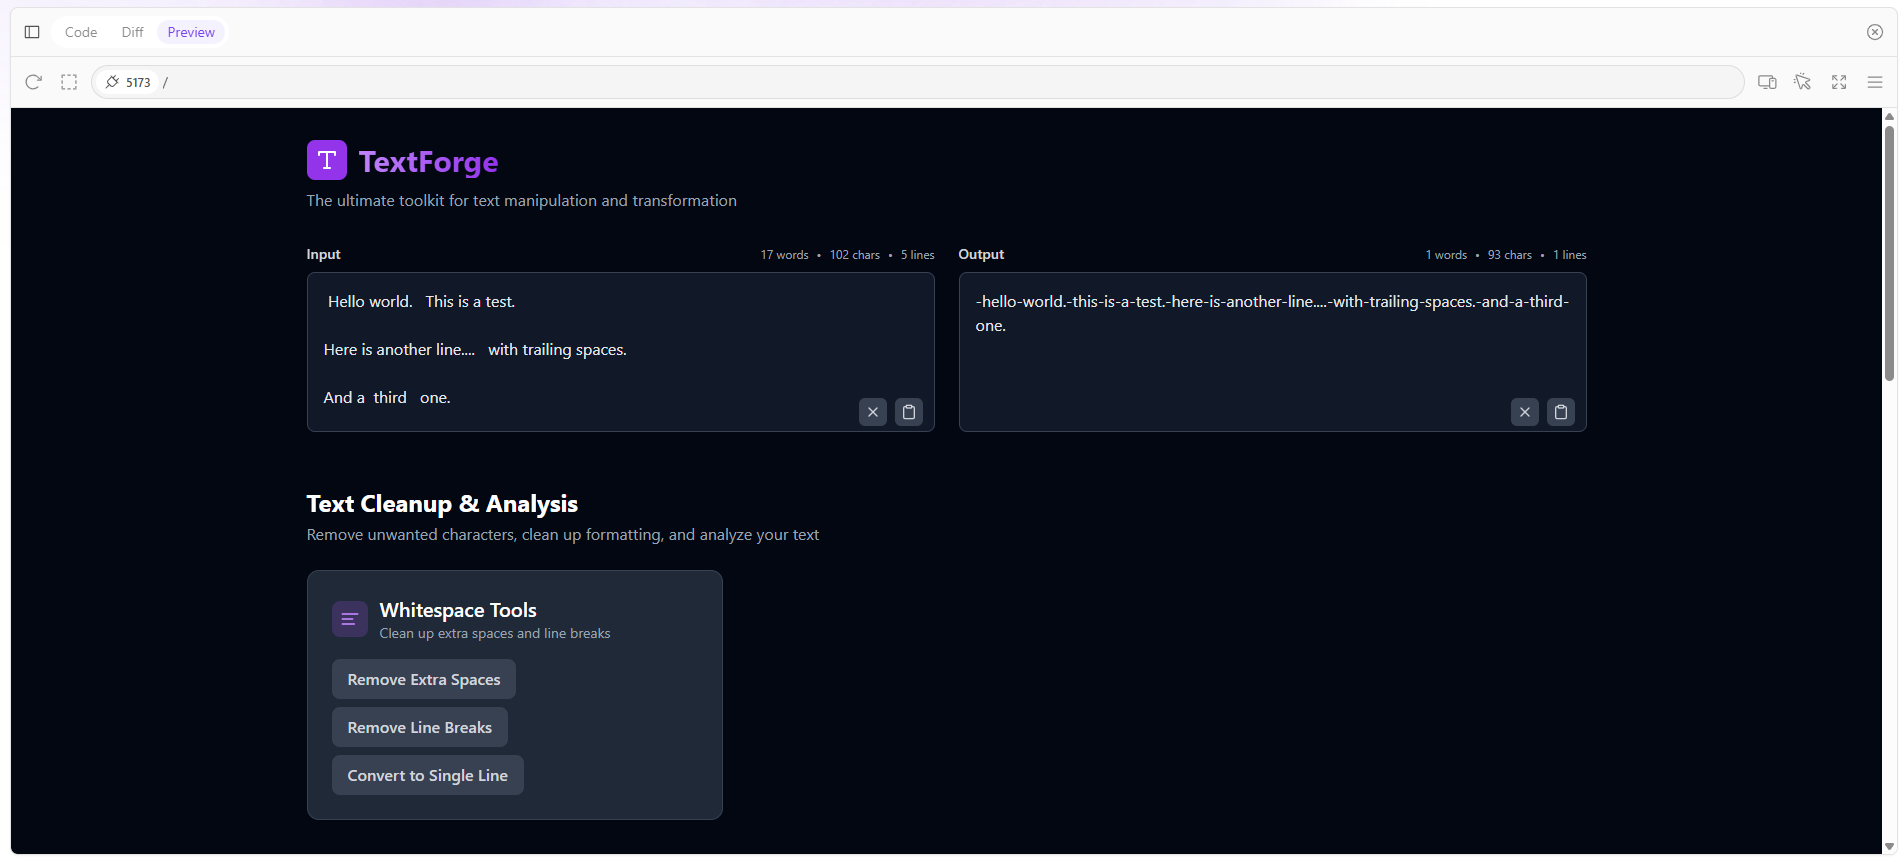
One-Shot Challenge Entry: TextForge
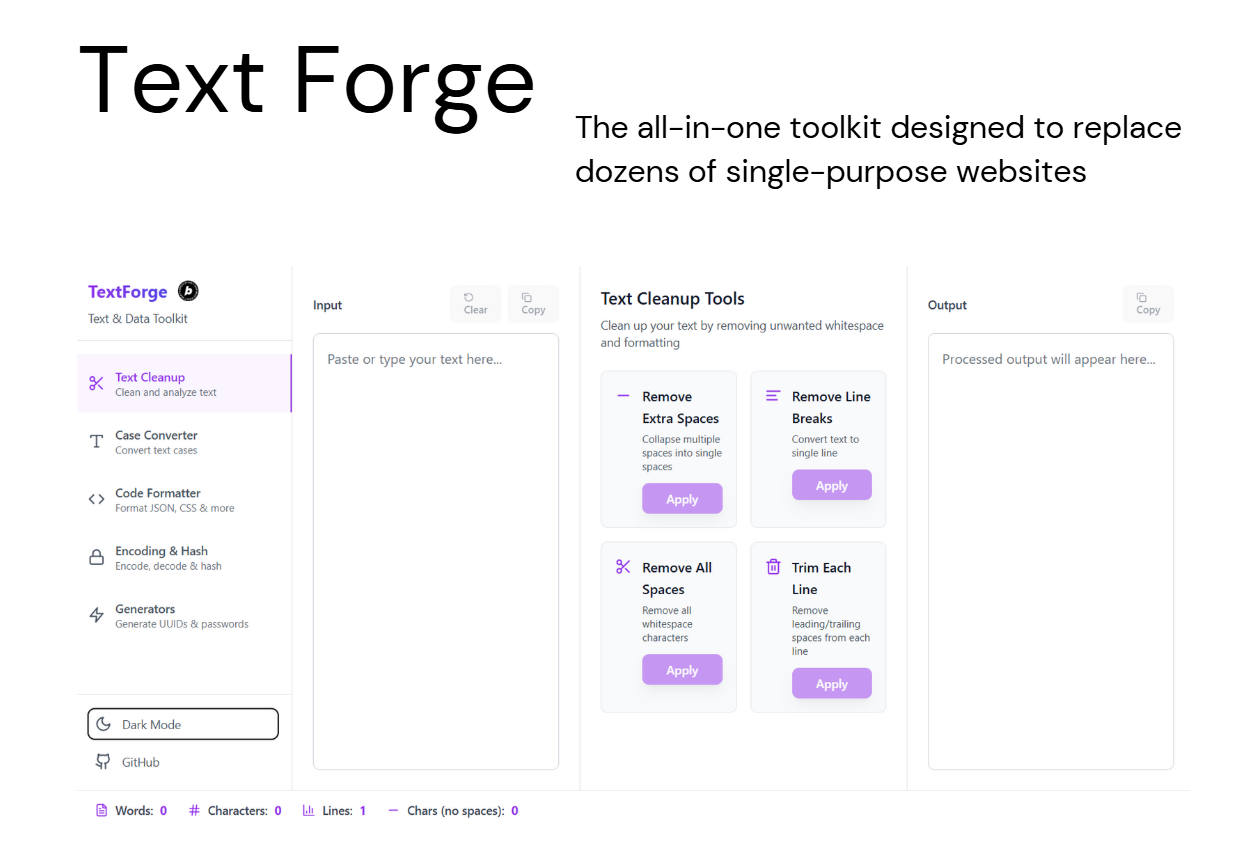
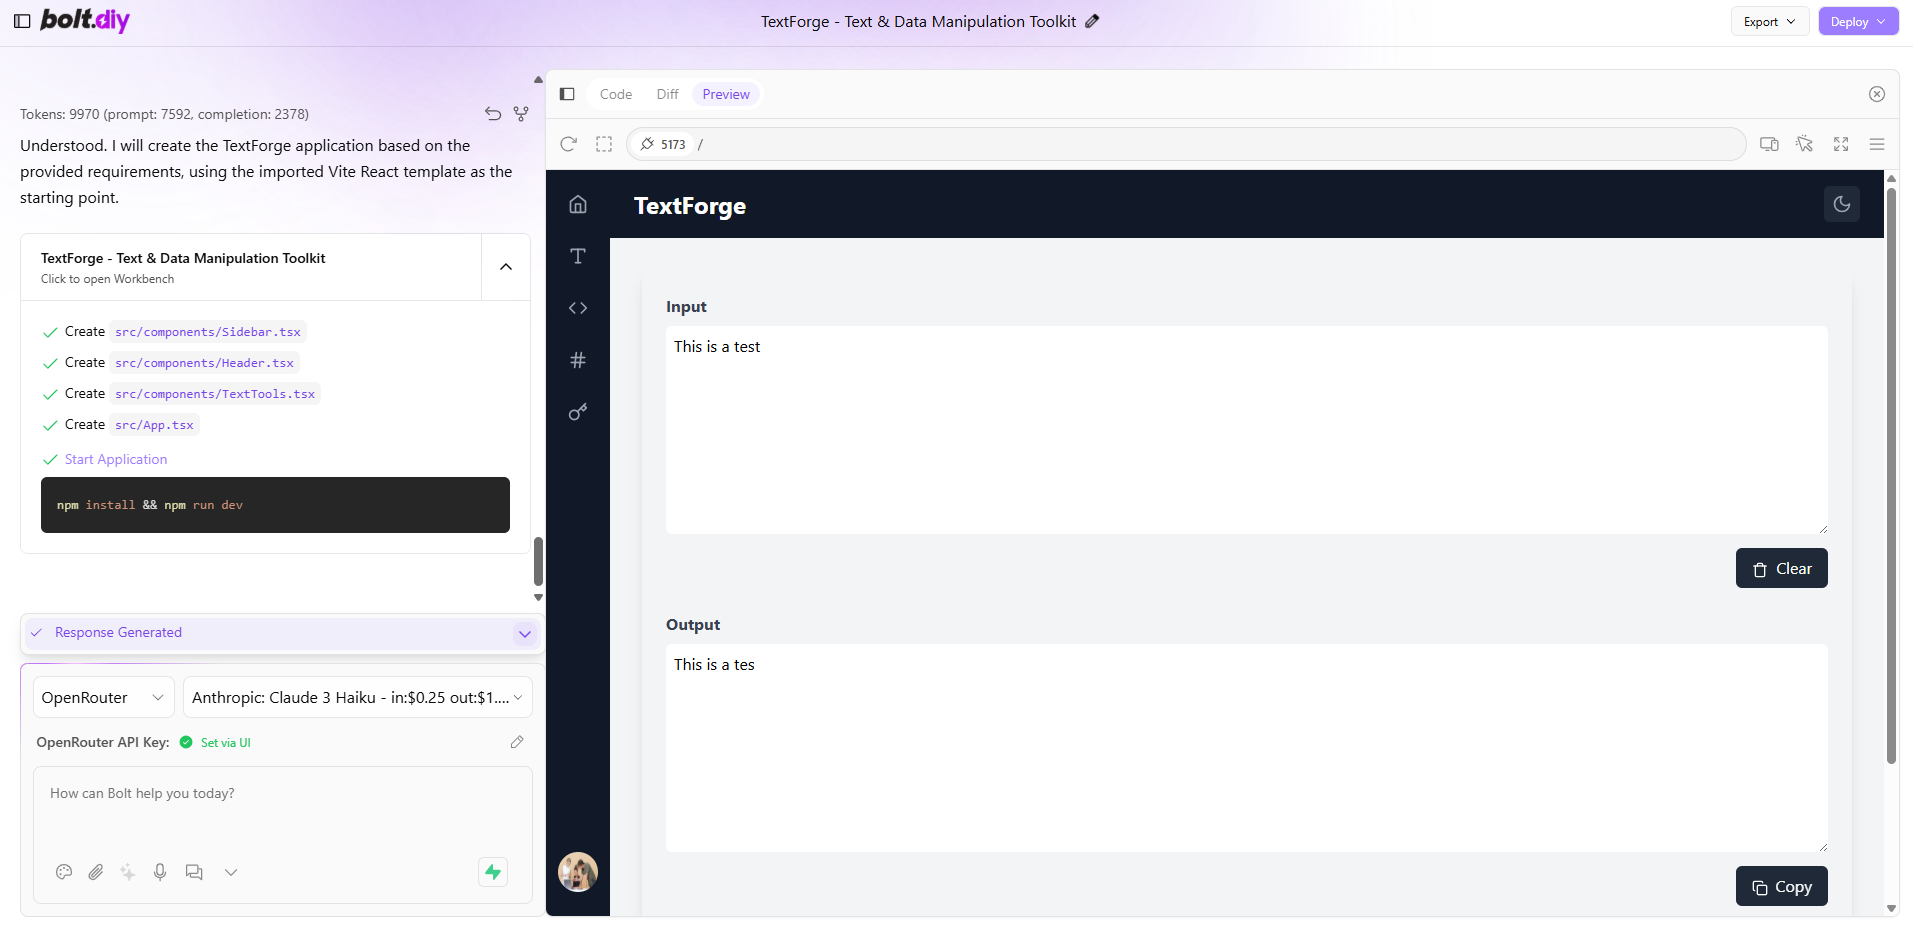
For the hackathon’s One-Shot Challenge, I submitted TextForge —a multi-functional toolkit tailored for text and data manipulation. It’s a developer-focused playground for quickly cleaning, formatting, converting, and analyzing text.
After iterating on various prompts and refining the features, I settled on a version that delivered just the right blend of utility and user experience. You can try the hosted TextForge demo here .
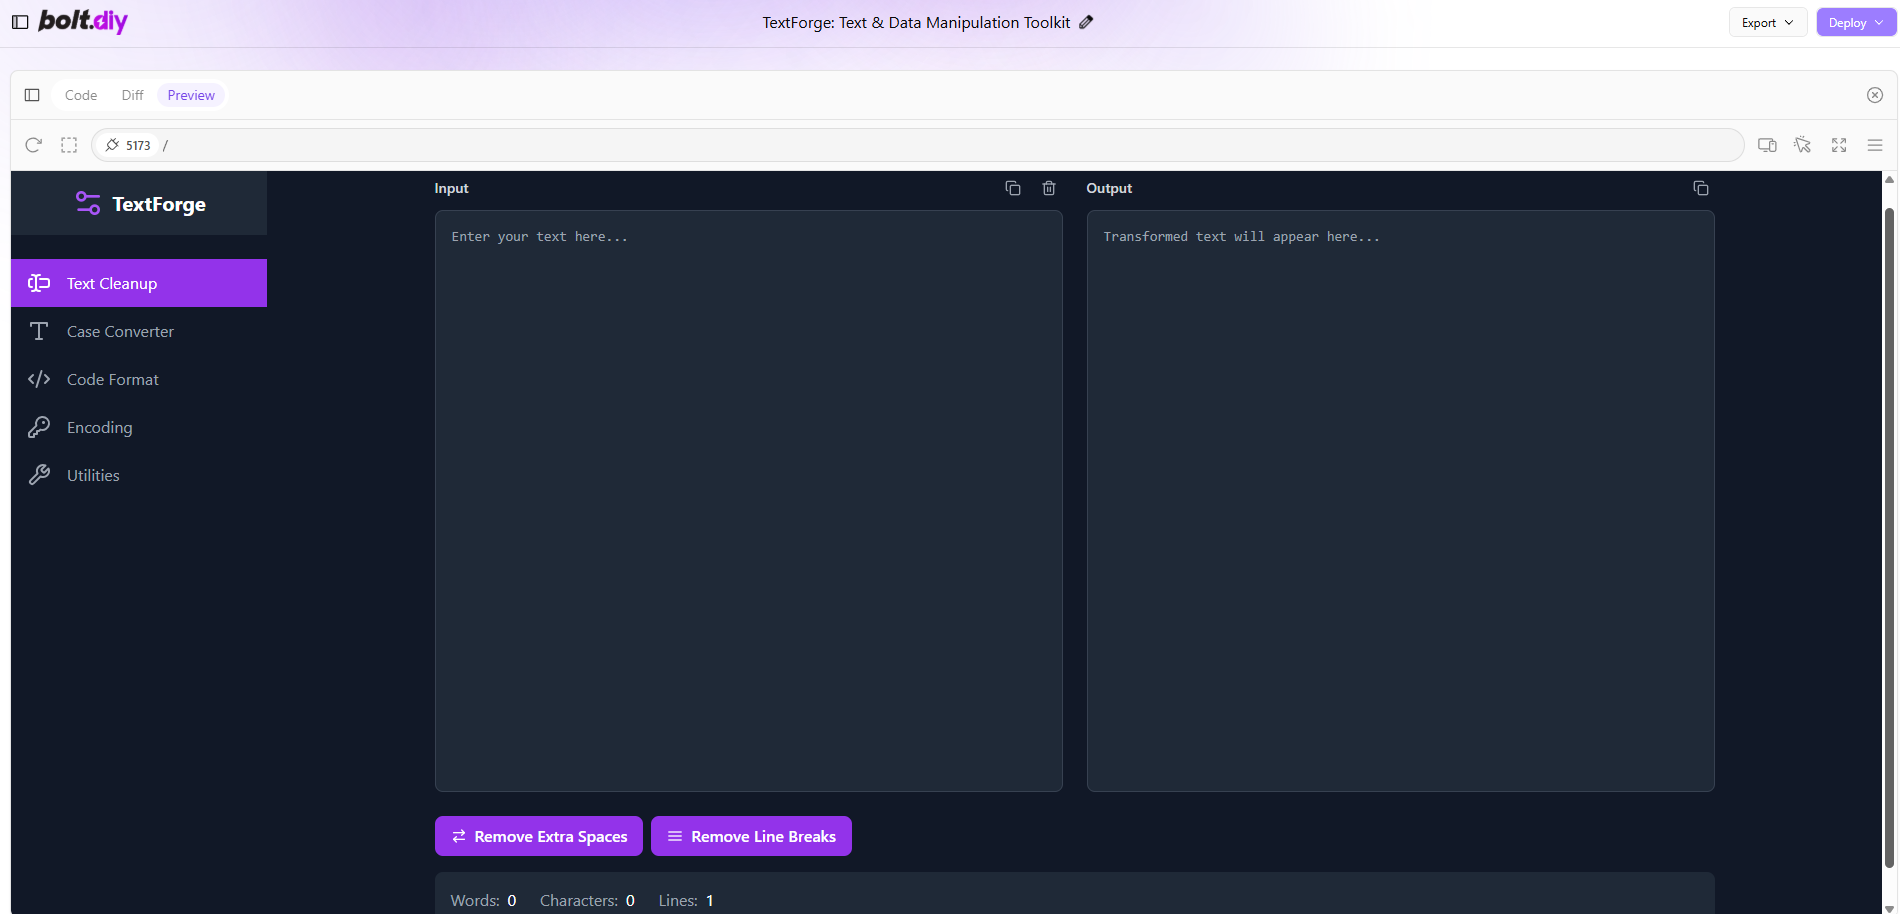
Prerequiste: Cloning and Running bolt.diy Locally
bolt.diy is the open-source counterpart to bolt.new, giving you the freedom to self-host and configure your preferred LLMs for prompt generation and code synthesis.
Clone the Repository
git clone https://github.com/stackblitz-labs/bolt.diy.git
cd bolt.diyInstall Dependencies and Run
npm install -g pnpm
pnpm install
pnpm run devYou should see the startup CLI confirming the dev server is active:
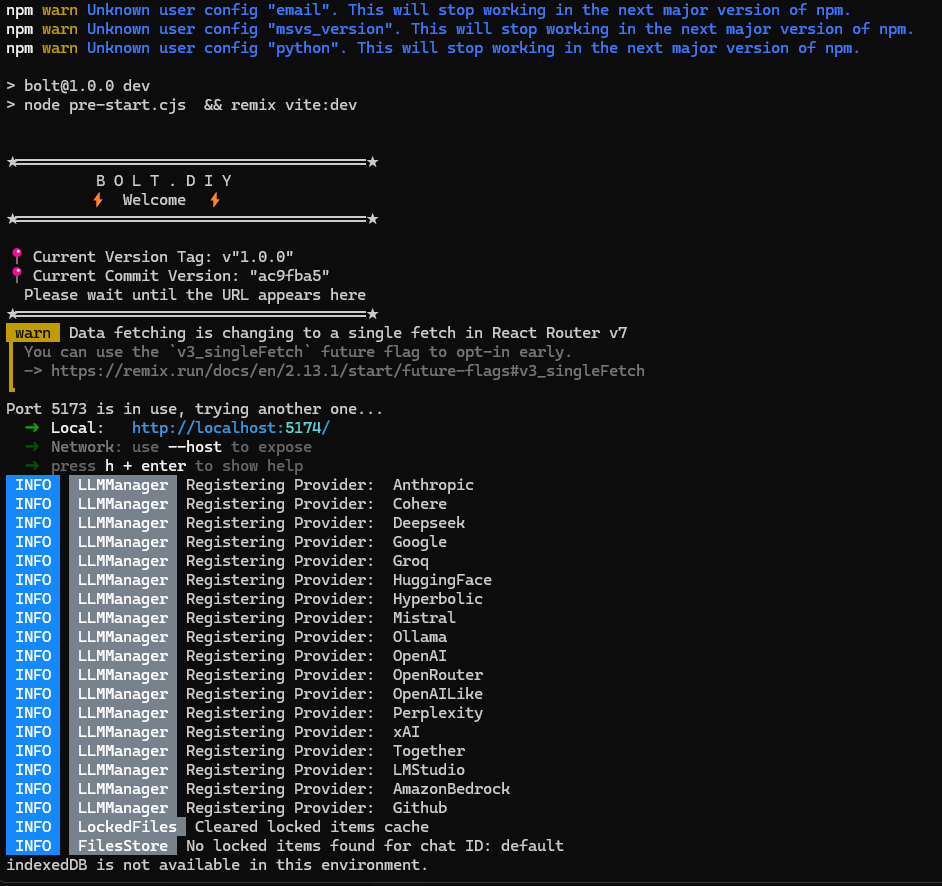
Then, navigate to your local instance, typically at http://localhost:5173:
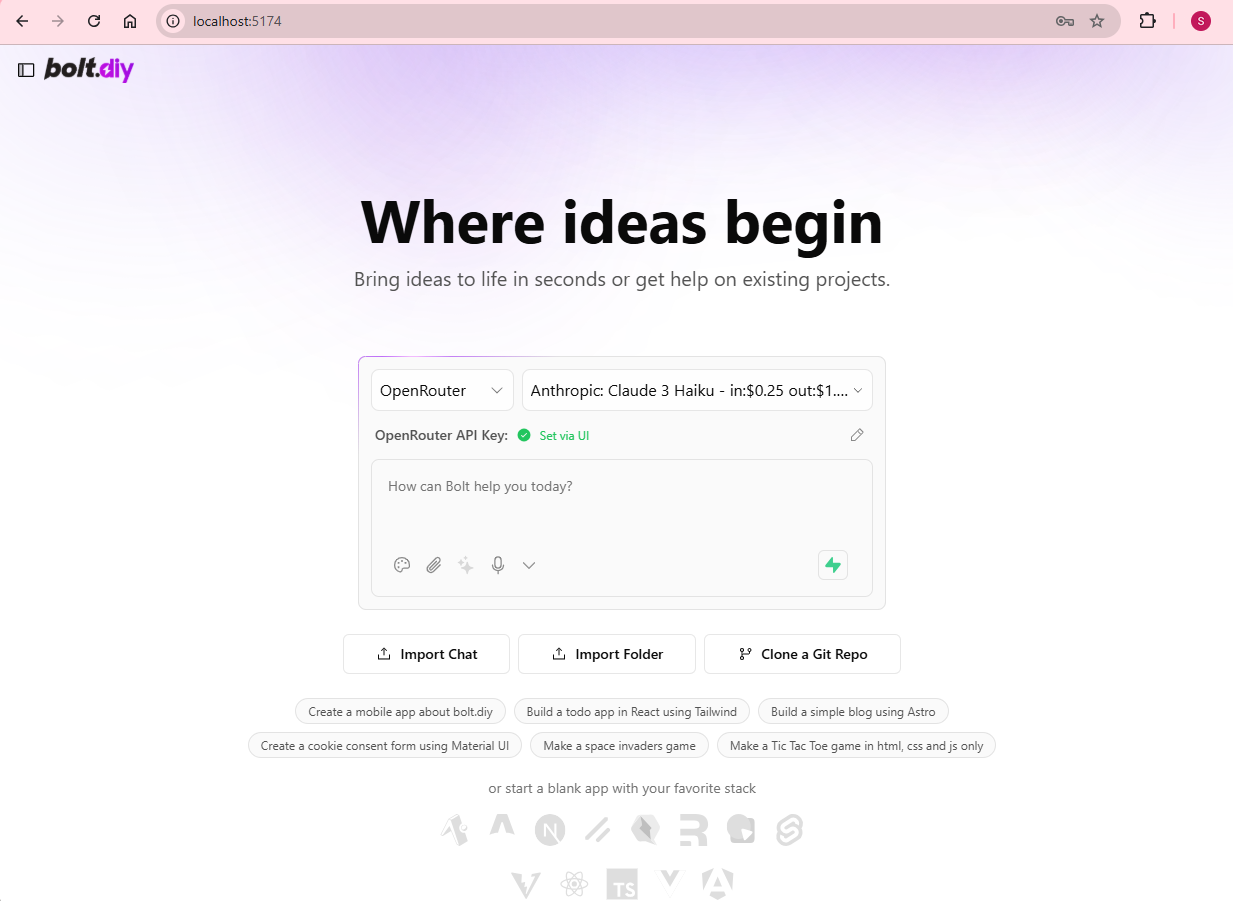
To interface with different models, I configured bolt.diy to use
OpenRouter
—a flexible gateway that provides API access to a variety of leading LLMs including Anthropic Claude, GPT variants, Mistral, and more.
My One-Shot Prompt for TextForge
Here’s the prompt that I crafted to bootstrap the generation of TextForge. It serves as a specification for a multi-tool, developer-centric utility with robust UX/UI features and thoughtful tooling:
One-shot prompt
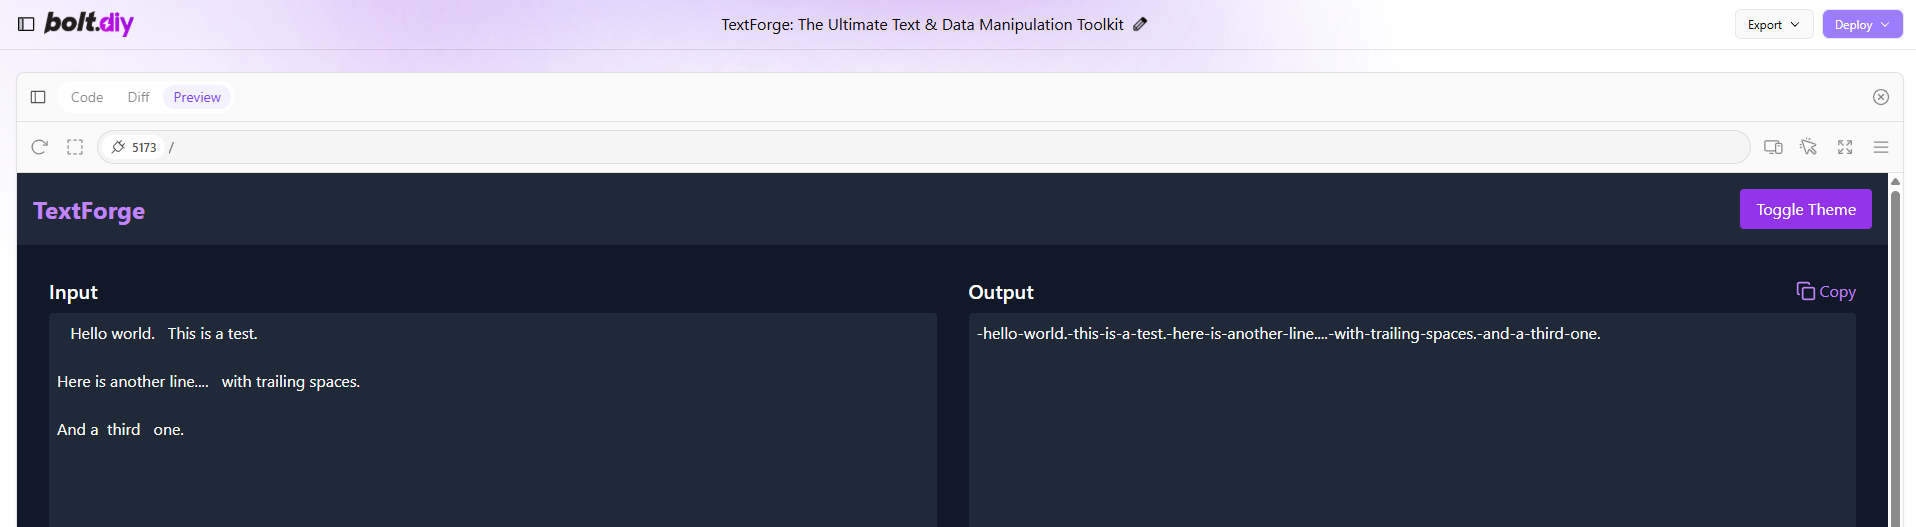
TextForge: The Ultimate Text & Data Manipulation Toolkit
A responsive, multi-tool web application designed for developers and writers to clean, format, convert, and generate text and data snippets efficiently.
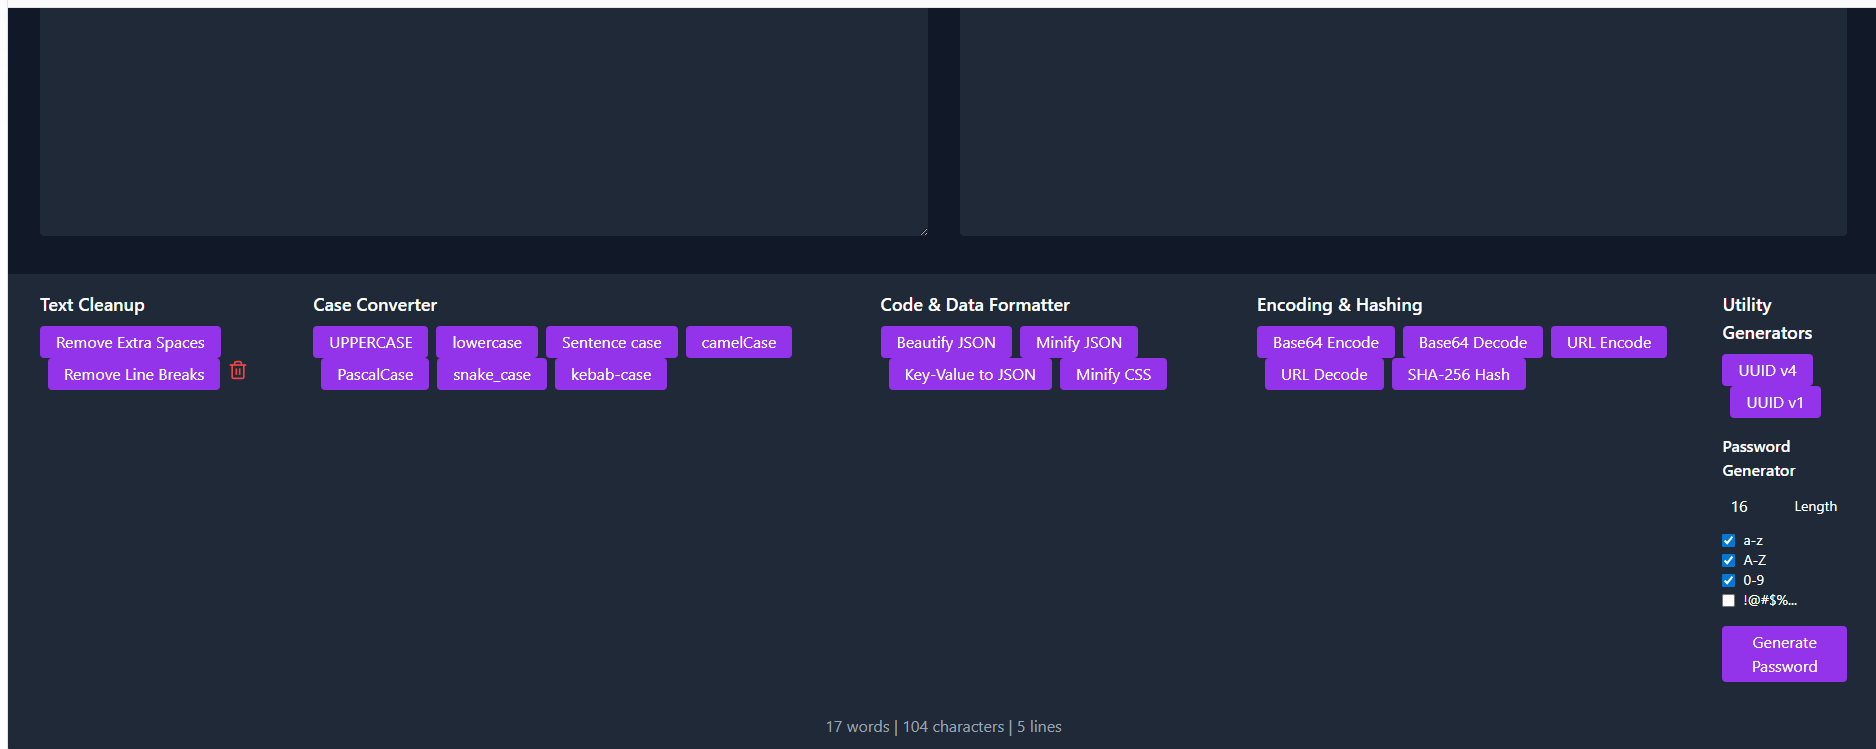
1. Text Cleanup & Analysis
Features:
Whitespace & Lines: Remove extra spaces, remove all line breaks, convert to a single line.
Text Analysis: Live word count, character count, and line count.
Clear Input: A quick button to clear the text area.
Implementation:
Generated javascript
// Example React state and handler
const [input, setInput] = useState("");
const [output, setOutput] = useState("");
// Analysis is derived from input state
const wordCount = input.trim().split(/\s+/).filter(Boolean).length;
const charCount = input.length;
const handleCleanup = (action) => {
let result = "";
switch (action) {
case "removeExtraSpaces":
result = input.replace(/\s+/g, ' ').trim();
break;
case "removeLineBreaks":
result = input.replace(/(\r\n|\n|\r)/gm, ' ');
break;
case "clear":
setInput("");
result = "";
break;
default:
result = input;
}
setOutput(result);
};
Use code with caution.
JavaScript
2. Case Converter
Features:
Standard Cases: UPPERCASE, lowercase, Sentence case.
Programming Cases: camelCase, PascalCase, snake_case, kebab-case.
Instant conversion on button click.
Implementation:
Use a combination of native string methods and regular expressions for complex cases.
Generated javascript
// Example conversion logic
const toCamelCase = (str) => {
return str.toLowerCase().replace(/([-_ ][a-z])/g, g => g.toUpperCase().replace(/[-_ ]/g, ''));
};
const toPascalCase = (str) => {
const camel = toCamelCase(str);
return camel.charAt(0).toUpperCase() + camel.slice(1);
};
const handleCaseChange = (caseType) => {
let result = "";
switch (caseType) {
case "uppercase": result = input.toUpperCase(); break;
case "camelCase": result = toCamelCase(input); break;
// ... other cases
}
setOutput(result);
};
Use code with caution.
JavaScript
3. Code & Data Formatter
Features:
JSON Tools: Beautify (pretty-print) and Minify JSON.
Data Conversion: Convert delimited Key-Value pairs (e.g., name=John\nage=30) into a JSON object.
CSS Minifier: Strip comments and whitespace from CSS code.
Implementation:
Use native browser APIs and a lightweight library for CSS.
Generated javascript
// JSON Formatting
const formatJSON = (beautify = true) => {
try {
const jsonObj = JSON.parse(input);
const space = beautify ? 2 : 0;
setOutput(JSON.stringify(jsonObj, null, space));
} catch (error) {
setOutput("Error: Invalid JSON");
}
};
// Key-Value to JSON
const convertKvToJson = () => {
const lines = input.split('\n').filter(line => line.includes('='));
const obj = lines.reduce((acc, line) => {
const [key, ...valueParts] = line.split('=');
acc[key.trim()] = valueParts.join('=').trim();
return acc;
}, {});
setOutput(JSON.stringify(obj, null, 2));
};
// For CSS Minification, suggest a library like 'clean-css' if building with Node/bundler
// In a simple client-side app, a regex approach can be a starting point:
const minifyCSS = (css) => {
return css.replace(/\/\*[\s\S]*?\*\/|([^:]|^)\/\/.*$/gm, '') // remove comments
.replace(/\s+/g, ' ') // collapse whitespace
.replace(/ ?([{:};,]) ?/g, '$1'); // remove space around operators
}
Use code with caution.
JavaScript
4. Encoding & Hashing
Features:
Base64: Encode text to Base64 and decode from Base64.
URL: Encode and Decode URI components.
Hashing: Generate a SHA-256 hash from text input (useful for integrity checks).
Implementation:
Use the built-in Web APIs for robust and secure operations.
Generated javascript
// Base64 Encoding/Decoding
const handleBase64 = (action) => {
try {
setOutput(action === 'encode' ? btoa(input) : atob(input));
} catch (error) {
setOutput("Error: Invalid input for this operation.");
}
};
// SHA-256 Hashing (async operation)
async function generateSha256(text) {
const encoder = new TextEncoder();
const data = encoder.encode(text);
const hashBuffer = await crypto.subtle.digest('SHA-256', data);
const hashArray = Array.from(new Uint8Array(hashBuffer));
return hashArray.map(b => b.toString(16).padStart(2, '0')).join('');
}
Use code with caution.
JavaScript
5. Utility Generators
Features:
UUID Generator: Generate version 4 (random) and version 1 (timestamp-based) UUIDs.
Password Generator: Create strong, randomized passwords with configurable length and character types (lowercase, uppercase, numbers, symbols).
Implementation:
Use the Web Crypto API and the popular uuid library.
Generated javascript
// UUID Generation
import { v1 as uuidv1, v4 as uuidv4 } from 'uuid';
const generateUUID = (version) => {
const newId = (version === 1) ? uuidv1() : uuidv4();
setOutput(prev => prev + (prev ? '\n' : '') + newId); // Append new UUIDs
};
// Or for a simple v4 without a library:
const generateCryptoUUID = () => {
setOutput(crypto.randomUUID());
}
Use code with caution.
JavaScript
UI/UX Considerations
Tool Switcher: A vertical sidebar with icons and labels for each tool category (Cleanup, Case, Format, etc.).
Layout: A responsive dual-pane layout. Input on the left, output on the right. On mobile, they stack vertically.
Real-time Updates: Output should update instantly as the user types or applies a transformation.
Copy & Clear: Prominent "Copy to Clipboard" buttons for the output and "Clear" buttons for both panes.
Theme & Styling:
Dark/Light Mode: A toggle switch in the header. Use CSS variables for easy theme switching.
Color Palette: A modern, purple-centric theme. (e.g., primary: #6D28D9, background-dark: #1F2937, text-dark: #E5E7EB).
Info Bar: A persistent footer bar displaying live Word Count, Character Count, and Line Count for the input text.
Deployment
Build: Create a production-ready build using a bundler like Vite or Create React App: npm run build.Testing with Multiple LLMs
After setting up bolt.diy, I experimented with different LLMs to see how well each could generate the desired frontend structure based on the one-shot prompt. Below are my findings.
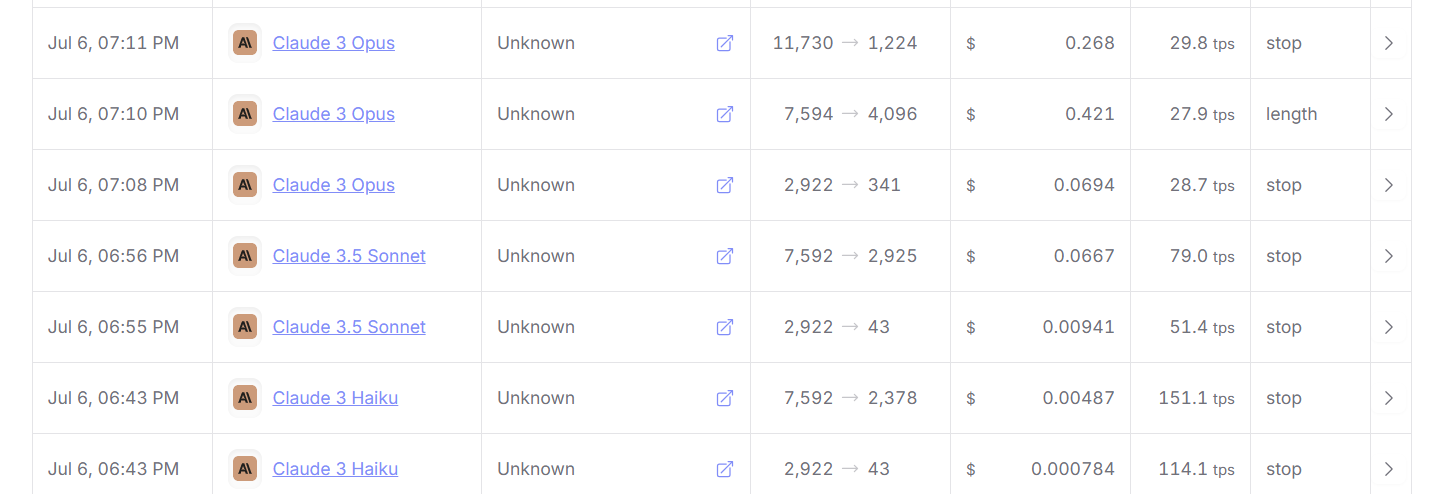
Test 1: Claude 3 Haiku
- Model:
anthropic/claude-3-haiku - Result: ❌ Unusable
Despite its speed and affordability, Claude 3 Haiku failed to generate meaningful output for this kind of frontend-heavy use case. The result was inconsistent and lacked structure.
Test 2: Claude 3.5 Sonnet
- Model:
anthropic/claude-3.5-sonnet - Result: ⚠️ Somewhat improved, but still unstable
This run delivered slightly better results with a more coherent layout, but many components were missing or incorrectly rendered.
Test 3: Claude 3 Opus
- Model:
anthropic/claude-3-opus - Result: ⚠️ Best Claude response, but still lacking usability
This version yielded the most complete interface among the Claude family, yet the layout was cluttered and not very user-friendly.
Cost Breakdown via OpenRouter
Here’s the comparative cost across the three Anthropic Claude models based on their usage in this test setup:
Test 4: DeepSeek Chat v3 0324 (Free Tier)
- Model:
deepseek/deepseek-chat-v3-0324:free - Result: ✅ Most successful and complete implementation
Despite being a free-tier model, DeepSeek V3 turned out to be the most reliable in generating a usable and well-structured UI for TextForge. It responded quickly, adhered closely to the prompt, and rendered a UI that was functional and clean.
And the best part—it’s completely free to use.
Conclusion
Running bolt.diy locally with OpenRouter integration offers great flexibility in experimenting with different LLMs. Through this test, I was able to:
-
Rapidly prototype frontend components using natural language prompts
-
Understand the practical limitations of LLM-generated UIs
-
Compare real-world performance and cost trade-offs of multiple language models
Ultimately, TextForge is now working as a locally built and deployable app, backed by LLMs and fully customizable. The repo is publicly available here: 👉 https://github.com/seehiong/textforge
Whether you’re exploring local AI tooling, building developer utilities, or hacking together a prototype—bolt.diy is a powerful playground to bring ideas to life.