Building an AI Application with Langchain4j
In this blog post, I’ll walk you through my journey of harnessing the capabilities of langchain4j to craft a powerful AI application using Java, specifically with a local language model. Unlike my previous exploration with Python, this post focuses on the Java implementation with Langchain4j.
Getting Started
To kick things off, I’ve chosen STS4 as my Integrated Development Environment (IDE) and opted for Java 17 as my programming language. Leveraging Postman as my API platform and Spring Boot as the framework of choice, let’s delve into the process.
Setting up a Spring Boot Application
To initiate the project, I began by creating a Spring Starter Project and selecting the Spring Web option. Here’s a snippet of the setup:
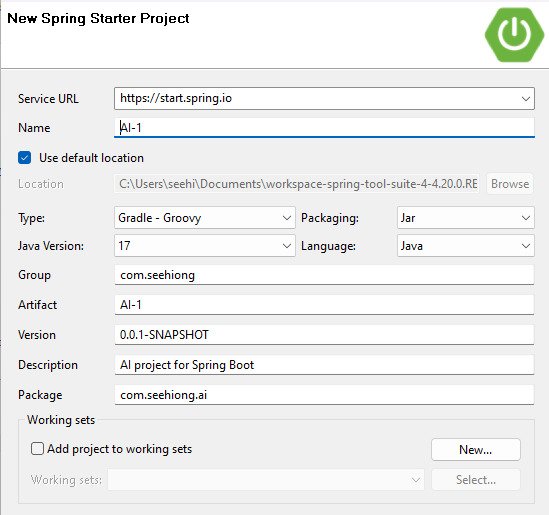
Spring Boot Application
Here’s my sprint boot application:
package com.seehiong.ai;

import org.springframework.boot.SpringApplication;
import org.springframework.boot.autoconfigure.SpringBootApplication;

@SpringBootApplication
public class AiApplication {
	public static void main(String[] args) {
		SpringApplication.run(AiApplication.class, args);
	}
}
Gradle Build Configuration
My build.gradle file outlines the dependencies, including Langchain4j components:
plugins {
	id 'java'
	id 'org.springframework.boot' version '3.1.5'
	id 'io.spring.dependency-management' version '1.1.3'
}

group = 'com.seehiong'
version = '0.0.1-SNAPSHOT'

java {
	sourceCompatibility = '17'
}

repositories {
	mavenCentral()
}

dependencies {
	implementation 'org.springframework.boot:spring-boot-starter-web'
	testImplementation 'org.springframework.boot:spring-boot-starter-test'

	implementation ('dev.langchain4j:langchain4j:0.23.0') {
		exclude group: "commons-logging", module: "commons-logging"
	}
	implementation 'dev.langchain4j:langchain4j-core:0.23.0'
	implementation 'dev.langchain4j:langchain4j-chroma:0.23.0'
	implementation 'dev.langchain4j:langchain4j-open-ai:0.23.0'
	implementation 'dev.langchain4j:langchain4j-local-ai:0.23.0'
	implementation 'dev.langchain4j:langchain4j-embeddings-all-minilm-l6-v2:0.23.0'

	implementation 'org.mapdb:mapdb:3.0.10'
}

tasks.named('test') {
	useJUnitPlatform()
}
Application Configuration
As a standard practice, I’ve created an application.properties file in the src/main/resources directory to specify server configurations:
server.port: 8888
Setting Up the Controller and Service
Let’s continue our journey by establishing the controller and service components of our Java application, seamlessly integrating the power of Langchain4j.
Controller Setup
Begin by setting up your controller. Below is the skeleton of an empty controller ready to be infused with the capabilities of Langchain4j.
package com.seehiong.ai.controller;

import org.springframework.web.bind.annotation.RequestMapping;
import org.springframework.web.bind.annotation.RestController;

@RestController
@RequestMapping(value = "/ai")
public class AiController {

	// We will add the services along the way
}
Service Setup
In the service layer, let’s explore the heart of our application. As highlight in the official langchain4j, we can now try out OpenAI’s gpt-3.5-turbo and text-embedding-ada-002 models with LangChain4j for free by simply using the API key “demo”. Here’s the sample model service for providing the demo model.
package com.seehiong.ai.service;

import org.springframework.stereotype.Service;

import dev.langchain4j.model.chat.ChatLanguageModel;
import dev.langchain4j.model.openai.OpenAiChatModel;

@Service
public class ModelService {

	private ChatLanguageModel demoModel;

	public ChatLanguageModel getDemoModel() {
		if (demoModel == null) {
			demoModel = OpenAiChatModel.withApiKey("demo");
		}
		return demoModel;
	}

	// We will be adding more models here in the subsequent sections
}
1. Implementing Chat Functionality
Building on the previous implementation, we’ve now introduced a dedicated ChatService to handle the generation of chat responses. Here is the updated code:
ChatService implementation:
package com.seehiong.ai.service;

import org.springframework.stereotype.Service;

import dev.langchain4j.model.chat.ChatLanguageModel;

@Service
public class ChatService {

	public String generate(ChatLanguageModel model, String text) {
		return model.generate(text);
	}
}
Updated AiController:
public class AiController {

	@Autowired
	private ModelService modelSvc;

	@Autowired
	private ChatService chatSvc;

	@GetMapping("/chat")
	public ResponseEntity<String> chat(@RequestParam("text") String text) {
		String response = chatSvc.generate(modelSvc.getDemoModel(), text);
		return new ResponseEntity<>(response, HttpStatus.OK);
	}
}
The ChatService is responsible for the generation of chat responses using the provided model. We’ve introduced the /chat endpoint that accepts a query parameter text which represents the input for chat. For simplicity, input validation has been omitted in the example.
Postman Result:

Spring Boot Output:

2. Introducing Custom Tools in the Controller
In this section, we’re taking our AI application a step further by incorporating a custom tool through the CalculatorService. Here’s the detailed code:
CalculatorService implementation:
package com.seehiong.ai.service;

import org.springframework.stereotype.Service;

import dev.langchain4j.agent.tool.Tool;
import dev.langchain4j.memory.chat.MessageWindowChatMemory;
import dev.langchain4j.model.chat.ChatLanguageModel;
import dev.langchain4j.service.AiServices;

@Service
public class CalculatorService {

	static class Calculator {

		@Tool("Calculates the length of a string")
		int stringLength(String s) {
			return s.length();
		}

		@Tool("Calculates the sum of two numbers")
		int add(int a, int b) {
			return a + b;
		}

		@Tool("Calculates the square root of a number")
		double sqrt(int x) {
			return Math.sqrt(x);
		}
	}

	interface Assistant {

		String chat(String userMessage);
	}

	public String calculate(ChatLanguageModel model, String text) {
		Assistant assistant = AiServices.builder(Assistant.class).chatLanguageModel(model).tools(new Calculator())
				.chatMemory(MessageWindowChatMemory.withMaxMessages(10)).build();
		return assistant.chat(text);
	}
}
Updated AiController:
public class AiController {
	...
	@Autowired
	private CalculatorService calculatorSvc;

	@GetMapping("/calculate")
	public ResponseEntity<String> calculate(@RequestParam("text") String text) {
		String response = calculatorSvc.calculate(modelSvc.getDemoModel(), text);
		return new ResponseEntity<>(response, HttpStatus.OK);
	}
}
The CalculatorService introduces the Calculator class with custom Tool annotation to calculate the length of a string, sum of two numbers, and the square root of a number. The Assistant interface facilitates the chat interation.
Postman Result:

3. Integrating Embedding Functionality with Chroma
To enhance our AI application, we’ve introduced embedding functionality using Chroma, following the Chroma embedding store example. Prior to running spring boot, make sure to pull the Chroma image and run it with Docker Desktop:
docker pull ghcr.io/chroma-core/chroma:0.4.6
docker run -d -p 8000:8000 ghcr.io/chroma-core/chroma:0.4.6
EmbeddingService Implementation:
This service demonstrates the embedding functionality:
package com.seehiong.ai.service;

import static dev.langchain4j.internal.Utils.randomUUID;

import java.util.List;

import org.springframework.stereotype.Service;

import dev.langchain4j.data.embedding.Embedding;
import dev.langchain4j.data.segment.TextSegment;
import dev.langchain4j.model.embedding.EmbeddingModel;
import dev.langchain4j.store.embedding.EmbeddingMatch;
import dev.langchain4j.store.embedding.EmbeddingStore;
import dev.langchain4j.store.embedding.chroma.ChromaEmbeddingStore;

@Service
public class EmbeddingService {

	private EmbeddingStore<TextSegment> embeddingStore;

	public String embed(EmbeddingModel embeddingModel, String text) {
		StringBuilder sb = new StringBuilder();

		Embedding inProcessEmbedding = embeddingModel.embed(text).content();
		sb.append(String.valueOf(inProcessEmbedding)).append(System.lineSeparator());

		TextSegment segment1 = TextSegment.from("I like football.");
		Embedding embedding1 = embeddingModel.embed(segment1).content();
		getEmbeddingStore().add(embedding1, segment1);

		TextSegment segment2 = TextSegment.from("The weather is good today.");
		Embedding embedding2 = embeddingModel.embed(segment2).content();
		getEmbeddingStore().add(embedding2, segment2);

		Embedding queryEmbedding = embeddingModel.embed("What is your favourite sport?").content();
		List<EmbeddingMatch<TextSegment>> relevant = getEmbeddingStore().findRelevant(queryEmbedding, 1);
		EmbeddingMatch<TextSegment> embeddingMatch = relevant.get(0);

		sb.append(String.valueOf(embeddingMatch.score())).append(System.lineSeparator()); // 0.8144288493114709
		sb.append(embeddingMatch.embedded().text()); // I like football.

		return sb.toString();
	}

	private EmbeddingStore<TextSegment> getEmbeddingStore() {
		if (embeddingStore == null) {
			embeddingStore = ChromaEmbeddingStore.builder().baseUrl("http://127.0.0.1:8000")
					.collectionName(randomUUID()).build();
		}
		return embeddingStore;
	}
}
Updated AiController:
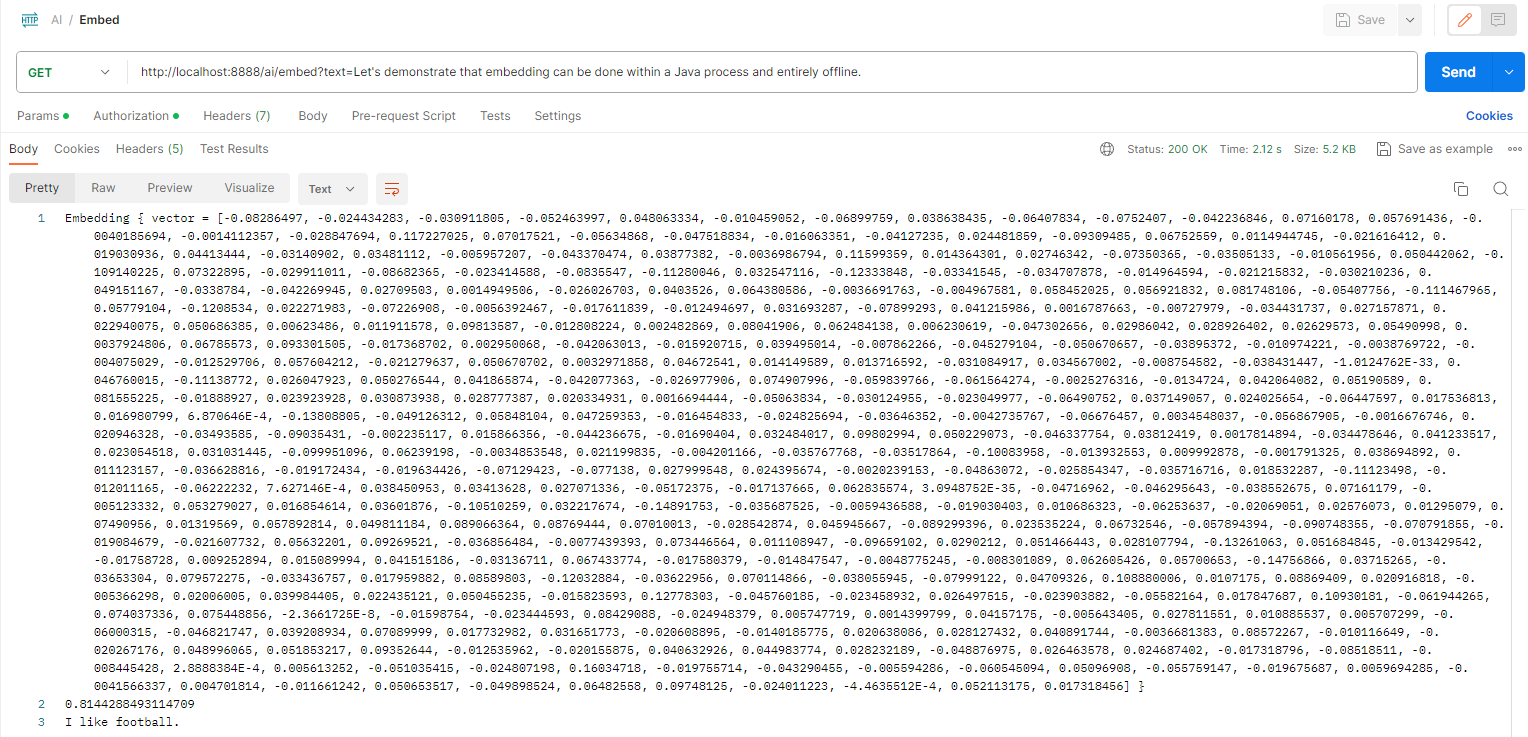
The AiController now includes the /embed endpoint to showcase the embedding functionality:
public class AiController {
	...
	@Autowired
	private EmbeddingService embeddingSvc;

	@GetMapping("/embed")
	public ResponseEntity<String> embed(@RequestParam("text") String text) {
		String response = embeddingSvc.embed(modelSvc.getEmbeddingModel(), text);
		return new ResponseEntity<>(response, HttpStatus.OK);
	}
}
Postman Result:
4. Integrating Translate Service
In this section, we’ve integrated the Translate Service into our AI application. Below are the relevant implementations:
TranslateService Implementation:
package com.seehiong.ai.service;

import org.springframework.stereotype.Service;

import dev.langchain4j.model.chat.ChatLanguageModel;
import dev.langchain4j.service.AiServices;
import dev.langchain4j.service.SystemMessage;
import dev.langchain4j.service.UserMessage;
import dev.langchain4j.service.V;

@Service
public class TranslatorService {

	interface Translator {
		@SystemMessage("You are a professional translator into {{language}}")
		@UserMessage("Translate the following text: {{text}}")
		String translate(@V("text") String text, @V("language") String language);
	}

	public String translate(ChatLanguageModel model, String text, String language) {
		Translator translator = AiServices.create(Translator.class, model);

		return translator.translate(text, language);
	}
}
Updated AiController:
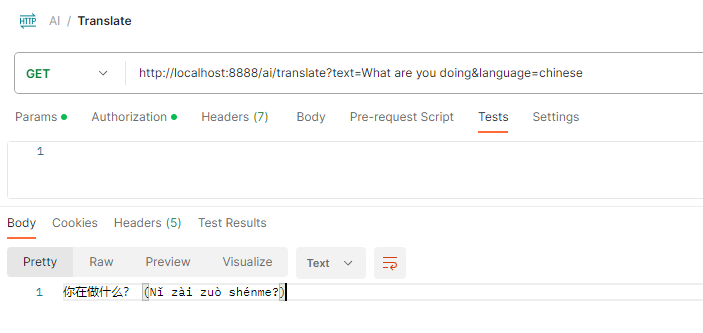
In the updated AiController, we have set the default language to Chinese, but users can override it and set it to any other language:
public class AiController {
	...
	@Autowired
	private TranslatorService translatorSvc;

	@GetMapping("/translate")
	public ResponseEntity<String> translate(@RequestParam("text") String text,
			@RequestParam(defaultValue = "chinese") String language) {
		String response = translatorSvc.translate(modelSvc.getDemoModel(), text, language);
		return new ResponseEntity<>(response, HttpStatus.OK);
	}
}
Postman Result:
5. Introducing Persistence Service
In this section, we’ve introduced a Persistence Service to add a persistence layer to our AI application. Below are the relevant implementations:
PersistenceService Implementation:
package com.seehiong.ai.service;

import static dev.langchain4j.data.message.ChatMessageDeserializer.messagesFromJson;
import static dev.langchain4j.data.message.ChatMessageSerializer.messagesToJson;
import static org.mapdb.Serializer.INTEGER;
import static org.mapdb.Serializer.STRING;

import java.util.List;
import java.util.Map;

import org.mapdb.DB;
import org.mapdb.DBMaker;
import org.springframework.stereotype.Service;

import dev.langchain4j.data.message.ChatMessage;
import dev.langchain4j.memory.chat.ChatMemoryProvider;
import dev.langchain4j.memory.chat.MessageWindowChatMemory;
import dev.langchain4j.model.chat.ChatLanguageModel;
import dev.langchain4j.service.AiServices;
import dev.langchain4j.service.MemoryId;
import dev.langchain4j.service.UserMessage;
import dev.langchain4j.store.memory.chat.ChatMemoryStore;

@Service
public class PersistenceService {

	private PersistentChatMemoryStore store = new PersistentChatMemoryStore();

	interface Assistant {
		String chat(@MemoryId int memoryId, @UserMessage String userMessage);
	}

	static class PersistentChatMemoryStore implements ChatMemoryStore {
		private final DB db = DBMaker.fileDB("multi-user-chat-memory.db").closeOnJvmShutdown().transactionEnable()
				.make();
		private final Map<Integer, String> map = db.hashMap("messages", INTEGER, STRING).createOrOpen();

		@Override
		public List<ChatMessage> getMessages(Object memoryId) {
			String json = map.get((int) memoryId);
			return messagesFromJson(json);
		}

		@Override
		public void updateMessages(Object memoryId, List<ChatMessage> messages) {
			String json = messagesToJson(messages);
			map.put((int) memoryId, json);
			db.commit();
		}

		@Override
		public void deleteMessages(Object memoryId) {
			map.remove((int) memoryId);
			db.commit();
		}
	}

	public String demo(ChatLanguageModel model, boolean showName) {
		StringBuilder sb = new StringBuilder();

		ChatMemoryProvider chatMemoryProvider = memoryId -> MessageWindowChatMemory.builder().id(memoryId)
				.maxMessages(10).chatMemoryStore(store).build();

		Assistant assistant = AiServices.builder(Assistant.class).chatLanguageModel(model)
				.chatMemoryProvider(chatMemoryProvider).build();

		if (showName) {
			sb.append(assistant.chat(1, "Hello, my name is Klaus")).append(System.lineSeparator());
			sb.append(assistant.chat(2, "Hi, my name is Francine"));

		} else {
			sb.append(assistant.chat(1, "What is my name?")).append(System.lineSeparator());
			sb.append(assistant.chat(2, "What is my name?"));
		}
		return sb.toString();
	}
}
Updated AiController:
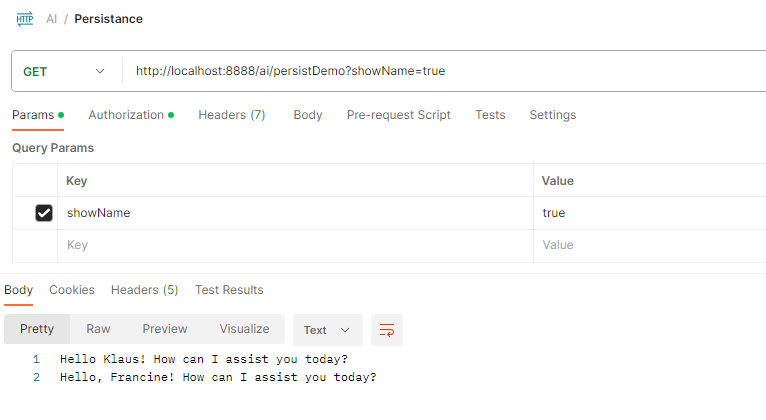
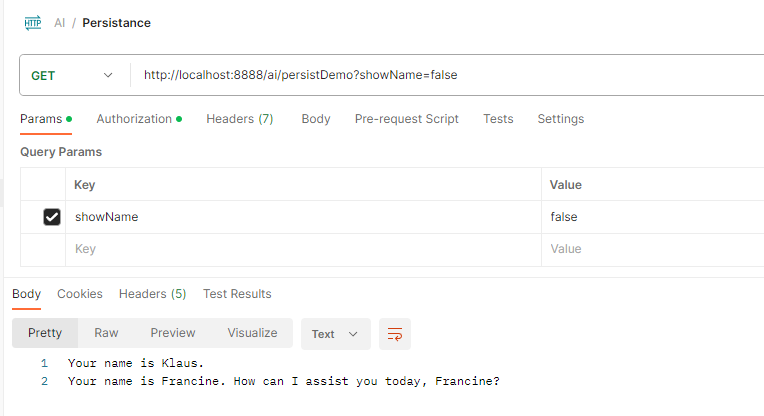
Here, we adapted from persistent ChatMemory. The AiController now includes an endpoint /persistDemo to showcase the Persistence Service. Users can set the showName parameter to true on the first run and false on the second run:
public class AiController {
	...
	@Autowired
	private PersistenceService persistenceSvc;

	@GetMapping("/persistDemo")
	public ResponseEntity<String> persistDemo(@RequestParam("showName") String showName) {
		String response = persistenceSvc.demo(modelSvc.getDemoModel(), Boolean.valueOf(showName));
		return new ResponseEntity<>(response, HttpStatus.OK);
	}
}
Postman Result 1 (showName=true):
Postman Result 2 (showName=false):
6. Introducing Retrieval Service via Local LLM
In this section, we’ve introduced a Retrieval Service utilizing a local Language Model (LLM) through LocalAI. Here are the key components and implementations:
Setting up Local AI
Before running the Spring Boot application, set up Local AI using the following commands within WSL. Please note that for below example, the docker container will download or use the models under the models folder:
docker pull quay.io/go-skynet/local-ai:v2.0.0
docker run -p 8080:8080 -v $PWD/models:/models -ti --rm quay.io/go-skynet/local-ai:v2.0.0 --models-path /models --context-size 2000 --threads 8 --debug=true
By setting to debug on, you should be seeing something like this:

Next, try to download a model with the command:
curl http://127.0.0.1:8080/models/apply -H "Content-Type: application/json" -d '{"url": "github:go-skynet/model-gallery/gpt4all-j.yaml"}'

# Using the similar curl command, replacing the actual job ID to check if the model has been downloaded successfully
curl http://127.0.0.1:8080/models/jobs/b5141f97-7bb8-11ee-aa82-0242ac110003
You may verify the list of downloaded models with:
curl http://127.0.0.1:8080/models/ | jq
Make sure Local AI is running successfully, and models are downloaded.

ModelService Modification
In the ModelService class, we added the configuration for the local model and an embedding model for retrieval augmented generation. Additionally, the timeout was extended to 5 minutes to account for the expected longer referencing time.
public class ModelService {
	...
	private static final String MODEL_NAME = "gpt4all-j";

	private static final String LOCAL_AI_URL = "http://127.0.0.1:8080";

	private ChatLanguageModel localModel;

	private AllMiniLmL6V2EmbeddingModel embeddingModel;

	public ChatLanguageModel getLocalModel() {
		if (localModel == null) {
			localModel = LocalAiChatModel.builder().baseUrl(LOCAL_AI_URL).timeout(Duration.ofMinutes(5))
					.modelName(MODEL_NAME).build();
		}
		return localModel;
	}

	public EmbeddingModel getEmbeddingModel() {
		if (embeddingModel == null) {
			embeddingModel = new AllMiniLmL6V2EmbeddingModel();
		}
		return embeddingModel;
	}
}
RetrievalService Implementation:
Following Chat with Documents, the RetrievalService now includes functionality for retrieving information based on a given question and a document:
package com.seehiong.ai.service;

import static dev.langchain4j.data.document.FileSystemDocumentLoader.loadDocument;

import java.net.URISyntaxException;
import java.net.URL;
import java.nio.file.Path;
import java.nio.file.Paths;

import org.springframework.stereotype.Service;

import com.seehiong.ai.AiApplication;

import dev.langchain4j.chain.ConversationalRetrievalChain;
import dev.langchain4j.data.document.Document;
import dev.langchain4j.data.document.splitter.DocumentSplitters;
import dev.langchain4j.data.segment.TextSegment;
import dev.langchain4j.model.chat.ChatLanguageModel;
import dev.langchain4j.model.embedding.EmbeddingModel;
import dev.langchain4j.retriever.EmbeddingStoreRetriever;
import dev.langchain4j.store.embedding.EmbeddingStore;
import dev.langchain4j.store.embedding.EmbeddingStoreIngestor;
import dev.langchain4j.store.embedding.inmemory.InMemoryEmbeddingStore;

@Service
public class RetrievalService {

	private EmbeddingStore<TextSegment> embeddingStore = new InMemoryEmbeddingStore<>();

	private static Path toPath(String fileName) {
		try {
			URL fileUrl = AiApplication.class.getResource(fileName);
			return Paths.get(fileUrl.toURI());
		} catch (URISyntaxException e) {
			throw new RuntimeException(e);
		}
	}

	public String retrieve(ChatLanguageModel model, EmbeddingModel embeddingModel, String fileName, String question) {
		EmbeddingStoreIngestor ingestor = EmbeddingStoreIngestor.builder()
				.documentSplitter(DocumentSplitters.recursive(500, 0)).embeddingModel(embeddingModel)
				.embeddingStore(embeddingStore).build();

		Document document = loadDocument(toPath(fileName));
		ingestor.ingest(document);

		ConversationalRetrievalChain chain = ConversationalRetrievalChain.builder().chatLanguageModel(model)
				.retriever(EmbeddingStoreRetriever.from(embeddingStore, embeddingModel)).build();

		return chain.execute(question);
	}
}
Updated AiController:
In the AiController class, the components are brought together to create the /retrieve endpoint. Users can utilize this endpoint to interact with the Retrieval Service, providing a file (document) and a text (question) to retrieve relevant information:
public class AiController {
	...
	@Autowired
	private RetrievalService retrievalSvc;

	@GetMapping("/retrieve")
	public ResponseEntity<String> retrieve(@RequestParam("file") String file, @RequestParam("text") String text) {
		String response = retrievalSvc.retrieve(modelSvc.getLocalModel(), modelSvc.getEmbeddingModel(), file, text);
		return new ResponseEntity<>(response, HttpStatus.OK);
	}
}
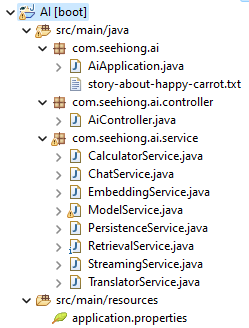
To ensure the code and sample work seamlessly, the document (story-about-happy-carrot.txt) is placed in the same package as AiApplication.txt.
This is the sample result (notice that it takes about 1 min):

7. Integrating Streaming Service through local LLM
In this final section, we explored the integration of a streaming service via a local Language Model (LLM). The Streaming Service implementation allows for the generation of responses in a streaming fashion, providing flexibility for handling large responses or real-time interactions.
StreamingService Implementation:
package com.seehiong.ai.service;

import static java.util.concurrent.TimeUnit.SECONDS;

import java.util.concurrent.CompletableFuture;
import java.util.concurrent.ExecutionException;
import java.util.concurrent.TimeoutException;

import org.springframework.stereotype.Service;

import dev.langchain4j.model.StreamingResponseHandler;
import dev.langchain4j.model.language.StreamingLanguageModel;
import dev.langchain4j.model.output.Response;

@Service
public class StreamingService {

	public String generate(StreamingLanguageModel model, String message) {
		StringBuilder answerBuilder = new StringBuilder();
		CompletableFuture<String> futureAnswer = new CompletableFuture<>();

		model.generate(message, new StreamingResponseHandler<String>() {

			@Override
			public void onNext(String token) {
				answerBuilder.append(token);
			}

			@Override
			public void onComplete(Response<String> response) {
				futureAnswer.complete(answerBuilder.toString());
			}

			@Override
			public void onError(Throwable error) {
				futureAnswer.completeExceptionally(error);
			}
		});

		try {
			return futureAnswer.get(30, SECONDS);
		} catch (InterruptedException | ExecutionException | TimeoutException e) {
			return "Unable to generate response: " + message;
		}
	}
}
ModelService Modification
public class ModelService {
	...
	private StreamingLanguageModel streamingModel;

	public StreamingLanguageModel getStreamingModel() {
		if (streamingModel == null) {
			streamingModel = LocalAiStreamingLanguageModel.builder().baseUrl(LOCAL_AI_URL).modelName(MODEL_NAME)
					.build();
		}
		return streamingModel;
	}
}
Updated AiController:
public class AiController {
	...
	@Autowired
	private StreamingService streamingSvc;

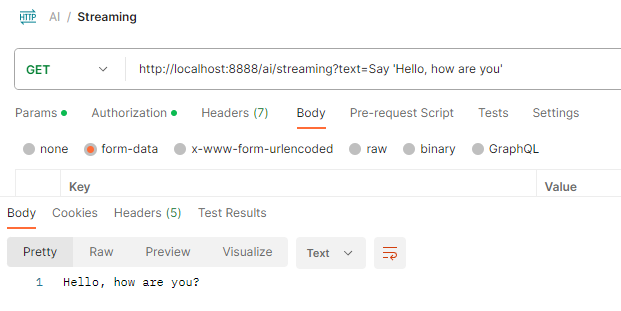
	@GetMapping("/streaming")
	public ResponseEntity<String> streaming(@RequestParam("text") String text) {
		String response = streamingSvc.generate(modelSvc.getStreamingModel(), text);
		return new ResponseEntity<>(response, HttpStatus.OK);
	}
}
Postman Result:
With the addition of the streaming service, this comprehensive blog post has covered various aspects of integrating LangChain4j into a Java-based AI application. It serves as a starting point for creating personalized AI applications, and I hope it has been a helpful guide for your exploration in this field.
Feel free to experiment further and build upon these foundations to create even more sophisticated AI applications!