By having a Highly Available Kubernetes Pi Cluster, you will have full control over your production grade environment on-premise
HA Kubernetes Pi Cluster (Part II)
(Total Setup Time: 20 mins)
In this follow up guide, I will configure the HA Kubernetes Cluster onto the previous external etcd setup.
Installing Docker
(5 mins)
Firstly, installs docker container runtimes to all master nodes:
sudo apt install docker.io
sudo usermod -aG docker ubuntu
su - ubuntu
sudo systemctl enable docker.service
Secondly, sets up the docker daemon:
# Run su commnad as root
sudo su -

# Set up the Docker daemon
cat > /etc/docker/daemon.json <<EOF
{
  "exec-opts": ["native.cgroupdriver=systemd"],
  "log-driver": "json-file",
  "log-opts": {
    "max-size": "100m"
  },
  "storage-driver": "overlay2"
}
EOF
Thirdly, enables and restarts Docker:
systemctl daemon-reload
systemctl enable docker
systemctl restart docker
Installing kudeadm
(10 mins)
Starts by adding Kubernetes repository to all master nodes:
sudo apt-get update && sudo apt-get install -y apt-transport-https curl

curl -s https://packages.cloud.google.com/apt/doc/apt-key.gpg | sudo apt-key add -

cat <<EOF | sudo tee /etc/apt/sources.list.d/kubernetes.list
deb https://apt.kubernetes.io/ kubernetes-xenial main
EOF
Next, installs kubeadm:
sudo apt-get update
sudo apt-get install -y kubelet kubeadm kubectl
sudo apt-mark hold kubelet kubeadm kubectl
sudo reboot
Initializing Kubernetes Master Nodes
(5 mins)
First, prepares the certs by following kubeadm HA setup:
sudo mkdir -p /etc/kubernetes/pki/etcd/
sudo cp /srv/etcd-certs/cacert.pem /etc/kubernetes/pki/etcd/
sudo cp /srv/etcd-certs/etcd.pem /etc/kubernetes/pki
sudo cp /srv/etcd-certs/etcd-key.pem /etc/kubernetes/pki
Second, inserts the following into kubeadm-config.yaml:
apiVersion: kubeadm.k8s.io/v1beta2
kind: ClusterConfiguration
kubernetesVersion: stable
controlPlaneEndpoint: "cluster-endpoint:6443"
etcd:
  external:
    endpoints:
    - https://192.168.100.119:2379
    - https://192.168.100.173:2379
    - https://192.168.100.100:2379
    caFile: /etc/kubernetes/pki/etcd/cacert.pem
    certFile: /etc/kubernetes/pki/etcd.pem
    keyFile: /etc/kubernetes/pki/etcd-key.pem
This is my /etc/hosts for all master nodes:
# cluster-endpoint points to first master node
127.0.0.1 localhost
192.168.100.119 master1
192.168.100.173 master2
192.168.100.100 master3
192.168.100.119 cluster-endpoint
Third, initializes the master node by:
sudo kubeadm init --config kubeadm-config.yaml --upload-certs

mkdir -p $HOME/.kube
sudo cp -i /etc/kubernetes/admin.conf $HOME/.kube/config
sudo chown $(id -u):$(id -g) $HOME/.kube/config
Fourth, installs Calio from the list of networking addons:
curl https://docs.projectcalico.org/manifests/calico-etcd.yaml -o calico-etcd.yaml
Fifth, prepares TLS for calico by following config options:
cat /srv/etcd-certs/cacert.pem | base64 -w 0
cat /srv/etcd-certs/etcd.pem | base64 -w 0
sudo cat /srv/etcd-certs/etcd-key.pem | base64 -w 0
# Searches for the Secret section in calico.yaml and paste cat output from the cacert.pem, etcd.pem and etcd-key.pem
apiVersion: v1
kind: Secret
type: Opaque
metadata:
  name: calico-etcd-secrets
  namespace: kube-system
data:
  # Populate the following files with etcd TLS configuration if desired, but leave blank if
  # not using TLS for etcd.
  # This self-hosted install expects three files with the following names.  The values
  # should be base64 encoded strings of the entire contents of each file.
  etcd-key: LS0tLS1CRUdJTiB...VZBVEUgS0VZLS0tLS0=
  etcd-cert: LS0tLS1...ElGSUNBVEUtLS0tLQ==
  etcd-ca: LS0tLS1CRUdJTiBD...JRklDQVRFLS0tLS0=
---
# Source: calico/templates/calico-config.yaml
# This ConfigMap is used to configure a self-hosted Calico installation.
kind: ConfigMap
apiVersion: v1
metadata:
  name: calico-config
  namespace: kube-system
data:
  # Configure this with the location of your etcd cluster.
  etcd_endpoints: "https://cluster-endpoint:2379"
  # If you're using TLS enabled etcd uncomment the following.
  # You must also populate the Secret below with these files.
  etcd_ca: "/calico-secrets/etcd-ca"
  etcd_cert: "/calico-secrets/etcd-cert"
  etcd_key: "/calico-secrets/etcd-key"
kubectl apply -f calico.yaml
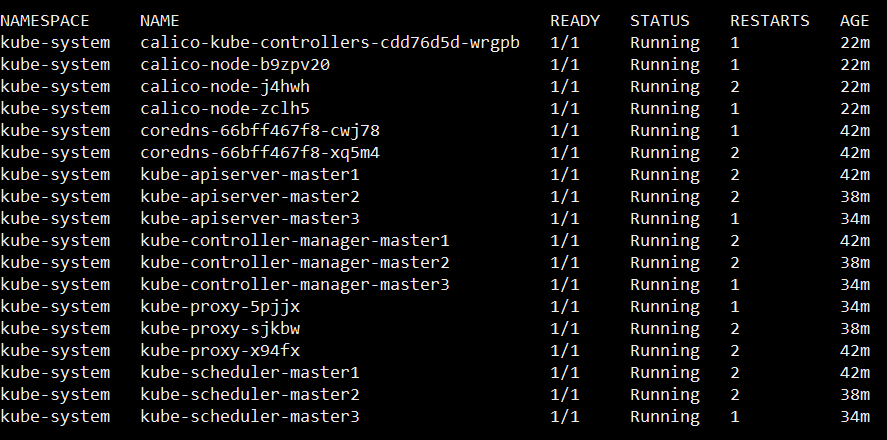
watch kubectl get pods --all-namespaces
kubectl get nodes -o wide
Lastly, runs this on the other 2 master nodes:
sudo kubeadm join cluster-endpoint:6443 --token puuck4.kjgqjif1xyy2397f \
    --discovery-token-ca-cert-hash sha256:50bb31b6f26ee6e98228f098fb9f50eaf7f1db67a011c90d6c764f7331cb90e1 \
    --control-plane --certificate-key 28ad20c49a7c6b8d06b2faa305fdf0c98d9763b932b929deb4704d57ec8ff959
This is my modified /etc/hosts:
# cluster-endpoint points to the loadbalancer IP
127.0.0.1 localhost
192.168.100.119 master1
192.168.100.173 master2
192.168.100.100 master3
192.168.100.200 cluster-endpoint
And that’s all to it! You now own a Highly Available Kubernetes Pi Cluster!
Troubleshooting
The connection to the server localhost:8080 was refused - did you specify the right host or port?
After kubeadm init, you need to run these commands:
mkdir -p $HOME/.kube
sudo cp -i /etc/kubernetes/admin.conf $HOME/.kube/config
sudo chown $(id -u):$(id -g) $HOME/.kube/config
Secret “kubeadm-certs” was not found in the “kube-system” Namespace. This Secret might have expired
If the certificate-key expires, generates a new one as below:
sudo kubeadm init phase upload-certs --upload-certs --config kubeadm-config.yaml
network: stat /var/lib/calico/nodename: no such file or directory
After resetting kubeadm, my kubernetes cluster runs successfully:
sudo kubeadm reset
sudo rm -rf /etc/cni/net.d
sudo iptables --flush
sudo ipvsadm --clear
rm $HOME/.kube/config
sudo rm -rf /var/lib/cni

# External etcd clean up
sudo etcdctl del "" --prefix --cacert /srv/etcd-certs/cacert.pem --cert /srv/etcd-certs/etcd.pem  --key /srv/etcd-certs/etcd-key.pem
Re-joining cluster
When your SD failed and you wish to re-configure the faulty PI, you need to perform:
# Cordon the faulty node
kubectl cordon master3

# Drain the faulty one
kubectl drain master3 -delete-emptydir-data --ignore-daemonsets

# if it hungs, you may have to open a separate terminal and to delete the relevant pod

# Delete the node
kubectl delete node master3

# Retrieve bootstrap token
kubeadm token list

# Retrieve token cacert hash (sha256)
openssl x509 -pubkey -in /etc/kubernetes/pki/ca.crt \
    | openssl rsa -pubin -outform der 2>/dev/null \
    | openssl dgst -sha256 -hex \
    | sed 's/^.* //'

# Generate new key
kubeadm init phase upload-certs --upload-certs --config kubeadm-config.yaml

# Forms the join as master command based on above results
kubeadm join 192.168.100.180:6443 --token 0abut7.guksf3dfp1k67osq --discovery-token-ca-cert-hash sha256:a263dfc32ddd3d16cc72f2f91a0786e869f9310646614dbdf6a103be5d42b9c7 --v=5 --control-plane --certificate-key 97e86ed12f1e1b4f97d51d1a1ff92485d678d5fb8725c3c73e66b17a660c68af