Gitea for MicroK8s Cluster

With Gitea for Raspberry Pi cluster, you can have your own self-hosted Git Service
Gitea for Raspberry Pi
(Total Setup Time: 45 mins)
Gitea is a painless self-hosted Git service. By hosting Gitea locally, our team is able to save cost and you also have more control over your server.
Preparation
(5 min)
If you are following my MicroK8s cluster setup, for each kubectl command, you need to append with microk8s. With this section, you can simply use kubectl. First, install kubectl:
sudo snap install kubectl --classic
Second, save microk8s configuration to kubectl:
microk8s kubectl config view --raw > ~/.kube/config
And you are done! You can continue to use either microk8s kubectl or simply kubectl:
kubectl get nodes
There are many ways to install docker-compose. By far, this is the most convenient way for my setup:
sudo apt install docker-compose
With this command, docker-compose –version, I get:
docker-compose version 1.25.0, build unknown
Setup MySQL
(15 mins)
Firstly, I download the mysql-server docker image:
docker pull mysql/mysql-server:latest
docker images
docker save mysql/mysql-server > mysql-server.tar
Secondly, inject the image into MicroK8s cache:
microk8s ctr image import mysql-server.tar
microk8s ctr images ls
Thirdly, with reference from here, I created the required path on my external HDD:
sudo mkdir -p /mnt/hdd/microk8s/application/mysql/data
sudo nano /mnt/hdd/microk8s/application/mysql/mysql-pv.yaml
Add the following to mysql-pv.yaml file:
apiVersion: v1
kind: PersistentVolume
metadata:
  name: mysql-pv-volume
  labels:
    type: local
spec:
  storageClassName: manual
  capacity:
    storage: 20Gi
  accessModes:
    - ReadWriteOnce
  hostPath:
    path: "/mnt/hdd/microk8s/application/mysql/data"
---
apiVersion: v1
kind: PersistentVolumeClaim
metadata:
  name: mysql-pv-claim
spec:
  storageClassName: manual
  accessModes:
    - ReadWriteOnce
  resources:
    requests:
      storage: 20Gi
Next, apply the above yaml file to create mysql persistent volumes with this command:
kubectl apply -f /mnt/hdd/microk8s/application/mysql/mysql-pv.yaml
Fourthly, add the following to /mnt/hdd/microk8s/application/mysql/mysql-deployment.yaml:
apiVersion: v1
kind: Service
metadata:
  name: mysql
spec:
  ports:
  - port: 3306
  selector:
    app: mysql
  clusterIP: None
---
apiVersion: apps/v1 # for versions before 1.9.0 use apps/v1beta2
kind: Deployment
metadata:
  name: mysql
spec:
  selector:
    matchLabels:
      app: mysql
  strategy:
    type: Recreate
  template:
    metadata:
      labels:
        app: mysql
    spec:
      containers:
      - image: mysql/mysql-server:latest
        name: mysql
        env:
          # Use secret in real usage
        - name: MYSQL_ROOT_PASSWORD
          value: password
        ports:
        - containerPort: 3306
          name: mysql
        volumeMounts:
        - name: mysql-persistent-storage
          mountPath: /var/lib/mysql
      volumes:
      - name: mysql-persistent-storage
        persistentVolumeClaim:
          claimName: mysql-pv-claim
Next, apply the above yaml file to create mysql service and deployment:
kubectl apply -f /mnt/hdd/microk8s/application/mysql/mysql-deployment.yaml
Lastly, you may use the following to check on your deployment:
kubectl describe deployment mysql
kubectl delete deployment,svc mysql # to delete development and service, if needed
kubectl delete pvc mysql-pv-claim # to delete PersistenceVolumeClaim, if needed
kubectl delete pv mysql-pv-volume # to delete PersistenceVolume, if needed
Preparing MySQL
(5 mins)
To prepare mysql for Gitea, I need to get the pod name:
kubectl get pods
First, ssh into mysql pod:
kubectl exec -it mysql-5f57bdc6c5-rbfwn -- /bin/bash
Second, connect to mysql:
mysql -u root -p
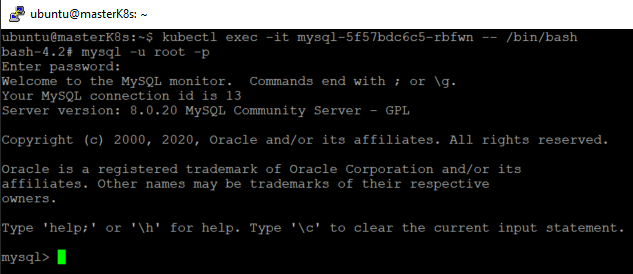
Lastly, prepare the database:
SET old_passwords=0;
CREATE USER 'gitea' IDENTIFIED BY 'gitea'; -- create database user
CREATE DATABASE giteadb CHARACTER SET 'utf8mb4' COLLATE 'utf8mb4_unicode_ci'; -- create database
GRANT ALL PRIVILEGES ON giteadb.* TO 'gitea'; -- grant privileges to database user
FLUSH PRIVILEGES;
Preparing Gitea with Docker
(15 mins)
You may start to install Gitea with docker by preparing the docker-compose.yml:
mkdir -p /mnt/hdd/docker/deployment/gitea
cd /mnt/hdd/docker/deployment
touch docker-compose.yml
Next, with reference from here, add the following to docker-compose.yml:
version: "2"

networks:
  gitea:
    external: false

services:
  server:
    image: gitea/gitea:latest
    environment:
      - USER_UID=1000
      - USER_GID=1000
      - DB_TYPE=mysql
      - DB_HOST=mysql:3306
      - DB_NAME=giteadb
      - DB_USER=gitea
      - DB_PASSWD=gitea
    restart: always
    networks:
      - gitea
    volumes:
      - ./gitea:/data
      - /etc/timezone:/etc/timezone:ro
      - /etc/localtime:/etc/localtime:ro
    ports:
      - "3000:3000"
      - "222:22"
You will get Gitea running with this command:
docker-compose up -d
docker-compose ps # to show if Gitea is started
docker-compose logs # to show Gitea logs
docker-compose down # to shutdown Gitea
Next, similar to mysql, you need to inject this into MicroK8s cache:
docker images
docker save gitea/gitea > gitea.tar
microk8s ctr image import gitea.tar
microk8s ctr images ls
Serving Gitea
(5 mins)
Since Gitea for Raspberry Pi is in Mircok8s cluster, I need to expose it to external using NodePort. Insert the following into /mnt/hdd/microk8s/application/gitea/gitea-deployment.yaml deployment file:
apiVersion: v1
kind: Service
metadata:
  name: gitea
spec:
  ports:
  - port: 3000
    targetPort: 3000
	nodePort: 30000
    name: gitea-http
  - port: 2222
    targetPort: 2222
	nodePort: 32222
    name: gitea-ssh
  selector:
    app: gitea
  type: NodePort
---
apiVersion: apps/v1 # for versions before 1.9.0 use apps/v1beta2
kind: Deployment
metadata:
  name: gitea
spec:
  replicas: 1
  selector:
    matchLabels:
      app: gitea
  strategy:
    type: Recreate
  template:
    metadata:
      labels:
        app: gitea
    spec:
      containers:
      - image: gitea/gitea:latest
        name: gitea
        ports:
        - containerPort: 3000
          name: gitea-http
        - containerPort: 22
          name: gitea-ssh
        volumeMounts:
        - name: git-data
          mountPath: /git-data
      volumes:
      - name: git-data
        hostPath:
          path: /mnt/hdd/microk8s/application/gitea/git-data
      nodeSelector:
        git-data-storage: "true"
Apply the above yaml file to create Gitea service and deployment:
kubectl apply -f /mnt/hdd/microk8s/application/gitea/gitea-deployment.yaml
Since Gitea has a nodeSelector which requires git-data-storage flag, the below label (replace with your node name) is needed for the pod to deploy successfully:
kubectl label nodes masterk8s git-data-storage=true
kubectl describe deployment gitea # to check Gitea deployment
kubectl delete deployment,svc gitea # to delete deployment and service, if needed
Get the IP address of mysql server from this command:
kubectl get pods -o wide
That’s it! By following the Git setup page using all of the above settings, you will have Gitea for Raspberry Pi!
Troubleshooting
The database settings are invalid: Error 1130: Host ‘10.1.19.xx’ is not allowed to connect to this MySQL server
You need to create the user and grant the necessary privileges before Gitea can access mysql.
ERROR 1045 (28000): Access denied for user ‘root’@‘10.1.19.xx’ (using password: YES)
You tried to connect to mysql pod using this command but failed:
kubectl run -it --rm --image=mysql/mysql-server:latest --restart=Never mysql-client -- mysql -h 10.1.19.xx -ppassword
You may consider ssh into mysql pod instead.