This application was developed with the assistance of AI pair programming tools, including DeepSeek Chat and Claude Chat. These tools were invaluable in brainstorming solutions, debugging code, and refining the architecture of the application. Their contributions helped streamline the development process and ensured the implementation of best practices.
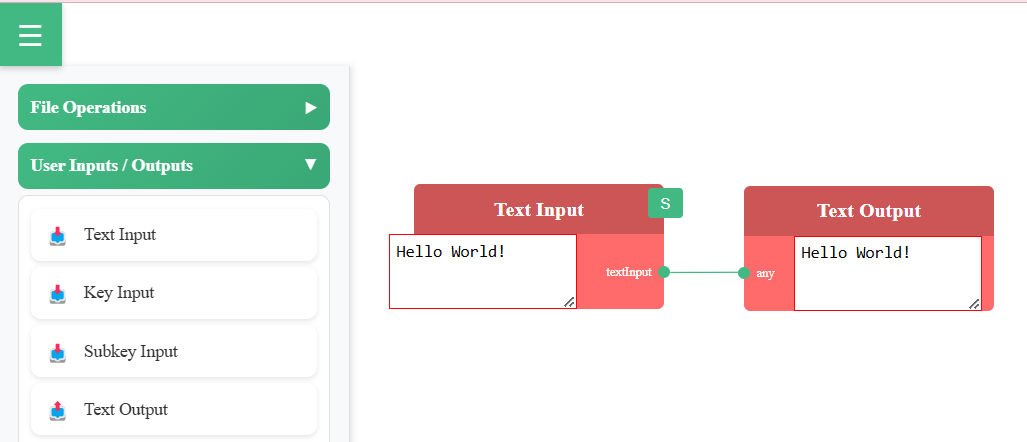
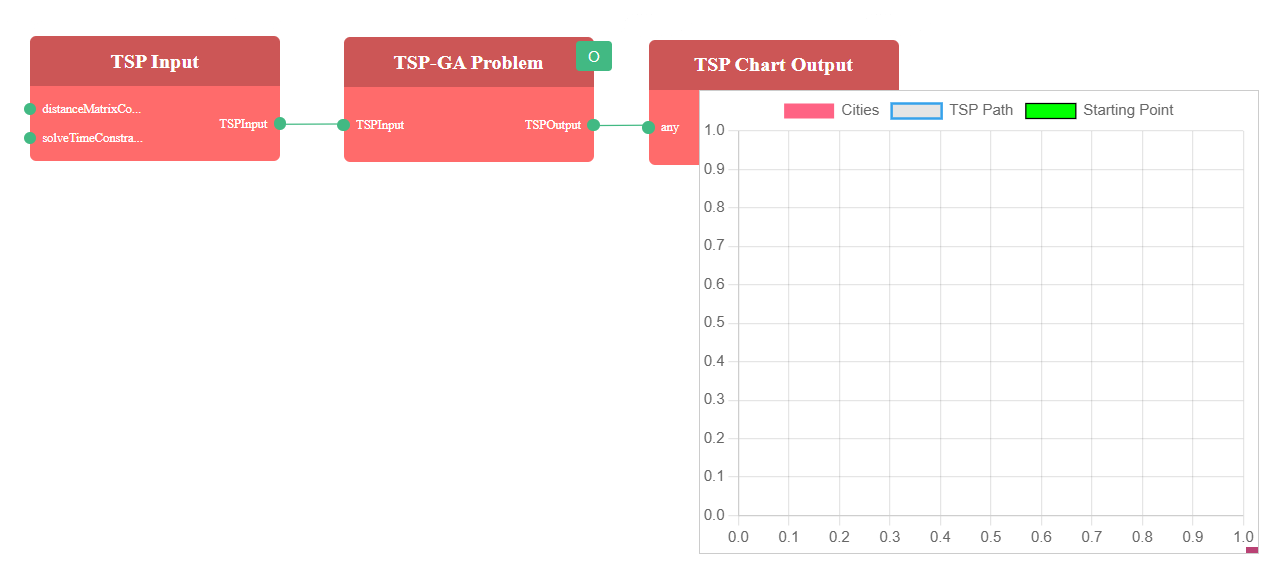
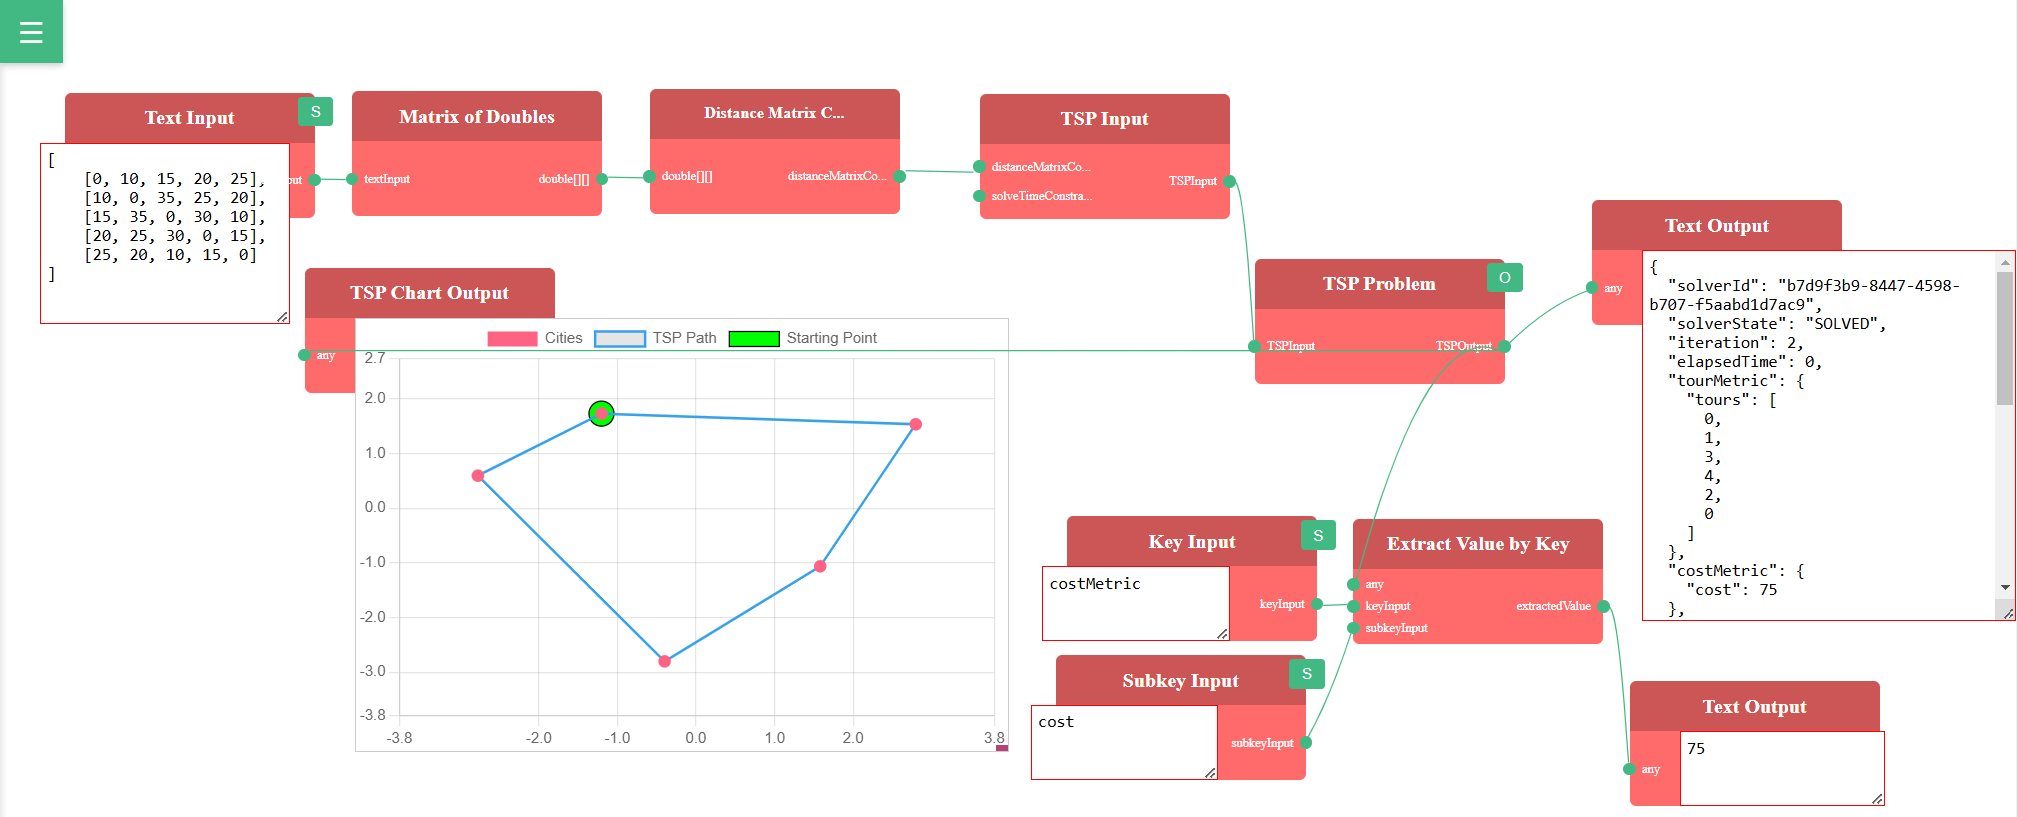
Following my previous post, Building a Flexible Optimizer Framework with Micronaut, I embarked on creating a frontend application with Vue.js. This app serves as a visual interface for designing and managing optimization workflows, seamlessly connecting to the Micronaut backend service. The primary goal was to create an intuitive drag-and-drop UI where users could define optimization problems by connecting inputs, transformations, and outputs. This approach eliminates the need for manual API testing tools and provides a user-friendly way to visualize and compare the efficiency of backend optimization algorithms.
In this blog, I’ll guide you through the setup, project structure, and key features of this Vue.js application.
Setup
To get started, ensure you have Node.js installed. Verify the installation by running:
node --version
# v22.12.0

npm --version
# 10.9.0
Next, install the Vue CLI globally and create the Vue project within the Micronaut-Optimizer repository:
npm install -g @vue/cli

vue create vue-app
Project Structure
The project is organized into a modular structure to ensure scalability and maintainability. Below is an overview of the directory layout:
vue-app/
├── src/
│   ├── assets/
│   ├── components/
│   │   ├── inputs/
│   │   │   ├── KeyInput.vue
│   │   │   ├── SubkeyInput.vue
│   │   │   └── TextInput.vue
│   │   ├── managers/
│   │   │   ├── DragManager.vue
│   │   │   ├── InputManager.vue
│   │   │   ├── LinkManager.vue
│   │   │   ├── NodeManager.vue
│   │   │   └── OutputManager.vue
│   │   ├── outputs/
│   │   │   ├── TextOutput.vue
│   │   │   └── TSPChartOutput.vue
│   │   ├── ConnectionLine.vue
│   │   ├── Inport.vue
│   │   ├── LeftPanel.vue
│   │   ├── LocalPersistent.vue
│   │   ├── MainPanel.vue
│   │   ├── OutPort.vue
│   │   └── WorkflowNode.vue
│   ├── models/
│   │   └── Node.js
│   ├── store/
│   │   └── index.js
│   ├── utils/
│   │   ├── lineConnectionUtils.vue
│   │   ├── nodeUtils.vue
│   │   └── transformUtils.js
│   ├── App.vue
│   └── main.js
├── babel.config.js
├── jsconfig.json
├── package.json
├── README.md
└── vue.config.js
This structure groups components, utilities, and managers logically, ensuring the project remains scalable as it evolves.
Key Concepts and Features
1. Component-Based Architecture
The Vue.js app follows a modular, component-based architecture. Components are grouped into subfolders such as inputs, managers and outputs to promote reusability and maintainability.
Below are the template sections for two essential components, TextInput.vue and TextOutput.vue:
TextInput.vue:
<template>
    <textarea v-model="text" placeholder="Text input..." spellcheck="false" @mousedown.stop @mouseup.stop
        @mousemove.stop @input="onInputChange"
        :style="{ width: initialWidth + 'px', height: initialHeight + 'px' }"></textarea>
</template>
TextOutput.vue:
<template>
    <textarea :value="formattedOutput" placeholder="Output text..." spellcheck="false" @mousedown.stop readonly
        :style="{ width: initialWidth + 'px', height: initialHeight + 'px' }"></textarea>
</template>
These components allow users to drag Workflow Nodes from the Left Panel, link outputs to inputs, and visually design optimization workflows.

2. Drag-and-Drop Functionality
The drag-and-drop feature is managed by DragManager.vue. Below is a snippet illustrating how nodes are handled during the drag process:
<script>
export default {
    methods: {
        onStartDrag(nodeId, event) {
            this.draggingNodeId = nodeId;
            const node = this.nodes.find((n) => n.id === nodeId);

            // Get the container's position
            const container = this.$el.parentElement;
            const containerRect = container.getBoundingClientRect();

            // Calculate offset relative to the container
            this.offset.x = event.clientX - containerRect.left - node.x;
            this.offset.y = event.clientY - containerRect.top - node.y;

            document.addEventListener("mousemove", this.onMouseMove);
            document.addEventListener("mouseup", this.onStopDrag);
        },
        onStopDrag() {
            this.draggingNodeId = null;
            document.removeEventListener("mousemove", this.onMouseMove);
            document.removeEventListener("mouseup", this.onStopDrag);
        },
    },
};
</script>
3. Connection Validation
The LinkManager.vue component handles connection validation between nodes, ensuring that connections adhere to predefined rules. These rules are defined in lineConnectionUtils.js.
Example of Line Linking:
<script>
export default {
  mounted() {
    window.addEventListener("keydown", this.onKeydown);
  },
  beforeUnmount() {
    window.removeEventListener("keydown", this.onKeydown);
  },
  methods: {
    onKeydown(event) {
      if (event.key === "Escape") {
        this.resetLinkingState();
      }
    },

    onStartLink(nodeId, type) {
      if (!this.linking.isDrawing) {
        this.startLink(nodeId, type);
      } else {
        this.endLink(nodeId, type);
      }
    },

    startLink(nodeId, type) {
      // Determine if the port is an input or output port
      const isInputPort = type === "input";

      // For input ports, check if they already have a line
      if (isInputPort && isInputPortConnected(nodeId)) {
        toast.warning(`This ${type} port already has a line.`);
        return;
      }

      // Start the linking process
      this.$emit("update-linking", {
        sourceId: nodeId,
        sourceType: type,
        targetId: null,
        targetType: null,
        isDrawing: true,
      });
    },

    resetLinkingState() {
      this.$emit("update-linking", {
        sourceId: null,
        sourceType: null,
        targetId: null,
        isDrawing: false,
      });
    },
  }
};
</script>
Example of Line Validation:
// src/utils/lineConnectionUtils.js
import store from '@/store';
import { useToast } from "vue-toastification";
import { findNodeById } from "@/utils/nodeUtils";

const toast = useToast();

const nodeTypes = {
    TextInput: {
        inputTypes: [""],
        outputTypes: ["textInput"],
    },
    KeyInput: {
        inputTypes: [""],
        outputTypes: ["keyInput"],
    },
    SubkeyInput: {
        inputTypes: [""],
        outputTypes: ["subkeyInput"],
    },
    TextOutput: {
        inputTypes: ["any"],
        outputTypes: [""],
    },
    DistanceMatrixConstraint: {
        inputTypes: ["double[][]"],
        outputTypes: ["distanceMatrixConstraint"],
    },
    SolveTimeConstraint: {
        inputTypes: ["string"],
        outputTypes: ["solveTimeConstraint"],
    },
    TSPInput: {
        inputTypes: ["distanceMatrixConstraint", "solveTimeConstraint"],
        outputTypes: ["TSPInput"],
    },
    TSPProblem: {
        inputTypes: ["TSPInput"],
        outputTypes: ["TSPOutput"],
    },
};

const typeCompatibility = {
    // Primitive type compatibility rules
    double: ["double", "double[]", "double[][]"],
    "double[]": ["double[]", "double[][]"],
    "double[][]": ["double[][]"],
    int: ["int", "int[]", "int[][]"],
    "int[]": ["int[]", "int[][]"],
    "int[][]": ["int[][]"],
    boolean: ["boolean", "boolean[]", "boolean[][]"],
    "boolean[]": ["boolean[]", "boolean[][]"],
    "boolean[][]": ["boolean[][]"],
    string: ["string", "string[]", "string[][]"],
    "string[]": ["string[]", "string[][]"],
    "string[][]": ["string[][]"],
    any: ["any"],
};
4. Consistent Line Rendering
The ConnectionLine.vue component ensures consistent rendering of lines between nodes. It includes logic to switch between straight lines and curves based on thresholds and adjusts source and target positions for perpendicularity.
<template>
    <path :d="curvePath" :stroke="strokeColor" :stroke-width="strokeWidth" fill="none"
        :stroke-dasharray="isDotted ? '3' : undefined" />
</template>

<script>
export default {
    name: "ConnectionLine",
    props: {
        sourcePointId: { type: String, required: true },
        targetPointId: { type: String, default: null },
        mousePosition: { type: Object, default: null },
        strokeColor: { type: String, default: "#42b983" },
        strokeWidth: { type: Number, default: 1 },
        isDotted: { type: Boolean, default: false },
    },
    computed: {
        sourcePosition() {
            return this.getPosition(this.sourcePointId);
        },
        targetPosition() {
            if (this.mousePosition) {
                return {
                    x: this.mousePosition.x,
                    y: this.mousePosition.y,
                };
            }
            return this.getPosition(this.targetPointId);
        },
        curvePath() {
            let { x: x1, y: y1 } = this.sourcePosition;
            let { x: x2, y: y2 } = this.targetPosition;

            // Calculate the distance between the source and target points
            const dx = x2 - x1;
            const dy = y2 - y1;
            const distance = Math.sqrt(dx * dx + dy * dy);

            // Define thresholds for switching between straight lines and curves
            const distanceThreshold = 50; // Use straight lines if nodes are within 10 pixels
            const alignmentThreshold = 10; // Use straight lines if nodes are aligned within 5 pixels

            // Adjust source and target positions for perpendicularity
            if (Math.abs(dx) < alignmentThreshold) {
                // Nodes are vertically aligned: adjust x positions to be the same
                x1 = x2 = (x1 + x2) / 2;
            } else if (Math.abs(dy) < alignmentThreshold) {
                // Nodes are horizontally aligned: adjust y positions to be the same
                y1 = y2 = (y1 + y2) / 2;
            }

            // Ensure the line stays within the 5-pixel bounding circles
            const radius = 5; // Radius of the bounding circle
            if (distance > 0) {
                const directionX = dx / distance; // Normalized direction vector (x)
                const directionY = dy / distance; // Normalized direction vector (y)

                // Adjust source position to stay within its bounding circle
                x1 = x1 + directionX * radius;
                y1 = y1 + directionY * radius;

                // Adjust target position to stay within its bounding circle
                x2 = x2 - directionX * radius;
                y2 = y2 - directionY * radius;
            }

            // Check if nodes are close or aligned
            if (
                distance < distanceThreshold || // Nodes are close
                Math.abs(dx) < alignmentThreshold || // Nodes are vertically aligned
                Math.abs(dy) < alignmentThreshold // Nodes are horizontally aligned
            ) {
                // Use a straight line
                return `M ${x1} ${y1} L ${x2} ${y2}`;
            } else {
                // Use a quadratic Bézier curve
                const cpX = (x1 + x2) / 2; // Midpoint between x1 and x2
                const cpY = y1 - 30; // Adjust this value to control the curve's height
                return `M ${x1} ${y1} Q ${cpX} ${cpY}, ${x2} ${y2}`;
            }
        },
    },
    mounted() {
        window.addEventListener('resize', this.handleViewportChange);
        window.addEventListener('scroll', this.handleViewportChange);
    },
    beforeUnmount() {
        window.removeEventListener('resize', this.handleViewportChange);
        window.removeEventListener('scroll', this.handleViewportChange);
    },
    methods: {
        handleViewportChange() {
            // Trigger a re-render of the lines
            this.$forceUpdate();
        },

        getPosition(pointId) {
            const element = document.querySelector(`[data-point-id="${pointId}"]`);
            const svgContainer = document.querySelector('.permanent-lines'); // Reference to the SVG container
            const elementRect = element.getBoundingClientRect();
            const svgRect = svgContainer.getBoundingClientRect();

            // Calculate positions relative to the SVG container
            const x = elementRect.left - svgRect.left + elementRect.width / 2;
            const y = elementRect.top - svgRect.top + elementRect.height / 2;

            return { x, y };
        },
    },
};
</script>
5. Dynamic Node Management
The WorkflowNode.vue component represents individual nodes in the workflow. Each node can be dynamically positioned and interacted with, allowing users to create flexible workflows. Below is the implementation:
<template>
  <div class="node" :style="{ left: node.x + 'px', top: node.y + 'px' }" :data-node-id="node.id"
    @mousedown="onStartDrag">
    <!-- Node Content -->
    <div class="node-rectangle">
      <div class="node-name" :style="{ fontSize: fontSize + 'px' }" :title="node.name">
        {{ truncatedName }}
      </div>
      <div class="left-section">
      </div>
      <div class="right-section">
        <button v-if="node.triggerAction !== 'A'" class="trigger-button" :title="actionTitle" @click="onTrigger">
          {{ node.triggerAction }}
        </button>
      </div>
    </div>

    <!-- Input Manager -->
    <InputManager :id="node.id" :hasTextInput="node.hasTextInput" :hasKeyInput="node.hasKeyInput"
      :hasSubkeyInput="node.hasSubkeyInput" :initialData="node.outputData" :initialWidth="node.width"
      :initialHeight="node.height" @input-change="onInputChange" @resize="onResize" />

    <!-- Output Manager -->
    <OutputManager :hasTextOutput="node.hasTextOutput" :hasTSPChart="node.hasChartOutput" :outputData="node.outputData"
      :solverId="solverId" :initialWidth="node.width" :initialHeight="node.height" @resize="onResize" />

    <!-- Input Ports -->
    <InPort v-for="(input, index) in node.inputTypes" :key="'input-' + index"
      :id="generatePortId(node.id, 'input', index)" :nodeWidth="200"
      :offsetY="getPortPosition(index, node.inputTypes.length)" :label="input" :inPortData="portInputData[index]"
      @start-link="onStartLink" />

    <!-- Output Ports -->
    <OutPort v-for="(output, index) in node.outputTypes" :key="'output-' + index"
      :id="generatePortId(node.id, 'output', index)" :nodeWidth="200"
      :offsetY="getPortPosition(index, node.outputTypes.length)" :label="output" :outPortData="portOutputData"
      @start-link="onStartLink" />
  </div>
</template>
There are three types of trigger actions: Submit, Auto, and Optimize. Each input node has a Submit button (S button) in its top-right corner, which propagates data to the next node in the workflow. Nodes with the Auto trigger action automatically transform their inputs into outputs. Optimization problems feature an Optimize button (O button), which invokes an API call to the Micronaut backend and streams data via Server-Sent Events (SSE) whenever a better solution is found.

The TSPChartOutput.vue component provides a resizable chart for visualizing optimization results:
<template>
  <div class="chart-output" :style="{ width: width + 'px', height: height + 'px' }" @mousedown="startDrag">
    <canvas ref="chartCanvas"></canvas>
    <div class="resize-handle" @mousedown="startResize"></div>
  </div>
</template>
6. Data Persistence with IndexedDB
The LocalPersistent.vue component uses IndexedDB to save and load the application state. This ensures that users can save their workflows and resume work later without losing progress, even with large datasets. For simplicity, I’ve implemented a save slot system that currently supports up to five slots. Data is compressed using the pako library before saving to reduce storage size.
<script>
import { useToast } from "vue-toastification";
import pako from 'pako';

const toast = useToast();

// IndexedDB utility functions
const openDB = () => {
    return new Promise((resolve, reject) => {
        const request = indexedDB.open('ProblemSolverDB', 1);

        request.onupgradeneeded = (event) => {
            const db = event.target.result;
            if (!db.objectStoreNames.contains('savedProblems')) {
                db.createObjectStore('savedProblems', { keyPath: 'slot' });
            }
        };

        request.onsuccess = () => resolve(request.result);
        request.onerror = () => reject(request.error);
    });
};

const saveToIndexedDB = async (slot, data) => {
    const db = await openDB();
    const transaction = db.transaction('savedProblems', 'readwrite');
    const store = transaction.objectStore('savedProblems');
    store.put({ slot, data });
};

const loadFromIndexedDB = async (slot) => {
    const db = await openDB();
    const transaction = db.transaction('savedProblems', 'readonly');
    const store = transaction.objectStore('savedProblems');
    const request = store.get(slot);
    return new Promise((resolve, reject) => {
        request.onsuccess = () => resolve(request.result?.data);
        request.onerror = () => reject(request.error);
    });
};
</script>
Running the Application
To run the application, execute the following commands:
# Clone the repo
git clone https://github.com/seehiong/micronaut-optimizer
cd micronaut-optimizer/vue-app

# Installs dependencies
yarn install

# Starts the development server
yarn serve

# Starts the backend Micronaut server
gradlew run
The frontend is configured to run on port 8081 and can be accessed at http://localhost:8081.

Conclusion
This Vue.js application provides an intuitive and powerful frontend for defining, managing, and troubleshooting optimization problems. It bridges the gap between complex backend algorithms and user-friendly workflows, making it easier to analyze and compare different optimization techniques.
Future enhancements include dynamic configuration retrieval from the backend, improved validation, and expanded visualization capabilities. Stay tuned for updates!